
Originally published on 26 Jul 2017
Last updated on 17 Jul 2019

In this blog, which follows on from the Cloud Connectors in Payara Micro, we will explain the Amazon Simple Queue Service (SQS) connector and how to use it in Payara Server / Micro.
A Quick Refresher on Terminology.
- Messaging system → A messaging system is a system that handles platform-agnostic communication between machines. This is generally used for communicating between production systems (for example, health check messages), but can also be used for common use cases like chat applications and system integration.
- Broker → A broker is basically another word for a server in the context of messaging systems. It refers to a machine that stores all of the messages and distributes them to multiple clients.
- Topic → Each message sent to the broker in a publish-subscribe messaging system will be associated with a topic. This is a way of grouping messages which are for certain hosts, or about a certain part of the system (e.g. a logging topic).
What is Amazon SQS?
The official website describes Amazon Simple Queue Service (SQS) as a "reliable, highly scalable hosted queue for storing messages as they travel between applications or micro services". SQS is hosted, meaning that there's no need to setup a broker manually. It's also worth noting that SQS uses queues, rather than topics from publish-subscribe messaging systems. This means that instead of storing all messages and notifying subscribers of any new messages, Amazon SQS will allow one client to remove an item from the queue for processing. There are two types of queues provided by SQS: a standard queue, and a first-in-first-out (FIFO) queue. There are explained simply in the diagram below, which is seen when creating a new queue from the AWS administration console:
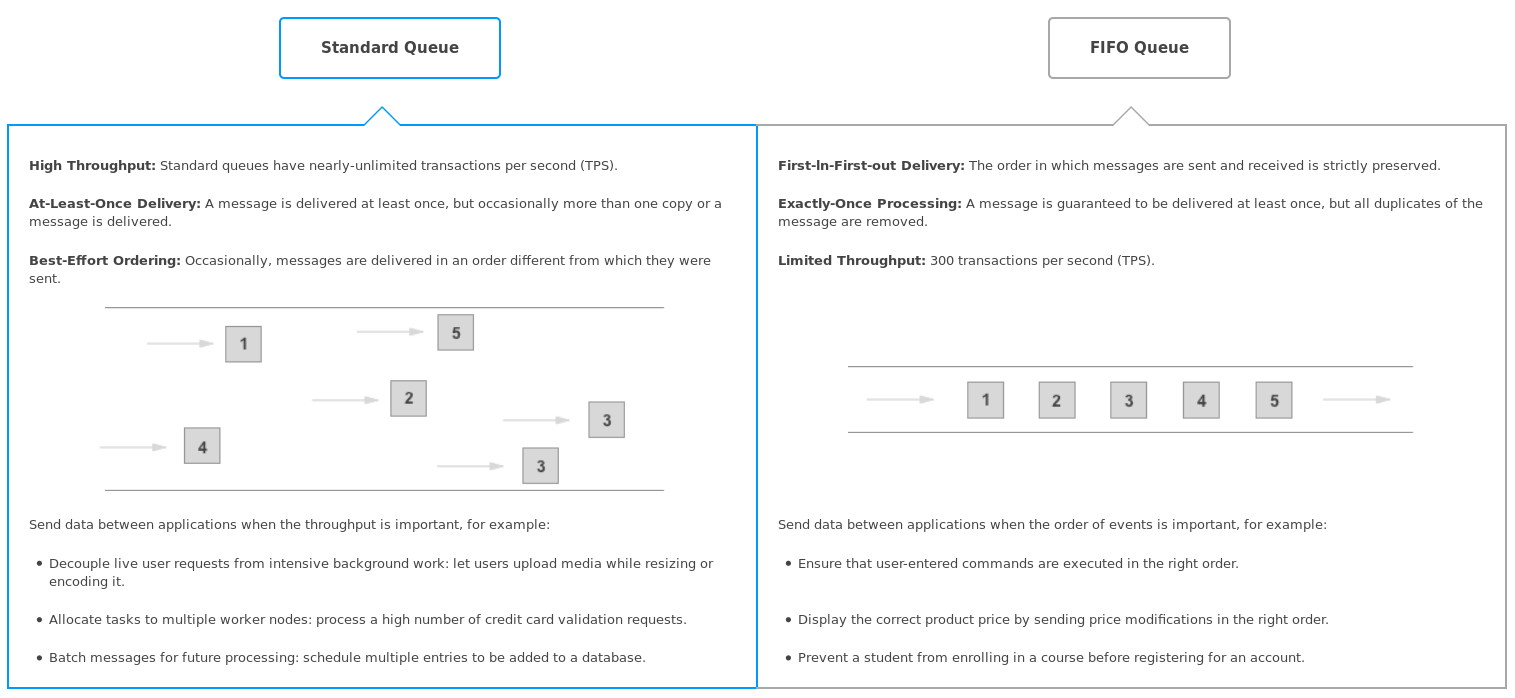
click image to enlarge
Each message is only processed by one client, meaning that SQS has a slightly different use case to the MQTT connector integration.
Why would I use Amazon SQS?
Where MQTT would be used for collecting mass amounts of data from different nodes, SQS would generally be used for decoupling application components. It allows any data that needs processing to be stored in a queue. So for example if you were running a video processing system where clients uploaded video clips for processing, the processing would take a long enough time that the servers might struggle under the load. To prevent this, the data could be uploaded to SQS, and the servers would then process the data from the queue as fast as they could. This allows the servers to operate "at their own convenience". Amazon SQS doesn't provide the speed or order of delivery that other messaging systems do (although a FIFO queue guarantees order delivery as mentioned in the previous image), but it does provide a scalable messaging system that provides an extremely good way of decoupling applications.
How do I use Amazon SQS with Payara Server / Micro?

The new Cloud Connectors Suite contains a simple interface for connecting to Amazon SQS. As SQS is a hosted service you just need to setup the queue from the AWS administration console so it can then be used from Payara Server.
Setting up an Amazon SQS Queue
Firstly, you'll need to have an Amazon AWS account. If you don't have one, create one from the AWS home page: https://aws.amazon.com/. You'll be prompted for payment details, but don't worry as SQS is eligible for the AWS free tier. The free tier gives 1 million free requests every month before you start getting automatically charged $0.00000040 per request. This gives quite a lot of room for testing the service, but know however that this also means that if you were to send 22.83 messages per minute for the month you would exceed the limit. Once you've got an account, go to the management console and navigate to the Simple Queue Service option:

Once here, click on Create New Queue in the top left. From here you'll be given a menu asking for a queue name and type (explained earlier). Once you've decided both of these, you can quickly create the queue. This configures it with the default settings, which are perfect for testing the service. On a production scenario, you might want to tweak these settings according to your environment and business needs.
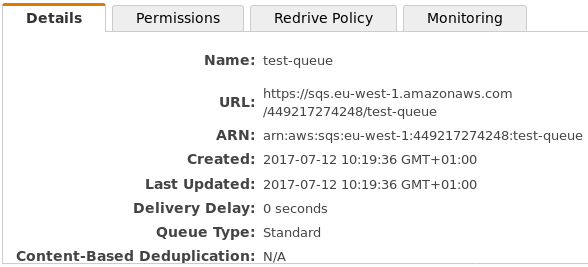
Once you've created the queue, take note of the URL from the details window at the bottom of the administration console, which will be used later when configuring the connector. Also, you need to set up permissions for the newly created queue. You'll see a Permissions tab next to the Details tab. This can let you decide which users can do what to the queue. The default configuration is to allow the queue's creator ALL permissions on the queue, and no permissions to other users.
Finally, you'll need to find your access key and secret to access this queue. These credentials are account specific, and can be managed from the user menu with the My Security Credentials option as shown below:
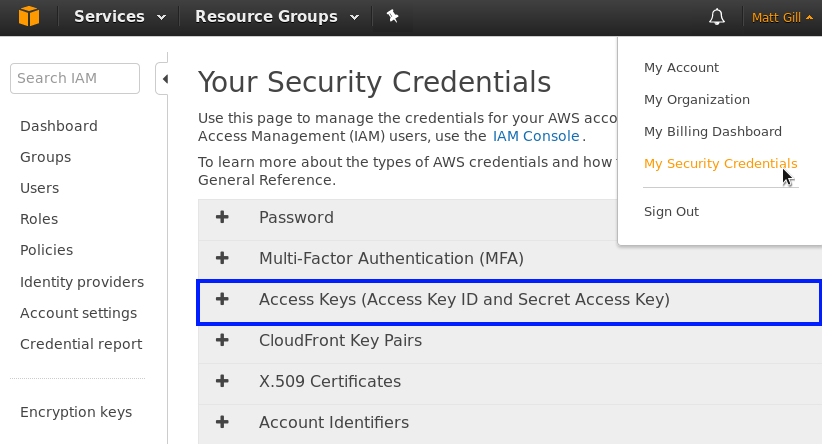
From this page, there will be a drop-down menu for Access Keys (shown in blue above). Here you can create an access key for your account. You will need to download a file when you do, which contains the access ID and secret key. This secret won't be available from anywhere else, so keep a hold on this file.
A Sample Amazon SQS Integration Application
This sample application will use the Cloud Connectors Suite. It will send an incrementing number to the broker every second, and then receive and print out each of these messages with a 1 second delay. This shows how messages can be sent as quickly as necessary to SQS, and they can be processed at any speed. These steps require a basic understanding of Java EE and Maven.
Firstly, create a new maven project. The pom.xml will look like this:
<?xml version="1.0" encoding="UTF-8"?>
<project xmlns="http://maven.apache.org/POM/4.0.0" xmlns:xsi="http://www.w3.org/2001/XMLSchema-instance" xsi:schemaLocation="http://maven.apache.org/POM/4.0.0 http://maven.apache.org/xsd/maven-4.0.0.xsd">
    <modelVersion>4.0.0</modelVersion>

    <groupId>fish.payara.test</groupId>
    <artifactId>sqs-test</artifactId>
    <version>1.0-SNAPSHOT</version>
    <packaging>war</packaging>

    <name>sqs-test</name>

    <properties>
        <project.build.sourceEncoding>UTF-8</project.build.sourceEncoding>
        <maven.compiler.source>1.8</maven.compiler.source>
        <maven.compiler.target>1.8</maven.compiler.target>
    </properties>

    <dependencies>
        <dependency>
            <groupId>javax</groupId>
            <artifactId>javaee-api</artifactId>
            <version>7.0</version>
            <scope>provided</scope>
        </dependency>
        <dependency>
            <groupId>fish.payara.cloud.connectors.amazonsqs</groupId>
            <artifactId>amazon-sqs-jca-api</artifactId>
            <version>0.1.0</version>
            <scope>provided</scope>
        </dependency>
        <dependency>
            <groupId>fish.payara.cloud.connectors.amazonsqs</groupId>
            <artifactId>amazon-sqs-rar</artifactId>
            <version>0.1.0</version>
            <type>rar</type>
            <scope>provided</scope>
        </dependency>
        <dependency>
            <groupId>com.amazonaws</groupId>
            <artifactId>aws-java-sdk-sqs</artifactId>
            <version>1.11.158</version>
            <scope>provided</scope>
        </dependency>
    </dependencies>

    <build>
        <plugins>
            <plugin>
                <groupId>org.apache.maven.plugins</groupId>
                <artifactId>maven-war-plugin</artifactId>
                <version>3.0.0</version>
            </plugin>
            <plugin>
                <groupId>org.apache.maven.plugins</groupId>
                <artifactId>maven-dependency-plugin</artifactId>
                <version>3.0.1</version>
                <executions>
                    <execution>
                        <id>copy-dependencies</id>
                        <phase>package</phase>
                        <goals>
                            <goal>copy-dependencies</goal>
                        </goals>
                        <configuration>
                            <includeTypes>rar</includeTypes>
                            <outputDirectory>target</outputDirectory>
                        </configuration>
                    </execution>
                </executions>
            </plugin>
        </plugins>
    </build>

</project>
The first block contains the project wide Maven properties. Source code version 1.8 is required, as there's some code that isn't supported by Maven's default of Java 1.5.
The second block contains the project dependencies. Since it is a Java EE project, the application uses the Java EE API (version 7). The second dependency is the connector API we will use for accessing the SQS. The third dependency is the Resource Adapter (RAR) for the Amazon SQS part of the cloud connectors suite, which will be deployed to Payara Micro with the WAR at the end. Resource Adapters allow the server access to a resource that is outside of Payara (in this case it's SQS). The final dependency is the Amazon SQS Software Development Kit (SDK) for Java, which we need to send messages directly to the SQS queue.
The third block contains the necessary plugin configurations. The first plugin (maven-war-plugin) stops the no web.xml error which was fixed in Servlet 3.0. The second plugin (maven-dependency-plugin) copies the RAR file next to the output WAR, which will be useful for deploying.
Sending and Receiving Messages From Amazon SQS
We can make two classes, one to send messages to SQS and one to receive them. The first class is shown below:
@MessageDriven(activationConfig = {
    @ActivationConfigProperty(propertyName = "awsAccessKeyId", propertyValue = "AccessKeyID"),
    @ActivationConfigProperty(propertyName = "awsSecretKey", propertyValue = "SecretKey"),
    @ActivationConfigProperty(propertyName = "queueURL", propertyValue = "https://sqs.eu-west-1.amazonaws.com/449217274248/test-queue"),
    @ActivationConfigProperty(propertyName = "pollInterval", propertyValue = "1"),
    @ActivationConfigProperty(propertyName = "region", propertyValue = "eu-west-2")
})
public class ReceiveMessage implements AmazonSQSListener {

    @OnSQSMessage
    public void receiveMessage(Message message) throws InterruptedException {
        try {
            Thread.sleep(1000);
        } catch (InterruptedException ex) {
            Logger.getLogger(ReceiveMessage.class.getName()).log(Level.SEVERE, "Receive process interrupted.", ex);
        }
        System.out.println("Message received: \"" + message.getBody() + "\"");
    }
}
This class is for receiving messages from SQS. The class is declared as a Message Driven Bean (MDB). This is a JCA annotation which means that the class reacts to events from an external source (in this case SQS). Several configuration values are provided using annotations. They are the access id, secret key and URL gathered earlier. The last two configured properties are the poll interval (how long to wait in seconds before asking SQS if it has any messages), and the region of the queue. The region relates to how AWS separates their servers. You setup a queue in a specific region, which is shown in the AWS administration console. The method is annotated with @OnSQSMessage and accepts an instance of the com.amazonaws.services.sqs.model.Message class as a parameter. This means that it will listen asynchronously for messages from the queue, and process them with whatever is in the method. In this case it's emulating a long process by sleeping for a second and then printing it out to the log.
The other class will be used to send messages to the queue
@ConnectionFactoryDefinition(name = "java:comp/env/SQSConnectionFactory",
        description = "SQS Connection Factory",
        interfaceName = "fish.payara.cloud.connectors.amazonsqs.api.AmazonSQSConnectionFactory",
        resourceAdapter = "amazon-sqs-rar-0.1.0",
        minPoolSize = 15,
        maxPoolSize = 30,
        transactionSupport = TransactionSupport.TransactionSupportLevel.NoTransaction,
        properties = {
            "awsAccessKeyId=AccessKeyID",
            "awsSecretKey=SecretKey",
            "region=eu-west-1"
        })
@Stateless
public class SendMessage {

    private int counter = 0;

    @Resource(lookup = "java:comp/env/SQSConnectionFactory")
    private AmazonSQSConnectionFactory factory;

    @Schedule(hour = "*", minute = "*", second = "*", persistent = false)
    public void sendMessage() {
        try (AmazonSQSConnection conn = factory.getConnection()) {
            conn.sendMessage("https://sqs.eu-west-1.amazonaws.com/449217274248/test-queue", ++counter + "");
            System.out.println("Sent: \"" + counter + "\"");
        } catch (ResourceException ex) {
            Logger.getLogger(SendMessage.class.getName()).log(Level.SEVERE, null, ex);
        } catch (Exception ex) {
            Logger.getLogger(SendMessage.class.getName()).log(Level.SEVERE, null, ex);
        }
    }
}
At the top of this class a connection factory is defined. It doesn't matter which class this is in, it will create a connection factory from anywhere. This is an alternative to creating the connection factory using post boot commands, except the connection factory is available solely to the application which defined the annotation. The key connection factory parameters are explained below. For full documentation on using the SQS SDK, go to https://github.com/payara/Cloud-Connectors/tree/master/AmazonSQS.
name→ This is the name of the connection factory. This will be the value used when injecting the factory for use.interfaceName→ This is the interface which is implemented for the factory. We are using the factory interface defined in the Payara Cloud Connector API for Amazon SQS.resourceAdapter→ This is the name of the resource adapter which the connection factory uses. This is the RAR which is being copied into the target folder in the pom.xml.minPoolSize→ This is the minimum size of the connection pool which is created. This many connections will be created at the start, and always maintained.maxPoolSize→ This is the maximum size of the connection pool which is created. No more than this many connections will be created by the factory.properties→ Defines any specific properties for the connections. Here we define the access key and secret noted earlier. The region is also specified, so the connection factory knows which AWS region we are in.
This class is declared as an @Stateless bean, as the message is being sent on an EJB timer, so the method needs to be an EJB to use this functionality. The factory is injected using the name specified above, and then it is used to send the message in the sendMessage() method. This method is automatically called on the time frame specified in the EJB @Schedule annotation, which in this case is every second. The factory is then used to send a message to the queue location specified. We are just incrementing counter and then sending it as the message. This means that an incrementing number will be send to the queue each second.
Now, proceed to build the application with the following command
mvn clean package |
If the project fails to compile, make sure than you've not missed any bits from above and that your maven dependencies are all correct. The two files you'll need now (other than Payara Micro) are the application WAR, which will be in the target folder (so for me it's target/sqs-test-1.0-SNAPSHOT.war), and the resource adapter, which should be found in target/amazon-sqs-rar-0.1.0.rar.
Testing Amazon SQS with Payara Micro
You should now have access to two files:
- The resource adapter (
target/amazon-sqs-rar-0.1.0.rar). - The application WAR for sending and receiving messages (
target/sqs-test-1.0-SNAPSHOT.war).
Also make sure you have the Payara Micro 172 JAR for running the application! All you need to run the application is the following command:
java -jar payara-micro.jar --deploy amazon-sqs-rar-0.1.0.rar --deploy application-name-version.war
Make sure that the deploy files are in the correct order, or the deployment may fail. Once you've run this and Payara Micro has initialised, you should see messages similar to the following :
This means the application is running correctly! You can see from the result above the characteristics described at the start. Amazon SQS doesn't provide immediate delivery, and the standard SQS queue doesn't provide order guarantees. This means that messages can appear in a strange order as shown above. By switching to a FIFO (first in first out) queue we can guarantee message delivery order, but the delivery speed won't be as configurable as other self-hosted messaging systems.
Amazon SQS is a good tool in the AWS ecosystem for decoupling application components, which makes it particularly useful in developing in a micro-services architecture. For more information on using Payara Micro in a micro-services architecture, see here.

Related Posts
The Payara Monthly Catch - August 2025
Published on 02 Sep 2025
by Dominika Tasarz
0 Comments

Welcome aboard the August 2025 issue of The Payara Monthly Catch! With summer in full swing, things may have felt a little more quiet across the Java world - but certainly not less interesting! We hope you managed to get some rest and recharge, ...
How to Build Cost-Effective Cloud Architectures
Published on 19 Aug 2025
by Chiara Civardi
0 Comments

Cloud adoption has transformed how developers build and scale applications, but it also brings new challenges in controlling costs. As cloud bills grow alongside usage, designing cost-efficient cloud architectures becomes essential for ...