
Originally published on 28 Jun 2017
Last updated on 28 Jun 2017

In this blog, which follows on from the introduction to Cloud Connectors in Payara Micro, we will explain MQTT and how to use it in Payara Micro with Mosquitto.
A Quick Refresher on Terminology
- Messaging system → A messaging system is a system that handles language agnostic communication between machines. This is generally used for communicating between production systems (for example, health check messages), but can also be used for things like chat applications.
- Broker → A broker is basically another word for a server in the context of messaging systems. It refers to a machine that stores all of the messages and distributes them to the correct clients.
- Topic → Each message sent to the broker in a publish-subscribe messaging system will be associated with a topic. This is a way of grouping messages which are for certain hosts, or about a certain part of the system (e.g. a logging topic).
- Subscriber → A subscriber in a publish-subscribe messaging system is a client that wants to receive messages from a certain topic.
- Publisher → A publisher is the opposite of a subscriber. It is a client that sends messages to the broker with a given topic.
What is MQTT?
MQ Telemetry Transport (MQTT) is a publish/subscribe messaging system (explained in the introductory blog) designed for devices on a low bandwidth or otherwise unreliable network. It performs so well in these conditions by being simple, and having an extremely low overhead for communication (as little as 2 bytes!). To show this, here's a comparison of an HTTP message against an MQTT message.


I'm using the Firefox network monitor with the WebSockets plugin to view these results. I went to http://test.mosquitto.org/ws.html, which is a WebSocket interface to a publicly available version of the MQTT broker Mosquitto. This means that you can test MQTT from your browser.
On the left you can see the initial HTTP connection to the web page. You can see that for the response, the headers use up 337 bytes. This would be a similar number even for an empty page. In contrast, the image on the right shows a series of MQTT communications for me connecting to the broker, subscribing to the "1" topic, and then publishing a null value to that topic. The highest response size I got was 5 bytes, which includes 1 byte for the topic name "1". This means that the highest overhead I got for MQTT responses was 4 bytes. This shows just how good MQTT is as a lightweight communication method, and why it's used so prevalently in the internet of things (IoT).
An interesting unique feature of MQTT is its 3 Quality of Services (QoS). The QoS defines how each MQTT message is delivered. You can specify this value for the device that is sending the messages. They mean the following:
- QoS 0 → At most once. This means that if a packet is lost, it will not be received by the client at all. This QoS has the best performance.
- QoS 1 → At least once. This means that there is a chance of the client receiving the message twice.
- QoS 2 → Exactly once. This means that the client will always receive every packet exactly once. This QoS also has the worst performance.
How Can I Use MQTT?
The new Cloud Connectors Suite contains a simple interface for connecting to MQTT brokers. You can install an MQTT broker such as RabbitMQ or ActiveMQ on a machine manually, but for testing MQTT there are already several publicly hosted brokers available for use. One such broker is Mosquitto, which can be found here: https://test.mosquitto.org/. You can also host your own instance of Mosquitto as it's a full MQTT broker, but as there are no security or uptime risks of a quick test, the online test server is ideal.
A Sample MQTT Project
This sample project will use the Cloud Connectors Suite. It will send an incrementing number to the broker every 5 seconds, and then receive and print out each of these messages again. These steps require a basic understanding of Java EE and Maven.
Firstly, make a new project in the IDE of your choice. If you're not using an IDE, then you can always just edit the pom.xml as you see fit and build a directory structure around that. The pom.xml will look like this:
<?xml version="1.0" encoding="UTF-8"?>

<project xmlns="http://maven.apache.org/POM/4.0.0" xmlns:xsi="http://www.w3.org/2001/XMLSchema-instance" xsi:schemaLocation="http://maven.apache.org/POM/4.0.0 http://maven.apache.org/xsd/maven-4.0.0.xsd">
    <modelVersion>4.0.0</modelVersion>

    <groupId>fish.payara.examples.cloud.mqtt</groupId>
    <artifactId>mqtt-tutorial-example</artifactId>
    <version>1.0-SNAPSHOT</version>
    <packaging>war</packaging>
    <name>mqtt-tutorial-example</name>
    <properties>
        <project.build.sourceEncoding>UTF-8</project.build.sourceEncoding>
        <maven.compiler.source>1.8</maven.compiler.source>
        <maven.compiler.target>1.8</maven.compiler.target>
    </properties>

    <dependencies>
        <dependency>
            <groupId>javax</groupId>
            <artifactId>javaee-api</artifactId>
            <version>7.0</version>
            <scope>provided</scope>
        </dependency>
        <dependency>
            <groupId>fish.payara.cloud.connectors.mqtt</groupId>
            <artifactId>mqtt-rar</artifactId>
            <version>0.1.0</version>
            <type>rar</type>
            <scope>provided</scope>
        </dependency>
        <dependency>
            <groupId>fish.payara.cloud.connectors.mqtt</groupId>
            <artifactId>mqtt-jca-api</artifactId>
            <version>0.1.0</version>
        </dependency>
    </dependencies>

    <build>
        <plugins>
            <plugin>
                <groupId>org.apache.maven.plugins</groupId>
                <artifactId>maven-war-plugin</artifactId>
                <version>3.0.0</version>
            </plugin>
            <plugin>
                <groupId>org.apache.maven.plugins</groupId>
                <artifactId>maven-dependency-plugin</artifactId>
                <version>3.0.1</version>
                <executions>
                    <execution>
                        <id>copy-dependencies</id>
                        <phase>package</phase>
                        <goals>
                            <goal>copy-dependencies</goal>
                        </goals>
                        <configuration>
                            <includeTypes>rar</includeTypes>
                            <outputDirectory>target</outputDirectory>
                        </configuration>
                    </execution>
                </executions>
            </plugin>
        </plugins>
    </build>
</project>
I'll explain this in the 3 logical blocks.
The first block contains the project wide maven properties. Source version 1.8 is required, as there's some code that isn't supported by Maven's default of Java 1.5.
The second block contains the project dependencies. Since it is a Java EE project, the pom.xml uses the javaee-api (version 7). The second dependency is the Resource Adapter (RAR) for the MQTT part of the cloud connectors suite. This will be deployed to Payara Micro with the WAR at the end. This allows the server access to a resource that is outside of Payara (in this case it's Mosquitto). The final dependency is the connector API we will use for accessing the broker.
The third block contains the final necessary plugins. The first plugin (maven-war-plugin) stops the 'no web.xml' error which was fixed in Servlet 3.0. The second plugin copies the RAR file next to the output WAR, which will be useful for deploying.
Listening Over MQTT
From here you're most of the way there. Create a package with the name of your choice. This should follow Maven conventions, meaning a folder structure of src/main/java/your/package/name/here. In here you can make a class for listening to Mosquitto. I've named my class MqttMDB, as it's a Message Driven Bean (MDB) for communicating over MQTT. Make sure you don't put the class in the default package, as this may cause some strange behaviour when running. The code for this class is shown below.
@MessageDriven(activationConfig = {
    @ActivationConfigProperty(propertyName = "serverURIs", propertyValue = "tcp://test.mosquitto.org:1883"),
    @ActivationConfigProperty(propertyName = "cleanSession", propertyValue = "false"),
    @ActivationConfigProperty(propertyName = "automaticReconnect", propertyValue = "true"),
    @ActivationConfigProperty(propertyName = "filePersistence", propertyValue = "false"),
    @ActivationConfigProperty(propertyName = "connectionTimeout", propertyValue = "30"),
    @ActivationConfigProperty(propertyName = "maxInflight", propertyValue = "3"),
    @ActivationConfigProperty(propertyName = "keepAliveInterval", propertyValue = "5"),
    @ActivationConfigProperty(propertyName = "topicFilter", propertyValue = "fish/payara/cloud/test/mosquitto"),
    @ActivationConfigProperty(propertyName = "qos", propertyValue = "1")
})
public class MqttMDB implements MQTTListener {

    @OnMQTTMessage
    public void getMessageTest(String topic, MqttMessage message) {
        System.out.println("Topic: " + topic);
        System.out.println("Message: " + new String(message.getPayload()));
        System.out.println();
    }
}
Full documentation for the connector suite is available here: https://github.com/payara/Cloud-Connectors/tree/master/MQTT.
The key parts of this class are in the annotations at the top. A few key ones are explained below.
serverURIs→ Specifies the URIs of the server to listen to. Accepts a comma separated list of URIs. For insecure connections you specifytcp://at the start, but for secure connections you would specifyssl://.topicFilter→ Accepts a comma separated list of topics to subscribe to.qos→ Accepts the quality of service defined earlier (i.e. 0, 1 or 2).
The method will be called when the topic is published to. Since there is a QoS of 1 specified, messages may be received more than once.
Sending Over MQTT
Another class can be made to send data to MQTT. I've named the class MqttMessenger. As with the first class, this should be in a sub folder under src/main/java, to follow Maven conventions. This class should also not be in the default package, as that may cause some strange behaviour when running. The code is shown below.
@ConnectionFactoryDefinition(name = "java:comp/env/MQTTConnectionFactory",
        description = "MQTT Connection Factory",
        interfaceName = "fish.payara.cloud.connectors.mqtt.api.MQTTConnectionFactory",
        resourceAdapter = "mqtt-rar-0.1.0",
        minPoolSize = 2,
        maxPoolSize = 2,
        transactionSupport = TransactionSupport.TransactionSupportLevel.NoTransaction,
        properties = {
            "serverURIs=tcp://test.mosquitto.org:1883",
            "cleanSession=true"
        })
@Stateless
public class MqttMessenger {

    @Resource(lookup = "java:comp/env/MQTTConnectionFactory")
    MQTTConnectionFactory factory;

    private int counter;

    @PostConstruct
    public void initialise() {
        counter = 0;
    }

    @Schedule(hour = "*", minute = "*", second = "*/5", persistent = false)
    public void fireEvent() {
        try (MQTTConnection conn = factory.getConnection()) {
            conn.publish("fish/payara/cloud/test/mosquitto", ("" + (counter++)).getBytes(), 1, false);
        } catch (Exception ex) {
            Logger.getLogger(getClass().getName()).log(Level.SEVERE, null, ex);
        }
    }

}
This code is a little more involved. There are also a few annotations that need explaining. Again, for full documentation see: https://github.com/payara/Cloud-Connectors/tree/master/MQTT.
name→ This describes the JNDI name for the connection factory being defined. As this connection factory is being defined at an application level, it is only available to the same application, rather than the server wide connection factories defined in Payara Server.interfaceName→ Defines the interface that the connection factory uses, which is included in the cloud connectors API from the pom.xml.resourceAdapter→ The name of the resource adapter which is to be used.minPoolSize→ The number of connections the factory will create on initialisation.maxPoolSize→ The maximum number of connections the factory will keep for allocation.properties→ This is where to specify extra properties listed in the documentation. I've declared the server URIs here. Again you can add more by comma separating them. A secure connection would be specified by usingssl://instead oftcp://.
The resource declared above is then injected by using @Resource and providing the JNDI name specified above. On initialisation a counter is set to 0, so it can be passed to messages. This class is declared as a @Stateless EJB, so it can use the EJB timer annotation @Schedule to call a method on an interval. This method is called every 5 seconds, where it uses the connection factory to publish a message over MQTT.
The conn.publish method takes 4 variables:
- The topic name as a string.
- The message as an array of bytes (since that is how messages are stored by most MQTT brokers).
- The QoS (explained earlier).
- Whether the message should be retained by the server. False means that the server will send the message immediately to all subscribers, but discard the message at the end.
Now you've got the classes both ready, compile the code and you're ready to run the application! If the application failed to compile, check that the files are in the correct location, and you've not missed any bits from above. The two files you'll want to find are the application WAR, which will be in the target folder (so for me it's target/mqtt-tutorial-example-1.0-SNAPSHOT.war), and the resource adapter, which should be found in target/mqtt-rar-0.1.0.rar.
Testing MQTT on Payara Micro with Mosquitto
You should now have access to two files:
- The resource adapter (target/mqtt-rar-0.1.0.rar).
- The application WAR for sending and receiving messages (target/application-name-version.war).

Also make sure you have the Payara Micro 172 JAR for running the application! Now all you need to do to run the code on Payara Micro is run the following command:
java -jar payara-micro.jar --deploy mqtt-rar-0.1.0.rar --deploy application-name-version.war
Make sure that the deploy files are in the correct order, or the deployment may fail. Once you've run this and Payara Micro has initialised, you should see messages similar to the following (although slower):
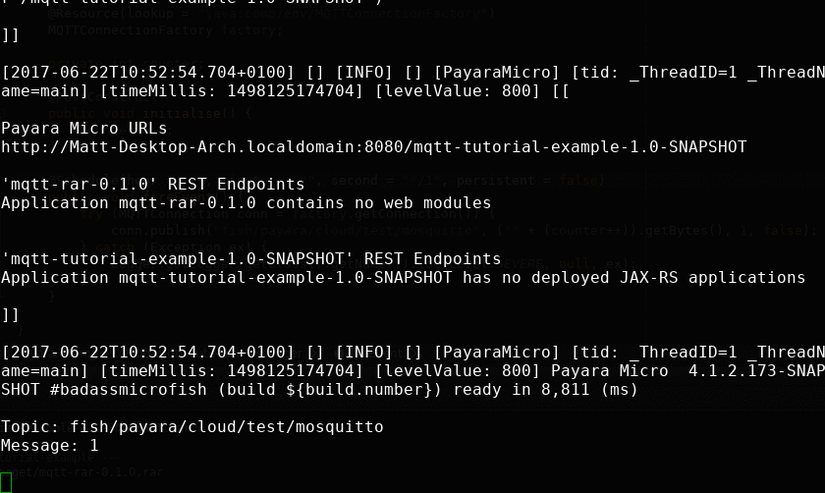
To sum up
This means the application is running correctly! The MDB is firing an incrementing number as a message to the server every 5 seconds, and the receiver is receiving every message to print out to the log. This shows how you could quickly set up Payara Micro as a messaging client to send and respond to messages to and from a broker. MQTT is a very useful tool in collecting data from many low power devices or devices with an unstable connection. This makes it particularly useful in IoT systems, such as collecting and processing data from lots of low power devices and sensors.

Related Posts
The Payara Monthly Catch - August 2025
Published on 02 Sep 2025
by Dominika Tasarz
0 Comments

Welcome aboard the August 2025 issue of The Payara Monthly Catch! With summer in full swing, things may have felt a little more quiet across the Java world - but certainly not less interesting! We hope you managed to get some rest and recharge, ...
How to Build Cost-Effective Cloud Architectures
Published on 19 Aug 2025
by Chiara Civardi
0 Comments

Cloud adoption has transformed how developers build and scale applications, but it also brings new challenges in controlling costs. As cloud bills grow alongside usage, designing cost-efficient cloud architectures becomes essential for ...