Introduction to Payara Scales - Using Payara Scales with Amazon CloudFormation
Originally published on 05 May 2016
Last updated on 28 Jul 2021
 by Mert Caliskan
In the first part of this 'Introduction to Payara Scales' blog, I will give you an overview of the architecture for a Payara Scales cluster and a load balancer upfront, using Amazon CloudFormation and Amazon EC2.
Payara Scales - a Highly Scalable Open Source Java EE Application Platform
Payara Server is a drop in replacement for GlassFish Server Open Source Edition, with quarterly releases containing enhancements, bug fixes and patches. Payara Scales is a version of the Payara Server that integrates with Hazelcast Enterprise's High-Density Memory Store, which enables web session replication across data centers with the help of the off-heap memory management feature of Hazelcast.
Hazelcast is an open-source in-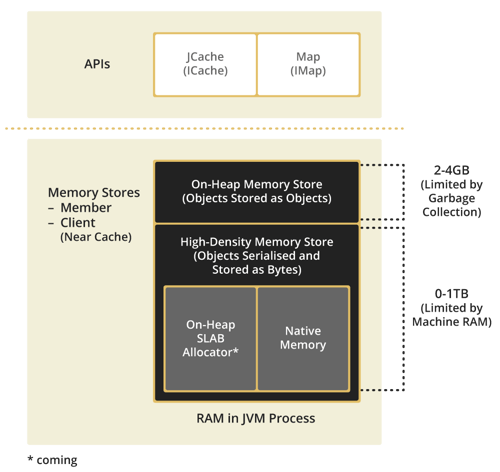 memory data grid framework, which is used as distributed in-memory storage and computing. It stores the data as partitioned across a cluster. This architecture allows Hazelcast to be used for replicating session data by sending web session data to other members of the cluster each time there is a change in the session data. So if an application server goes offline, the load balancer simply sends incoming requests to another server. The user can be directed to any other server in the array, since all servers have a copy of the user’s session.
In addition to its open-source features, Hazelcast has some advanced features in its enterprise (commercial) product. From the data storage perspective, Hazelcast Enterprise has a "High-Density Memory" feature, which is an efficient in-memory storage service for storing hundreds of GBs of data in the main memory without struggling with long and unpredictable garbage collection pauses. This service is a very efficient way to store hundreds of GBs worth of session data without any GC pressure.
Architectural Overview
Payara Scales combines Payara Server with Hazelcast’s aforementioned High Density Memory Storage to provide resilient architecture, and with this article we’d like to show you how to configure an array of servers with a load balancer placed upfront. The architectural overview is as follows:
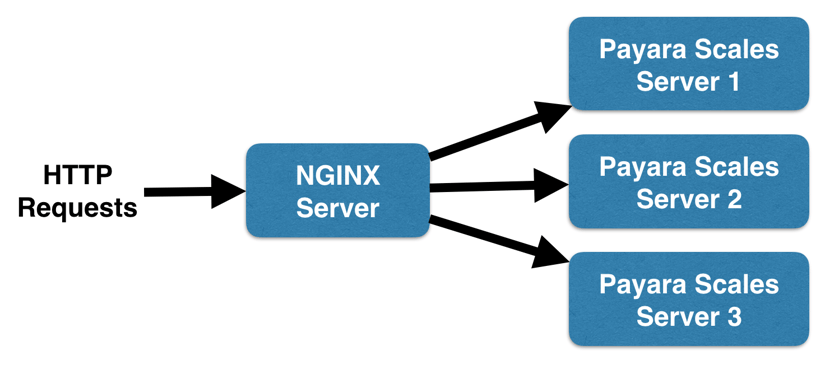
Payara Scales Servers and NGINX Server will be spawned on Amazon EC2 with the help of Amazon CloudFormation scripts. Amazon Elastic Compute Cloud (Amazon EC2) is a web service that provides resizable compute capacity in the cloud. Amazon CloudFormation provides an easy way to create and manage a collection of related AWS resources, and in our scenario we will define each server configuration in JSON format with it.
For each server instance we’ll be using the EC2 image named Amazon Linux AMI 2016.03.0 (HVM) and the instance type t2.micro that provides 1 vCPU and 1 GB of memory.
Configuring Up the Server Stack
CloudFormation configuration of one of the Payara Scales servers is given as follows. The whole CloudFormation configuration can be accessed in the Deployment of Server Stack onto Amazon EC2 section along with the detailed initialization steps.
As seen in the excerpt, after getting the instance up and running, we are executing bash commands to:
- Create a /payara folder
- Download Payara Server 4.1.1.161.1
- Unzip Payara Server to /payara/payara41
- Enable Hazelcast configuration via asadmin
- Stop the server in order to replace the hazelcast.jar with the Hazelcast enterprise version.
- Deploy the ClusterJSP application with the given context root
"PayaraScalesEC2Instance1" : {
    "Type" : "AWS::EC2::Instance",
		"Properties" : {
			"ImageId" : "ami-e2df388d",
			"InstanceType" : "t2.micro",
			"KeyName" : "PayaraScales",
			"SecurityGroupIds" : [ "%SECURITY_GROUP_ID%" ],
			"Tags": [ {
				"Key": "Name",
				"Value": "payara-scales 1"
			}],
			"UserData": { "Fn::Base64" : { "Fn::Join" : ["", [
			  "#!/bin/bash", "\n",
			  "mkdir /payara","\n",
			  "wget -P /payara https://s3-eu-west-1.amazonaws.com/payara.co/Payara+Downloads/Payara+4.1.1.161.1/payara-4.1.1.161.1.zip","\n",
			  "unzip -q /payara/payara-4.1.1.161.1.zip -d /payara","\n",
			  "sudo chown -R ec2-user /payara","\n",
			  "/payara/payara41/bin/asadmin start-domain payaradomain","\n",
			  "/payara/payara41/bin/asadmin set-hazelcast-configuration --enabled=true","\n",
			  "/payara/payara41/bin/asadmin stop-domain payaradomain","\n",
			  "rm /payara/payara41/glassfish/modules/hazelcast.jar","\n",
			  "wget -P /payara/payara41/glassfish/modules https://s3.eu-central-1.amazonaws.com/payarascales/hazelcast-enterprise-all.jar","\n",
			  "wget -P /payara https://s3.eu-central-1.amazonaws.com/payarascales/clusterjsp.war","\n",
			  "wget -P /payara/payara41/glassfish/domains/payaradomain/config/ https://s3.eu-central-1.amazonaws.com/payarascales/hazelcast-config.xml","\n"
			 ] ] } }
		}
	}
There are manual steps that need to be processed after getting the servers up and running. This is because CloudFormation does not support managing cyclic dependencies and we have Hazelcast servers depending on each other IP-wise. For each server, the hazelcast-config.xml file that resides under the payara/glassfish/domains/payaradomain/config folder should be edited and private IP values for each server should be put into the Hazelcast# placeholders in the snippet given below:
<wan-replication name ="payara-scales-wan-cluster">
    	<target-cluster group-name="c1" group-password="c1-pass">
			<replication-impl>com.hazelcast.enterprise.wan.replication.WanNoDelayReplication</replication-impl>
			<end-points>
				<address>Hazelcast1:5701</address>
				<address>Hazelcast2:5701</address>
				<address>Hazelcast3:5701</address>
			</end-points>
		</target-cluster>
	</wan-replication>
After editing, each server needs to be started via asadmin, and clusterjsp.war should be deployed with asadmin as:
/payara/payara41/bin/asadmin deploy --contextroot “/” /payara/clusterjsp.war
The ClusterJSP application contains a <distributable/> tag definition in its web.xml as follows:
<?xml version="1.0" encoding="UTF-8"?>
<web-app version="3.1"
         xmlns="http://xmlns.jcp.org/xml/ns/javaee"
         xmlns:xsi="http://www.w3.org/2001/XMLSchema-instance"
         xsi:schemaLocation="http://xmlns.jcp.org/xml/ns/javaee http://xmlns.jcp.org/xml/ns/javaee/web-app_3_1.xsd">
    <distributable/>
    …
</web-app>
For load balancing, we are using NGINX, which is an HTTP and reverse proxy server that is widely adopted by web sites that handles the heavy load. The CloudFormation excerpt for NGINX server configuration is as follows. The whole CloudFormation configuration can be accessed in the Deployment of Server Stack onto Amazon EC2 section along with the detailed initialization steps.
"NginxEC2Instance" : {
    	"Type" : "AWS::EC2::Instance",
		"Properties" : {
			"ImageId" : "ami-e2df388d",
			"InstanceType" : "t2.micro",
			"KeyName" : "PayaraScales",
			"SecurityGroupIds" : [ "%SECURITY_GROUP_ID%"" ],
			"Tags": [ {
			  "Key": "Name",
			  "Value": "nginx"
			}],

			"UserData": { "Fn::Base64" : { "Fn::Join" : ["", [
			  "#!/bin/bash", "\n",
			  "sudo yum -y install nginx", "\n",
			  "wget https://s3.eu-central-1.amazonaws.com/payarascales/nginx.conf", "\n",
			  "sed -i -e 's/payaraserver1/server ", { "Fn::GetAtt": [ "PayaraScalesEC2Instance1", "PrivateIp" ] }, ":8080/' nginx.conf" ,"\n",
			  "sed -i -e 's/payaraserver2/server ", { "Fn::GetAtt": [ "PayaraScalesEC2Instance2", "PrivateIp" ] }, ":8080/' nginx.conf" ,"\n",
			  "sed -i -e 's/payaraserver3/server ", { "Fn::GetAtt": [ "PayaraScalesEC2Instance3", "PrivateIp" ] }, ":8080/' nginx.conf" ,"\n",
			  "sudo mv -f nginx.conf /etc/nginx/nginx.conf","\n",
			  "sudo /etc/init.d/nginx start","\n"
			] ] } }
	  }
	}
As seen on excerpt, after getting the instance up and running, we are executing bash commands to:
- Install nginx via yum
- Download a customized nginx.conf file from our S3 bucket
- Replace placeholders in nginx.conf with private IPs of all 3 Payara Scales servers
- Update NGINX configuration with our customized version
- Start NGINX
The private IP’s of all 3 Payara Scales servers are registered to the nginx.conf file in order to proxy the requests to these backend servers. The connections between NGINX and backend servers need to be tuned with the Keep-alive status. Keep-alive is a configuration that was introduced with HTTP/1.1 that allows the use of the same TCP connection for HTTP requests. It’s also known as persistent connection. Enabling it will make the NGINX perform better since there won’t be any utilization for establishing TCP connections for every request.
Deployment of Server Stack onto Amazon EC2
In order to operate with Amazon EC2 and CloudFormation, you need to create a key pair by following the menu EC2 > Network & Security > Key Pairs. Name your key pair as PayaraScales since this name is being used in CloudFormation JSON configuration as "KeyName" : "PayaraScales".
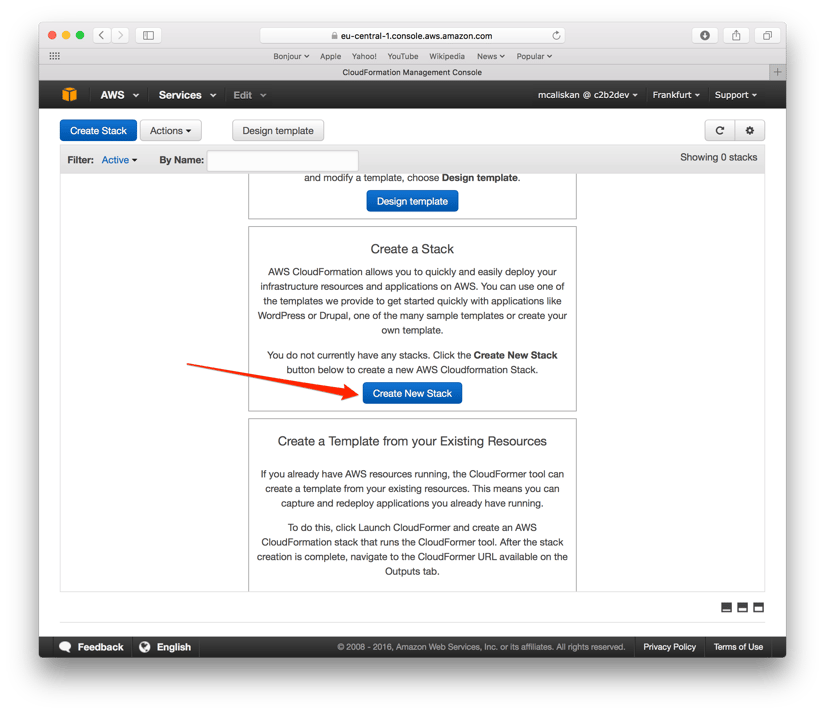
The hosted payarascales.json file should be uploaded via CloudFormation user interface. First you need to select “Create New Stack”.
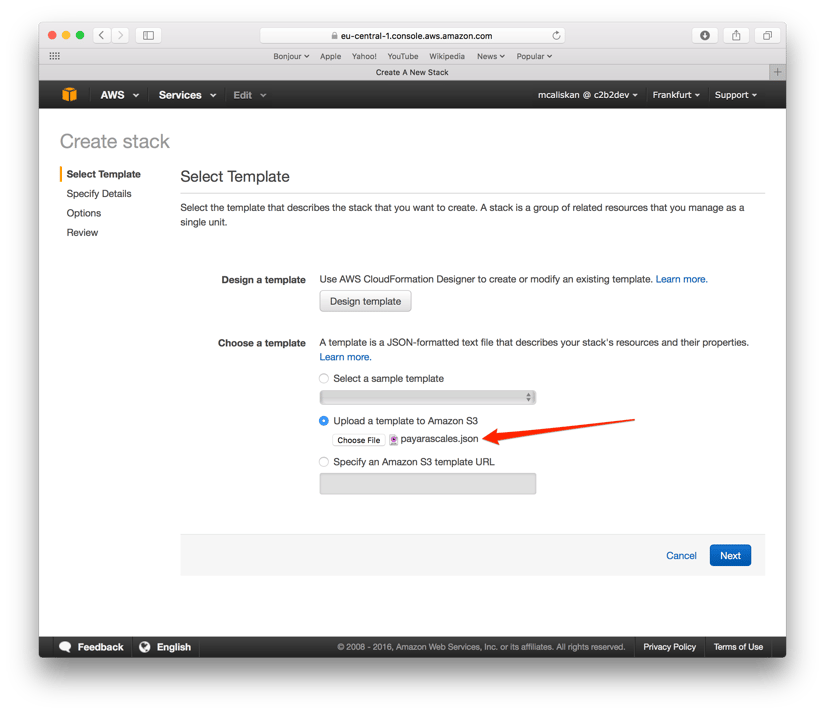
Then you can upload the JSON configuration file by choosing. Keep in mind Enterprise Hazelcast license and security group id information are omitted from the hosted file and need to be provided according to your configuration.
After uploading your file, give your stack a name without using spaces.
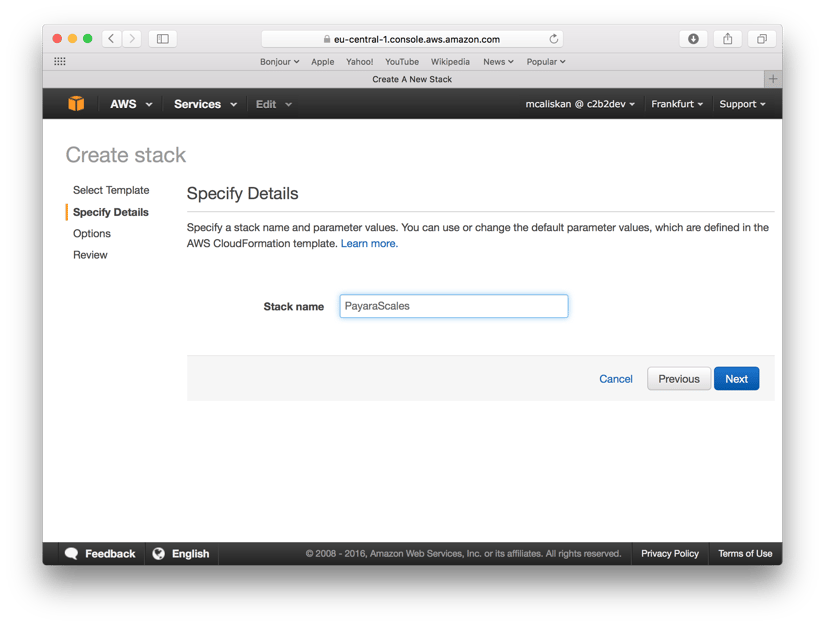
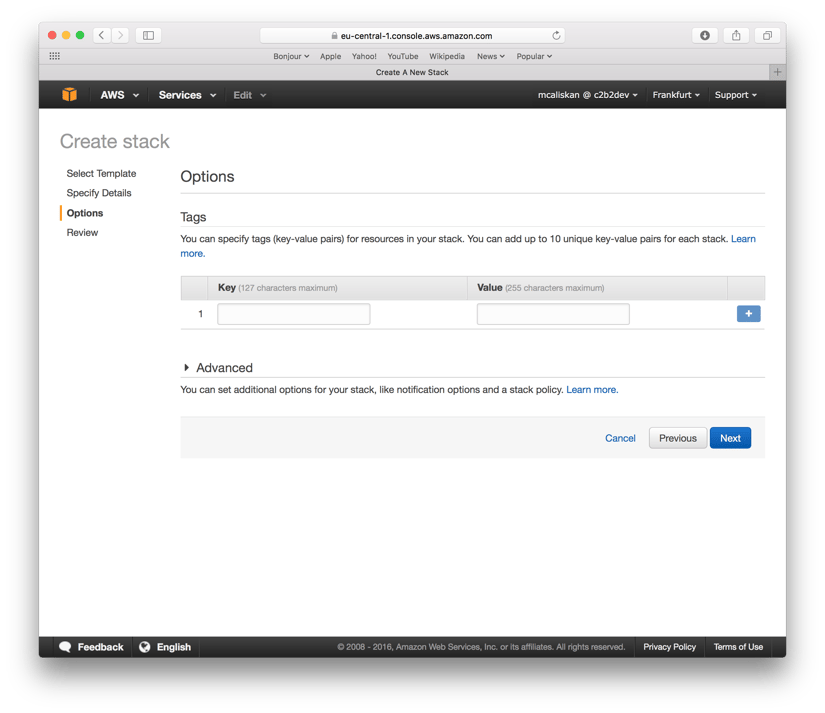
You can specify any Tag key-value pair if you like, we just ignored them & moved on.
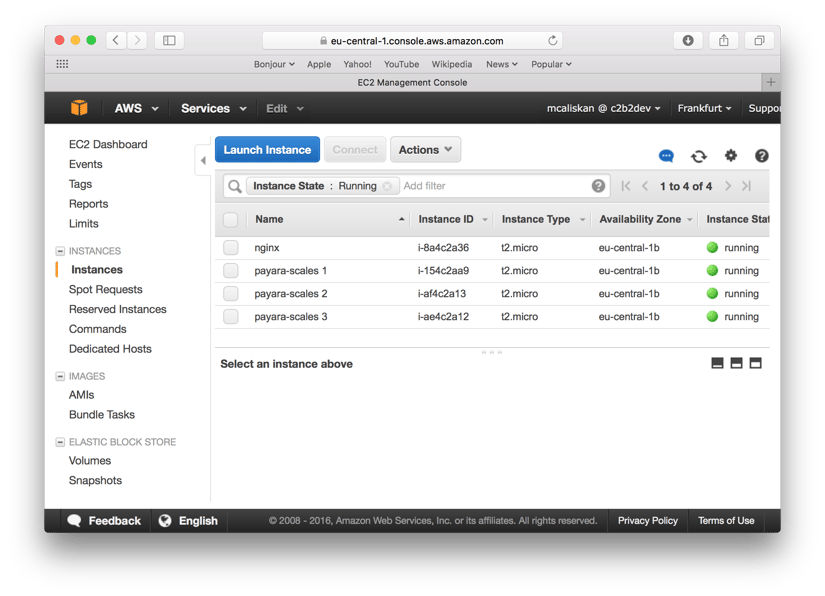
After reviewing your setup and finishing the wizard by clicking the Create button, you will see the stack go through the “CREATE_IN_PROGRESS” and “CREATE_COMPLETE” statuses. When you navigate to the EC2 Console, you will see 4 instances up and running as shown in the image below:
When you request the public IP address of the NGINX instance like http://52.58.25.27, you will get the main page of the ClusterJSP application served from a PayaraScales server.
Related Posts
Join Payara at JavaLand 2025 for Java Ecosystem Insights
Published on 03 Mar 2025
by Nastasija Trajanova
0 Comments
A More Flexible Way to Deploy Jakarta EE Apps: Introducing Pay As You Go Pricing for Payara Cloud
Published on 05 Dec 2024
by Luqman Saeed
0 Comments

