
Originally published on 02 Feb 2017
Last updated on 16 Jun 2017

In this blog series, we will aim to give an overview of the basics of using Payara Server in a production scenario using Apache Web Server (sometimes called httpd) and Ubuntu 16.04. Many of the concepts described in these blogs do not rely on the tools we are using here and can be applied to other scenarios.
Our aim is to configure the following:
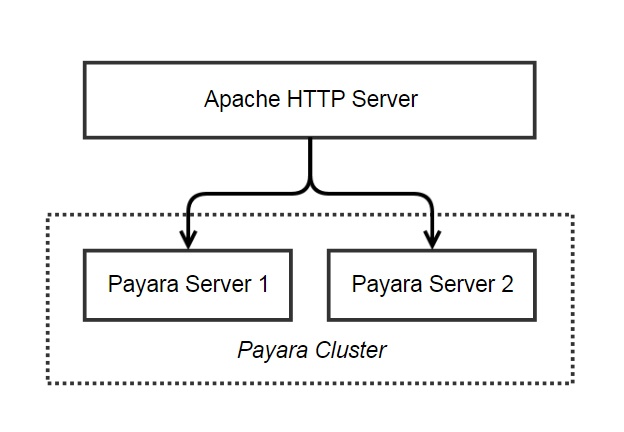
Here we have an Apache web server which will be exposed to our users. Their requests will be forwarded to one of two Payara Server instances and we will use sticky sessions based on the JSESSIONID cookie to make sure each user interacts with the same Payara Server. We will also investigate session replication and prove that, if one Payara Server goes down, the other will be able to handle the existing sessions seamlessly.
The first step in our scenario will be to install Apache web server on Ubuntu 16.04.
What is Apache Web Server?
 Apache Web Server, also known as just "Apache", is simply a server which can handle web traffic and can be extended through the use of modules. Calling the web server Apache may seem a little confusing at first, but generally when talking about a software product it refers to the Apache HTTP Server which is developed and maintained by the Apache Software Foundation (ASF). As an open-source community, the ASF maintains a very large range of software, but the web server was the first and it was the web server that lent its name to the foundation.
How can I install Apache Web Server?
At this point it is worth noting that the installation of Apache HTTP Server may differ by distribution. The package in Ubuntu's repository has a set of helper tools - commands which make it easier to manage configuration files - and a different folder structure, aimed at making life easy when managing very large web sites.
For Ubuntu 16.04, Apache web server is available as a package in the aptitude repository and can be installed from a terminal as follows:
sudo apt install apache2
Note that, earlier versions of Ubuntu, you will need to use "apt-get" in place of simply "apt" in 16.04 and above.
This command will fetch the latest version of the package from the repository and install it as a service, meaning that you can use the service command to control it. Stopping, starting and restarting Apache is handled as follows:
sudo service apache2 stopsudo service apache2 startsudo service apache2 restart
When the installation has finished, the Apache service should automatically be started. If not, you should be able to use the commands above to start it yourself. Once that has been done, you can confirm it is running by visiting http://localhost in your browser:
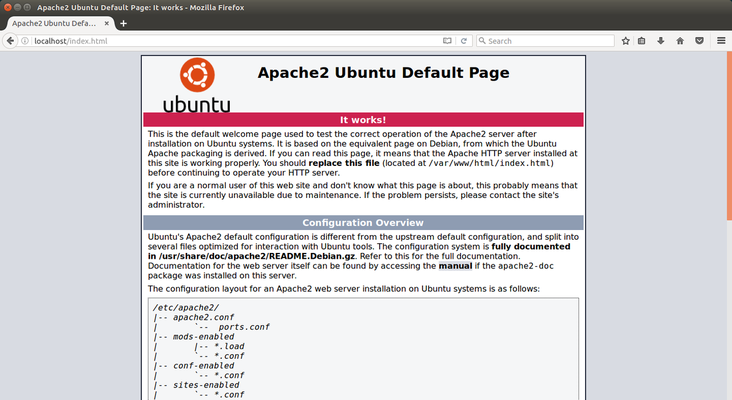
The Ubuntu Default Page above gives an overview and explanation of the folder structure and the helper tools such as a2enmod (enable a module) and a2dismod (disable a module).
Next steps
Now that Apache is installed, we can use it to forward requests to Payara Server. In our next blog, we will look at how to configure Apache to transparently forward requests to Payara Server.

Related Posts
Join Live Webinar - Simplifying Security for Your Jakarta EE Applications with Apache Shiro
Published on 26 Aug 2024
by Dominika Tasarz
0 Comments

Join us for an insightful webinar with Lenny Primak & Luqman Saeed, where we'll demystify security for your Jakarta EE applications using Apache Shiro.
Simplifying Security for Your Jakarta EE Applications with Apache Shiro
Wednesday, the the ...
Payara Podcast Episode 7: Keeping Projects Alive – A Conversation About Open Source Contribution
Published on 06 Aug 2024
by Dominika Tasarz
0 Comments

In the latest episode of the Payara Podcast, we talk to Lenny Primak. Lenny is an experienced software architect and developer - he’s been contributing to various open source projects for many years, including Apache, Jakarta EE and Payara.
...