
Originally published on 18 Jun 2019
Last updated on 18 Jun 2019
.jpg?width=200&name=Payara%20ECE%202018%20sponsor%20(2).jpg)
Several Cloud Providers have the possibility to run your Payara Platform Docker Images on their infrastructure. In this blog, I will describe to you how you can run your application on Microsoft Azure using a Docker Container. All the steps required to perform this are described using the Azure Portal (web-based application) and the Azure Command line.
Docker Registry
The first thing we have to do is to make our Docker Image available for the Azure platform. Just as any other Docker infrastructure, we can put the image in a public repository like DockerHub and it can be picked up.
But of course, when dealing with corporate applications, it is recommended to put the image in a private repository so that not everyone has access to it.
The Azure platform has the Azure Container Registry feature for this purpose. It lets you run a private Registry so that you can store your images and it can be picked up by the Docker Container you start later on.
Using Azure Portal
You can create a registry through the portal but connecting to this registry and pushing images to it is easier using the Azure CLI.
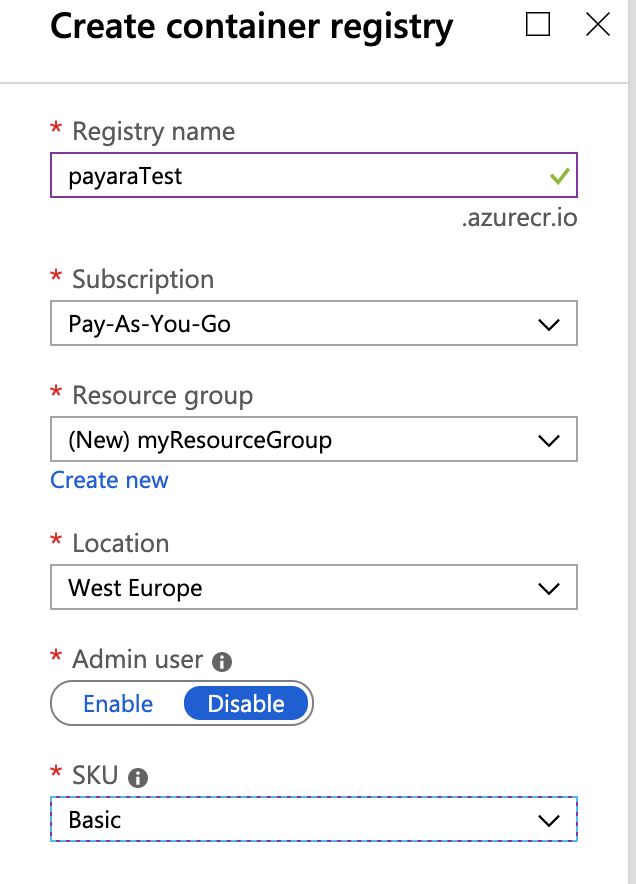
When using the portal, look for a new resource called “Container Registry” or ACR. You need to specify the following values:
- Registry name, this name will become part of the URL on which your private Docker Registry is hosted. This needs to be unique across the world, so maybe your first choice is no longer available.
- Resource Group, is a logical grouping of resources. It makes it easy for you to find a specific resource or can be used to remove all resources in go (like all the resources you create when you follow the examples in this blog)
- SKU defines the size of the registry. For most cases, the Basic option will suffice.
Using Azure CLI
The creation of the Container Registry can be performed by issuing the following commands
az group create --name myResourceGroup --location eastus
This command creates a Resource Group, a logical grouping of your Azure resources. It allows you to easily find a specific resource or remove all resources related to this demo if you have finished testing.
For a location near you, have a look at this list https://azure.microsoft.com/en-us/global-infrastructure/locations/ and the output of
az account list-locations
Now that we have a resource group created, or we can reuse one of the Resource Groups we have created earlier of course, we can create the Registry ‹with the following command.
az acr create --resource-group myResourceGroup --name payaratest --sku Basic
Push Image to Registry
Now that we have a Docker Registry available for our Docker images, we are ready to push to the Azure Infrastructure.
Since we have created a private Repository some authentication is required to access it. We can do this directly without Docker CLI, but the Azure CLI has a very useful command to this for us, based on the credentials we have specified for this CLI.
az acr login --name payaratest
Now our Docker CLI is configured to send the appropriate authentication and we can prepare the Image and send it over to the Registry.
If you have already an image available, you can give it the correct tag so that it can be pushed. Otherwise, you can build it and supply the expected tag name.
The tag name needs to be of the following format
<myRegistry>.azurecr.io/<name>:<version>
And of course, that version is optional as you probably know, but it is a good practice to always define it.
So for example, when I have already my Docker Image available locally, called testmicro the following command defines it with the expected tag name:
docker tag testmicro payaratest.azurecr.io/testmicro:v1
Or when I need to build it, I can define the tag name with a command similar to:
docker build -t payaratest.azurecr.io/testmicro:v1 .
And the last step we need to perform is that we push the Image, including all the layers which it needs. So depending on the Image, it can take some time:
docker push payaratest.azurecr.io/testmicro:v1
Create a Docker Container
Now that our Docker Image is ready for use by the Azure Docker infrastructure, we only have to define a Container for it and how we want to expose it.
Container Instances from Azure Portal
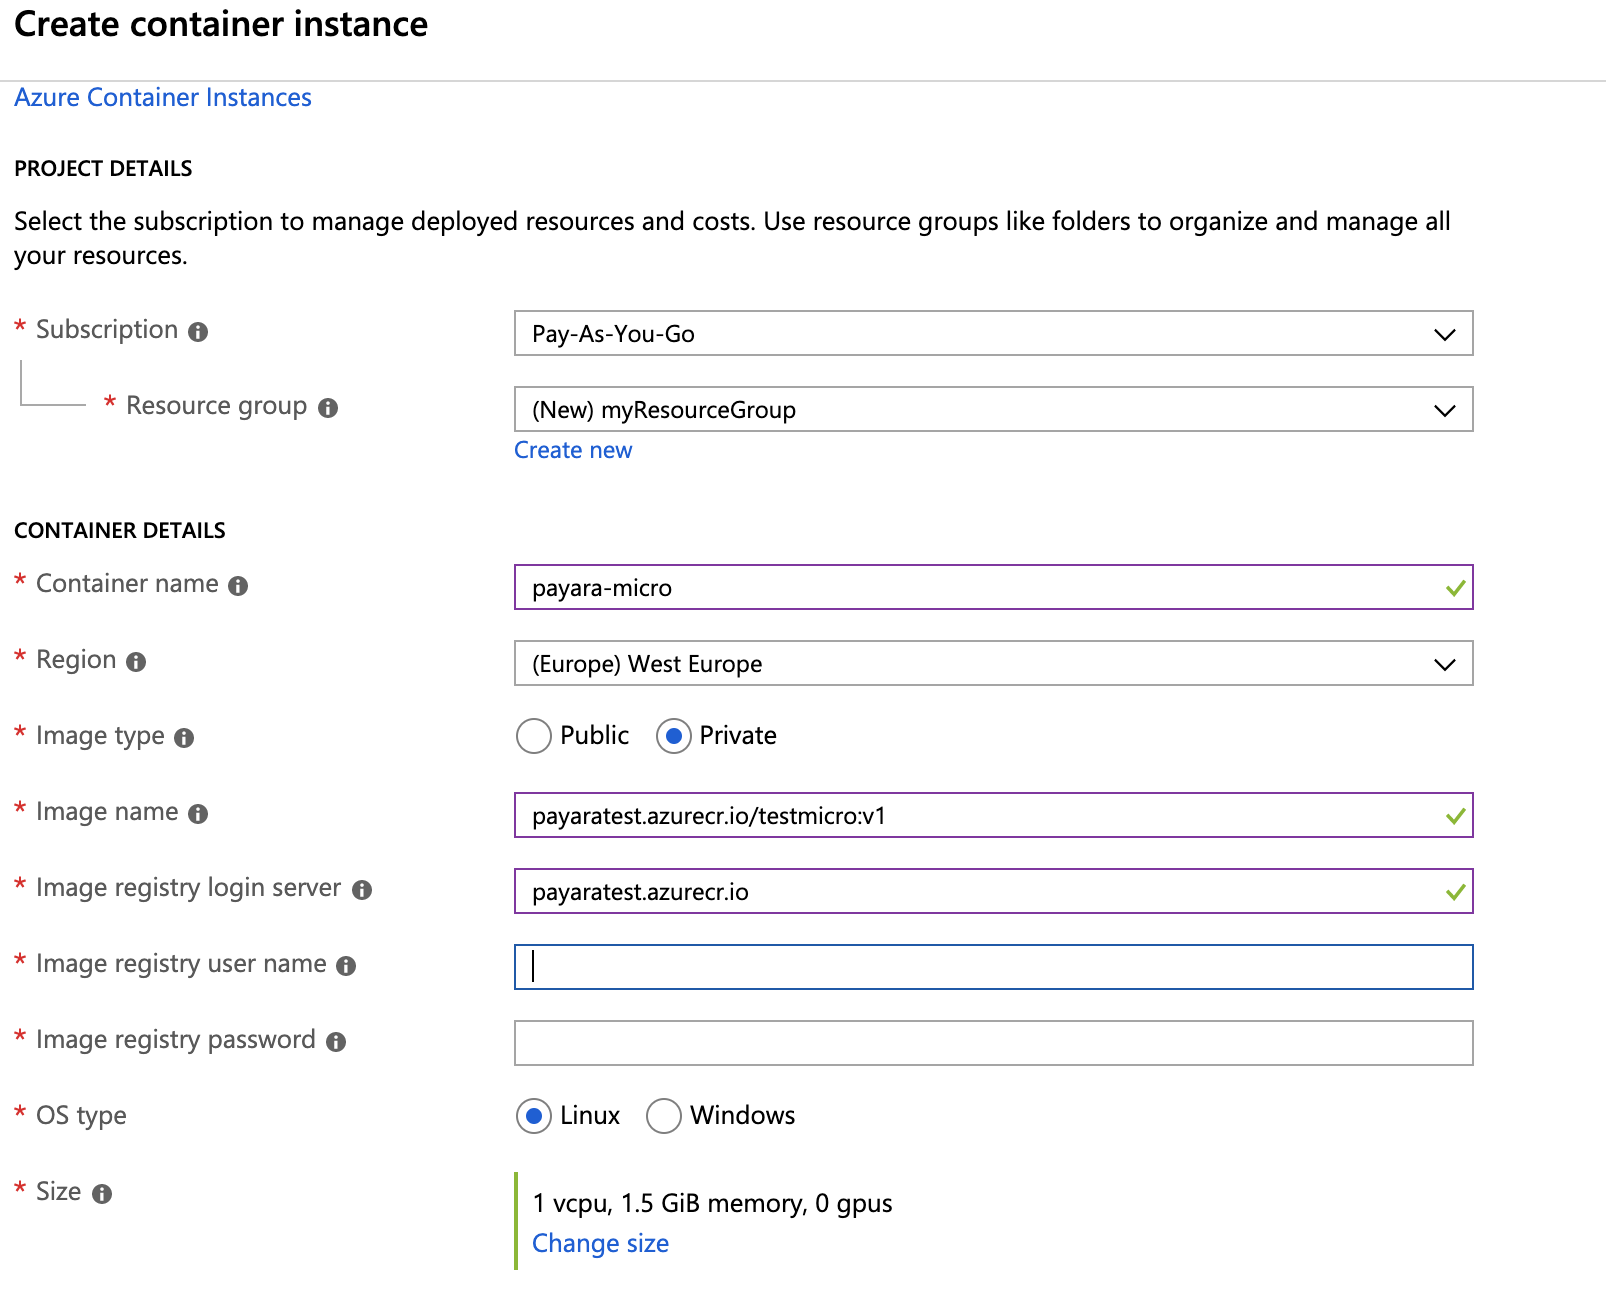
Within the Portal, we need to create another Resource which has the Name “Container Instance” this time.
When selecting this resource, we get a wizard to enter the required information.
On the first screen, we specify our image. Since we are using the Private Repository we have created, we specify the location of our image in this repository payaratest.azurecr.io/testmicro:v1
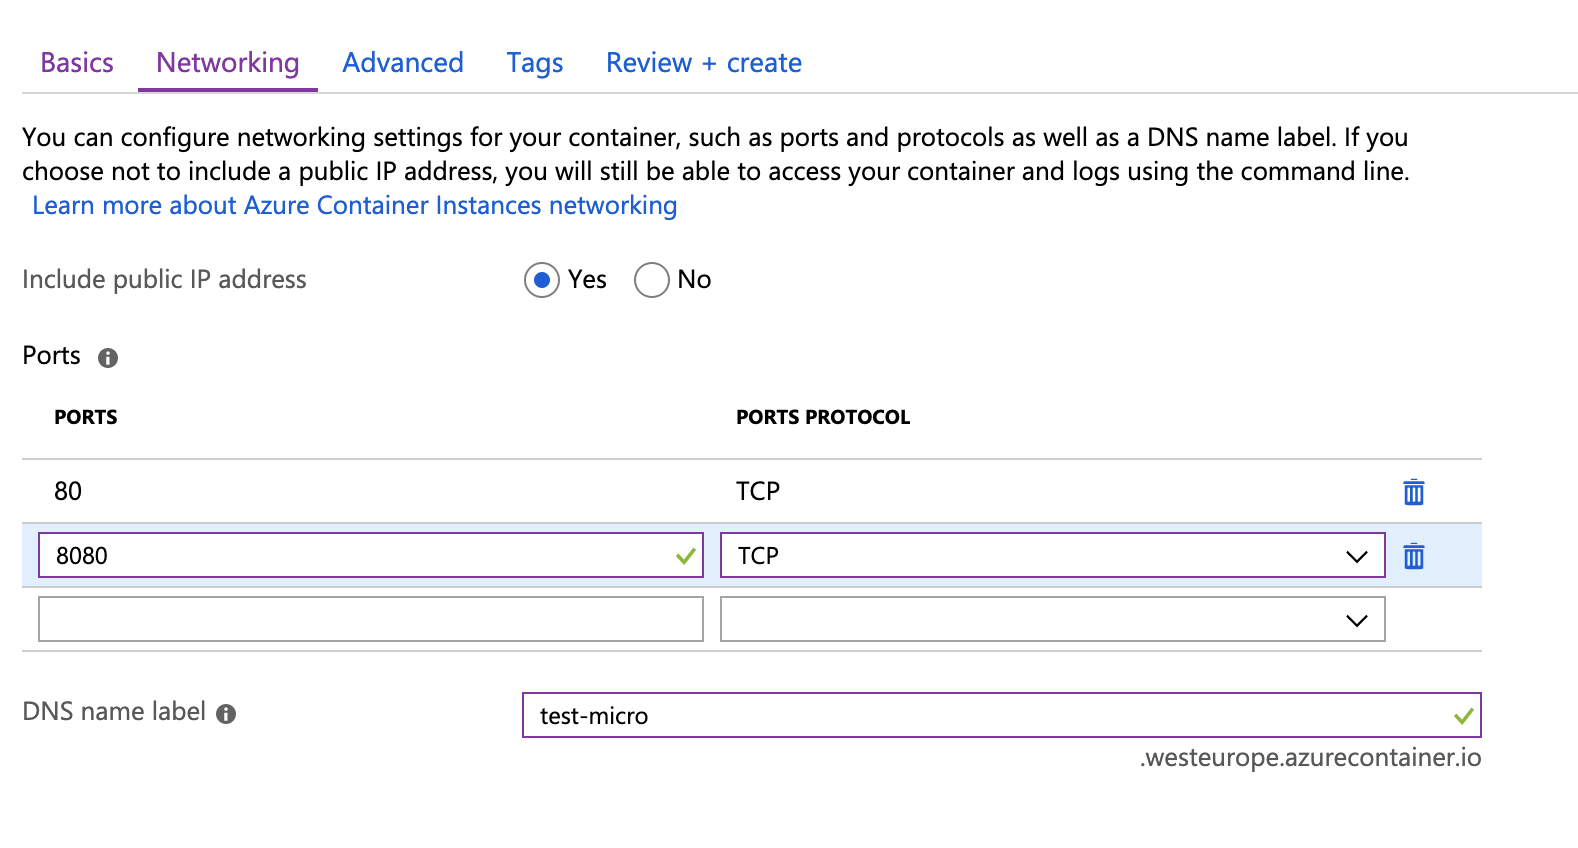
On the second screen of the wizard, we need to indicate all things related to the exposure of our application through some network information.
Since our image is using Payara Micro which makes our application available on port 8080, we fill in this value.
At the moment, there is no possibility to define a port mapping. So in our case, the application will also be available on port 8080.
Through a post-boot command of Payara Micro, you can of course change this port value in case the default value is not suited for you.
We also indicate that we need a public IP address and the dns-name so that we can access the application.
Container with Azure CLI
If you are working with the Azure CLI instead of the Portal, you can issue the following command on your console which creates the Docker Container, defines the networking information.
az container create --resource-group myResourceGroup --name test-micro --image payaratest.azurecr.io/testmicro:v1 --dns-name-label test-micro --ports 8080
Accessing your Application
Once the container is started, you can access your application through that dns-name you specified (like http://test-micro.westeurope.azurecontainer.io:8080/testapp/endpoint), or you can lookup the IP address which is assigned to the container.
And if things aren’t going as expected, you can always consult the log of the Payara Micro instance with the Azure CLI command
az container logs --resource-group myResourceGroup --name test-micro
Run your Application on Azure using a Docker Container
With the Azure platform, it is relatively easy to push your Docker images to a private Registry and run the application within a Docker Instance. The graphical portal allows the less experienced users of the platform to perform all the new tasks.
Review our detailed guides for using the Payara Platform with Docker:

Related Posts
What's New In The Payara Platform September 2025 Release?
Published on 03 Sep 2025
by Luqman Saeed
0 Comments

The September 2025 release marks a significant milestone with Payara 7.2025.1.Beta1 advancing Jakarta EE 11 readiness, alongside focused improvements across Payara Platform Community 6.2025.9, Enterprise 6.30.0, and Enterprise 5.79.0. This ...
What's New In The Payara Platform August 2025 Release?
Published on 06 Aug 2025
by Luqman Saeed
0 Comments
The August 2025 release brings important security fixes and stability improvements across the Payara Platform. This month's releases include Payara Platform Community 6.2025.8 and Payara Platform Community 7.1 Alpha4, Payara Platform Enterprise ...