
Originally published on 15 Jan 2021
Last updated on 04 Mar 2021
.jpg?width=200&name=Payara%20ECE%202018%20sponsor%20(2).jpg)
Creating a Docker image is not that difficult. The Dockerfile script contains a few commands that define and prepare your image that will be run by the engine as a container.
But various aspects are important to have an efficient build process, resulting in a lightweight and secure container.
This blog describes the 14 tips you must consider for the next Docker Image that you build.
1. Tag Your Images
Each Docker image has a tag value, and if you do not explicitly specify one, it has the value latest. The latest value is for several reasons not a good idea so you should always define a value that follows the semantic versioning.
Creating another image that has the same tag value latest, overrides your previous version. It is available on your Docker repository but your Docker Engine still takes the old image with the same tag value. The engine just looks at what it has available locally and doesn't perform any checks to see if there is a newer image available on the repository. If you want to use the most recent version, you need to perform a docker pull each time.
But using the same tag value (which also applies to a value following your semantic versioning) results in another issue. Although you have performed all the tests there is an issue with a new version of your application and/or the Docker Image and you need to go back to the previous version. But that version no longer exists as you have overwritten it! So you always need access to a previous version, and thus different tags are required to have the entire history.
2. Create Ephemeral Images
When a Docker container stops running, all information included in the container is lost. If you stored some data or log files in the running container itself - that information is no longer accessible.
This is a well-known fact of the system, but most of the time, users still store the log files within the container. Even when we use a log aggregator system, the logs should be stored outside so that we are sure that we have all the logging information in those cases that we need it.
For a Payara Server Docker Image, the following command can be used to store the log directory on your host machine:
docker run -d -v ~/temp/payara-log:/opt/payara/appserver/glassfish/domains/production/logs payara/server-full:5.2020.5
Look at the volume and mount commands of Docker to assign dedicated volumes for logging and assigning them to your Container.
3. Images Can't be Environment-Specific
Your application and runtime environment probably require some environment-specific configuration values. The most common scenario is needing to connect to a different database in test than you need to connect to in production.
Do not create specific images for each environment, containing different configuration values. An image, once it is tested and approved, should move unaltered to the production environment. When you need another image for production, you likely make a mistake one day and put a wrong 'version' into production. Just as you should not recompile and repackage your application when you go to production, you shouldn't do it for the Docker Image, either.
The Payara Platform supports various options to retrieve configuration values from environment variables or other configuration sources. These allow you to create a single image that can be used in any environment without change. For more details about this, look at our documentation.
4. Layer Structure
A Docker image is made up of a series of layers, each containing portions of the file system that is assembled to the actual one when the container starts.
You should limit the number of layers as this will lead to a faster startup of the container. The contents of the layers are immutable and when a higher layer in the definition changes files, like the content is altered or by removing them, it overwrites the information of the other layer. For each file, the resulting content needs to be calculated at startup to assemble the actual file system. And more layers means more work to find out what ends up in the actual file system.
But these layers mean also that your Docker Image can contain redundant data. Files removed or overwritten in a higher layer are still present, increasing the size of the data that needs to be transferred over the network and stored in the repository.
Most of the commands in the Dockerfile corresponds with a layer in the resulting image. So you should combine as much as possible the commands. This will limit the number of layers and can be used to remove temporary files resulting from the execution of the commands.
This is the reason you see a similar command in the Payara Dockerfile (simplified to show you better what is going on)
RUN true \
    && ./asadmin start-domain ${DOMAIN_NAME} \
    # The configuration commands
    && ./asadmin stop-domain ${DOMAIN_NAME} \
    && rm -rf \
       ${PAYARA_DIR}/glassfish/domains/${DOMAIN_NAME}/osgi-cache \
       ${PAYARA_DIR}/glassfish/domains/${DOMAIN_NAME}/logs \
    && true
All the OS commands are packed together, and when Payara Server is stopped, the unnecessary files, like logs and OSGI cache, are removed. By combining all of them into a single RUN command, we keep the layer small, it just contains the configuration changes, and it is in a single layer.
5. Correct Layer Ordering
You not only need to minimise the layers but also the order is very important. Each layer has a 'link' to the layer below it. And when a layer is rebuilt, all layers depending on it also need to be rebuild. So when you do not design the layers correctly, a small change means that you need to rebuild all the layers and need to push all the changed layers to your Docker Repository. This results in longer build times and more data that needs to be pushed over the network.
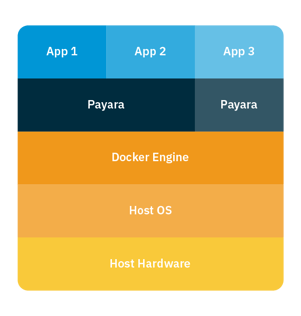
The structure should look like the above image. Your application should be the top layer and does not contain any other artifacts. So you should never run your application as an executable jar file as that means that a big layer needs to be rebuilt, including your runtime, every time you have a small code change.
From the image, you can also see that a layer can be (re-)used by multiple containers. When you use the same base image containing the same Payara Server setup so that it can be used by two or more of your applications, the layer is only loaded once by the Docker Engine.
So the order of the commands within the Dockerfile is important and doesn't always reflect the logical order they are used in. The CMD and ENTRYPOINT commands should not be the last commands in your Dockerfile, they can easily be one of the first ones. These commands don't change frequently (if changed at all), so they should be at the top so they create a layer near the bottom that doesn't need to be rebuilt every time. The last command should always be the COPY command that brings in your application artifact.
6. Use Multi-Stage Builds
If the creation of your Docker Image is a complex one, with many steps, you should consider using a multi-stage build. As you have seen in the previous tips, the number and order of the layers are important.
Some situations result in multiple layers containing redundant data and in those cases, this new feature introduced in Docker 17.06 can make your image small again.
It combines the information on the file system of all the layers that you have created up to that point, as a starting point for a new layer. As a result, files that are changed will only appear once, having the latest content, and removed files will effectively no longer be present.
FROM ... AS builder
# Other commands to create the first image


FROM ....
COPY --from=builder <from> <to>
# Contains other commands required for your image
7. Single Service per Container
The idea of running your application within a container is to isolate it from the other applications and/or processes. When there is a problem with your application, only that one is affected, and not other applications and processes running on the same instance.
Running multiple applications defeats the whole point of the reasoning of containerisation and should not be implemented.
There are occasions that you may want to run auxiliary processes within your container, like processing log files or providing proxies for services. But these kind of processes should also be in a separate container and use the principal of the sidecar container so that isolation, reuse, and optimal sizing and configuration can be achieved.
8. PID 1
Signals are important in the Unix and Linux world as they are used to properly terminate or shutdown forcefully your processes and applications.
Within a Docker Container, only the first started process, the one with identification 1 - PID 1, will receive a notification for termination or shutdown. Also, when this first process stops, the container stops. So you need to make sure that your application can properly respond to those signals, the container is stopped when your application ends, etc ...
The Tini project can help you with achieving these requirements. It properly delegates all signals to the process you have defined and ends when your application end. Instead of bundling it within the Docker Image yourself, tiny is available within Docker itself since version 1.13. You need to specify the --init flag with the docker run command to make use of it. However, it is recommended to bundle it within your application so that your users don't need to, or forget to specify, the flag to make your image work properly.
9. Least Privileged User
Until now, we only concentrated on creating the best possible Docker Image but left out the security aspects. However, security is important and should be addressed in the Docker build process.
An important aspect is the user and the privileges of that user that runs your application. By default, this is the user root, and thus is a security risk.
Docker containers run in isolation by default, which means that your process can't see other running processes. But it can still interact with the kernel of the Operating System that is running the Docker Engine. And thus running your application within the container with user root is a major security issue.
Therefore, always create a specific user and assign it privileges just enough to perform the tasks it needs to do. Using this newly created user ensures that when a hacker tries to overtake your system via your application they are unsuccessful.
RUN addgroup --gid 1000 payara \
    && adduser --system --uid 1000 --no-create-home --shell /bin/bash --home "${HOME_DIR}" --gecos "" --ingroup payara payara \
    && echo payara:payara | chpasswd

USER payara
10. Don't Store Sensitive Data
We have already discussed the general rule that no data should be stored within your container itself. So we should not store any sensitive data of course.
But this tip is more about using sensitive data in the Dockerfile itself. The content of the file is readable, and thus any sensitive data you put in there, like database passwords, can be read. Always use arguments to provide this kind of information to the build process and use variables for database passwords for example if you need them at runtime of the container.
11. Avoid the ADD Command
With the Docker ADD command, you can copy a remote file into your Docker Image. The ADD command also has the added benefit that an unzip operation can be performed on the fly on the resource. But using this command also poses a security risk since you potentially pull in a program from an untrusted source or which can be altered during transit.
If you are using the ADD command, always make sure you verify its integrity using a checksum verification. This way you avoid creating a Docker image containing malicious code.
12. Scan Images for Vulnerabilities
Always scan your images for known vulnerabilities. A tool like Snyk can be used to scan your Dockerfile and report any of the known vulnerabilities. Just as you should scan your application and dependencies you are using for known vulnerabilities, you should do this for the Docker Image.
Putting an application in production without knowing that there are no known vulnerabilities should not be an accepted procedure.
13. Sign Your Images
Using the previous tips, we now made sure that we use the appropriate steps and checked all the resources we are using in our Docker Image. We have implemented a secure process and have been checking for known vulnerabilities.
The last thing we need to do is to make sure our images don't get altered before they end up in production.
Docker has a tool for this which is called Notary, and it can be used to sign your images. By verifying this signature when the image is loaded by the Docker Engine, we can make sure the content is still the same as at the time we have to build it.
14. Create Your Images
Now that we have become experts in creating Docker Images, we are ready to create our images from the bottom up! There are many good Docker images available on the internet and many of them use all the best practices described in the previous tips.
But they are generic images and thus maybe not ideal for your specific case. When basing your image on them, you might end up with some layers overriding content in previous layers because it doesn't suit your needs.
So you might consider building your version entirely optimised and tailored to your need. With the help of the above tips and a linter like Hadolint, that verifies if you adhere to some best practices, you create the image that is best for you.
Conclusion
Creating a Dockerfile build script seems easy and you can get something to work very quickly and easily. But knowing some concepts of Docker helps you to understand why some images are better. And as always, you should be aware of some security aspects and make sure your application within the Container does not only run fast and reliable but also secure.

Click here for more information about using the Payara Platform with Docker.
Related Posts
Multi-stage Docker Builds for Efficient Jakarta EE Deployments with Payara
Published on 17 Jul 2025
by Luqman Saeed
0 Comments

Enterprise Jakarta EE applications require extensive tooling during development - Maven for dependency management, full JDKs for compilation, and various build utilities. However, production environments need only the compiled application and ...
Mitigating Kubernetes Misconfigurations: How To Secure Your Deployments
Published on 19 May 2025
by Chiara Civardi
0 Comments

Almost any developer looking to leverage containers turns to Kubernetes (K8s) for orchestration. However, with its complexity comes security risks, particularly misconfigurations, which remain one of the most critical attack vectors in ...