
Originally published on 16 Apr 2018
Last updated on 15 Jun 2020

Virtual servers are a common concept to developers familiar with configuring web servers like Apache HTTP or Nginx. A virtual server represents a placeholder for a physical Payara Server instance to be "visualized" as multiple instances at once, allowing to server requests for multiple domain names. Detailed information on virtual servers can be found in the official documentation for Payara Server.
Virtual servers are part of the HTTP Service in Payara Server, but they are configured with sensible defaults so hosting web applications can be done with little to no custom configuration. This blog will show you why you might want to use virtual servers more consciously, and how you would do so.
2 Example Applications
When making a web application, it's usually good practice to separate out the front-end and back-end. To do this, you might in some cases just leave your website at the context root (e.g. "http://mycoolwebsite.com") and host the API in a subdirectory (e.g. "http://mycoolwebsite.com/api"). However, in some cases it can be useful to separate these two components out into different subdomains. This would mean that for the previous example you could keep your website at http://mycoolwebsite.com, but instead move your API to http://api.mycoolwebsite.com. This is one of the scenarios that can be achieved using virtual servers in Payara Server, and is the scenario that the remainder of this blog will describe. A basic knowledge of JSF as well as JAX-RS will be assumed.
We are using two applications below, both of which can be found in the Payara-Examples suite (here and here). Alternatively, you can make your own applications and use the example projects as inspiration!
Back-end Application
We are going to use the hello-world-rest application from the Payara Examples suite. This is a simple application that tests a basic endpoint, and uses JAX-RS filters to print to the log the name of the endpoint that was hit. It hosts an endpoint at "/hello" which returns "Hello World!" as a string.
Front-end Application
For the front-end we can use the rest-request-jsf application from the Payara Examples suite. Because we have separated out the front-end and back-end so much, you could instead replace the front-end library with any other front-end library or language (e.g. Angular or React). JSF is referred to as a component-based MVC framework as opposed to a request based framework like the afforementioned two Javascript frameworks. In context this means that the intended JSF application design is not to make REST requests, but to delegate logic to a backing bean and @Inject everything you need in there. In this application we're ignoring that to prove a point. It's generally inadvisable to write code in production just to prove a point (for some reason it seems to wind people up!), but for the purposes of this example it shows off virtual servers quite well!
This application hosts a JSF page, which will print the output of the "/hello" endpoint from the API. The index.xhtml page is shown below, followed by it's backing bean and API communication class.
<?xml version='1.0' encoding='UTF-8' ?>
<!DOCTYPE html PUBLIC "-//W3C//DTD XHTML 1.0 Transitional//EN" "http://www.w3.org/TR/xhtml1/DTD/xhtml1-transitional.dtd">
<html xmlns="http://www.w3.org/1999/xhtml"
      xmlns:h="http://xmlns.jcp.org/jsf/html">
    <h:head>
        <title>REST Request</title>
    </h:head>
    <h:body>
        <!-- Prints out the getMessage() method of the helloWorldBackingBean -->
        #{helloWorldBackingBean.message}
    </h:body>
</html>
@Named @Dependent public class HelloWorldBackingBean { @Inject private ApiRequester api; public String getMessage() { return api.get("hello", String.class); } } |
@Named
@Dependent
public class ApiRequester {

    private HttpServletRequest request;

    /**
     * Gets the details of the request that was made to the JSF page to
     * initialise this bean.
     */
    @PostConstruct
    private void getContext() {
        request = ((HttpServletRequest) FacesContext.getCurrentInstance().getExternalContext().getRequest());
    }

    /**
     * Makes a GET request to a specified endpoint for a local API. E.g. to get
     * a String from the URL http://api.localhost/hello call get("/hello",
     * String.class).
     *
     * @param uri The endpoint to get the result of.
     * @param returnType The type of Object expected from the endpoint.
     * @return The result.
     */
    public <T> T get(String uri, Class<T> returnType) {
        return createResource(uri).get(returnType);
    }

    /**
     * Makes a POST request to a specified endpoint for a local API. E.g. to get
     * a String from the URL http://api.localhost/hello call post("/hello", "",
     * String.class).
     *
     * @param uri The endpoint to get the result of.
     * @param requestEntity The request body to post to the endpoint.
     * @param returnType The type of Object expected from the endpoint.
     * @return The result.
     */
    public <T> T post(String uri, Object requestEntity, Class<T> returnType) {
        return createResource(uri).post(returnType, requestEntity);
    }

    private Builder createResource(String uri) {
        // Append "api." to start of URL
        String apiUrl = request.getRequestURL().toString().replaceAll("://", "://api.");
        // Get a request builder object from API link (remove leading slash from parameter to prevent double slash)
        return Client.create().resource(apiUrl + uri.replaceAll("^/", "")).getRequestBuilder();
    }

}
Deploying to Virtual Servers
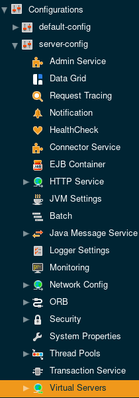
Once you've downloaded and built both of the above applications you're ready to deploy both. Start Payara Server, and go to the admin console at http://localhost:4848. Go to Configurations → server-config → Virtual Servers.
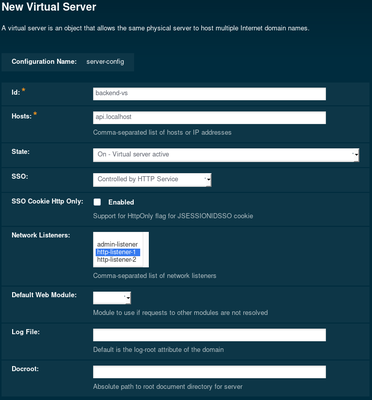
Create two new virtual servers. Make the IDs of both something memorable. I named one 'backend-vs' and one 'frontend-vs'. Make sure that the 'Hosts' option is 'localhost' for the frontend virtual server and 'api.localhost' for the backend virtual server. Assign both to the http-listener-1 network listener (hosted on port 8080).
Next, make sure that default virtual server for the chosen listener is changed. Otherwise there's a chance you might get redirected to the default Payara page instead of the deployed application. This is because the listener doesn't see an application name in the URL, so might redirect you to the 'server' virtual server (which hosts the default Payara page). You can configure this option under Configurations → server-config → Network Config → Network listeners → your-listener → HTTP → Default Virtual Server.
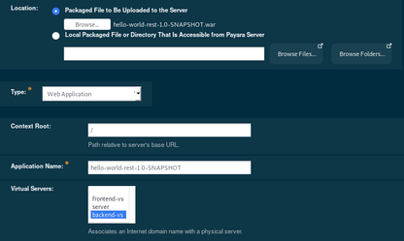
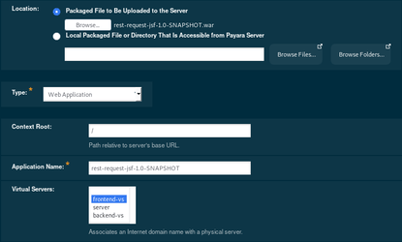
Deploy each of the applications. They can both be deployed to the base context root (/), as they're going to different virtual servers. The JAX-RS Hello World application should be deployed to the back-end virtual server, and the Rest Request application should be deployed to the front-end virtual server.
Once you've done this, the page will be available from http://localhost:8080/. You can also visit http://api.localhost:8080/hello/, which will give you the same result but from the REST endpoint!
This blog has shown you how you can use virtual servers in Payara to serve requests from different subdomains. Virtual servers are also capable of doing a lot more like serving completely different domains, as well as configuring error pages and redirects for multiple deployed applications. To get more details on the workings of virtual servers, see the official documentation at: https://docs.payara.fish/documentation/payara-server/server-configuration/http/virtual-servers.html.
Related Posts
Boost Developer Productivity with Payara Server Maven Plugin + AI Agent
Published on 12 Sep 2025
by Gaurav Gupta
0 Comments

Managing Payara Server Just Got Smarter
Imagine managing your Jakarta EE applications not just with Maven goals, but by asking natural questions.
With the experimental AI Agent built into the Payara Server Community's Maven Plugin, you can ...
The Payara Monthly Catch - August 2025
Published on 02 Sep 2025
by Dominika Tasarz
0 Comments

Welcome aboard the August 2025 issue of The Payara Monthly Catch! With summer in full swing, things may have felt a little more quiet across the Java world - but certainly not less interesting! We hope you managed to get some rest and recharge, ...