
Originally published on 08 Apr 2016
Last updated on 01 Feb 2021

One of the most common administration tasks with Payara Server, as well as with any web server, is to set up certificates to secure either HTTP protocol or remote access to Payara Server administration interface. You might have a self-signed certificate or a certificate signed by a trusted authority. In both cases it is pretty easy to add them to a Payara Server domain and use them to secure communication channels.

Overview of the Steps Described in this Guide
The process of securing your Payara Server with new certificates involves several steps, which are worth summarising here:
- Acquire an SSL certificate
- Bundle public and private key into a single PKCS12 file
- Add bundled public and private key into the key store used by the Payara Server domain
- Add certificate public key to the trusted certificates in Payara Server domain - optional, but strongly encouraged
- Enable security on HTTP listener, if required
- Enable security on admin interface, if required
In order to follow this guide, you will need:
- certificate file (public key) - we will name it mycert.crt (either self-signed or signed by a certification authority)
- certificate private key - we will name it mycert.key
- alternatively, you might have a bundle with public and private key instead of mycert.crt and mycert.key
- Payara Server installation – we will use a domain named mydomain (your domain might be the default domain1 domain, or another or a new domain you have created)
Acquire an SSL certificate
In most cases, you would want to use an SSL certificate created and signed by a Certificate Authority (CA). Often you would create a Certificate Signing Request (CSR), send it to a CA and then get the SSL certificate from the CA. Payara Server Enterprise makes this very easy and provides the commandgenerate-csr to generate a CSR. Alternatively, you can use openssl orcertreqto generate a CSR.
If you want to follow this guide with a new self-signed certificate instead, you can either create it directly using Payara Server Enterprise or by a third-party tool like openssl.
Payara Server Enterprise offers thegenerate-self-signed-certificatecommand to generate a self-signed certificate right in the domain configuration. With this command, you can skip all the steps requried to generate a certificate outside of Payara Server and import it into the domain. You can generate a self-signed certificate using Payara Server Enterprise with the following asadmin command:
asadmin generate-self-signed-certificate --dn "C=UK,O=Payara,CN=payara.fish" mydomain_certificate
The generated certificate will be automatically stored in the Payara key store and trust store under alias mydomain_certificate. This means you can now skip bundling the private and public keys and importing them to Payara's keystore and trust store and you can jump right to configuring Payara Server to use this certificate alias.
Alternatively, you can generate self-signed private and public key using openssl:
openssl req -x509 -newkey rsa:4096 -keyout mycert.key -out mycert.crt -days 365

If you acquired your certificate from a trusted authority, your keys might be already bundled. This is often the case with certificates signed by a trusted authority. If your bundle is in a different format than PKCS12, you need to specify a different store type for some operations, or export the keys in PKCS12 format.
For the purpose of this guide, it is not important whether the certificate is self-signed or it is signed by a certification authority. The only difference between them is how the certificates are obtained. If authentication is not a concern, for example if all the communication will be private and behind a firewall, then it is sufficient to use self-signed certificates. However, it is useful to obtain and use a CA certificate for HTTPS connections available to the outside world to increase trustfulness and prevent forgery attempts.
Preparation
In order to operate with keystores, we will use keytool executable available in bin directory of your JDK installation.
All the configuration changes happen inside the config folder of your domain. In order to make the steps simple, we start by copying both certificate public and private key files into this folder - let's copy mycert.cer and mycert.key into <Payara_install>/glassfish/domains/mydomain/config. If you already have a bundle with public and private key, copy it to config directory - we will assume its file name is mycert.p12.
It is also recommended to stop the Payara Server domain before proceeding with the steps. For some actions we will need to start the domain, but the guide will explicitly mention that.
Change Domain Master Password
Before we can access certificate keystores, we need to make sure that we set Payara Server domain master password. This password is used by the Payara Server to access keystores. You will need to use the same password to access keystores later.
The default master password is changeit. You may want to change it by following command:
asadmin change-master-password --savemasterpassword=true mydomain
This command will ask you for a new master password. Please, remember it, as it will be also used to encrypt/decrypt the keystore files and to decrypt any included key bundles. Using --savemasterpassword=true will save the password to the disk so that asadmin start-domain command doesn't prompt for password. If you don't want to store the password, omit this option.
Add Certificate Public and Private Keys to the keystore
In order to secure inbound connections, such as HTTP listeners, we need to put the certificate keys into a keystore file keystore.jks in the domain config folder. Before we do that, we need to bundle the public and private key together into a PKCS12 bundle file. Mind that the final PKCS12 bundle file needs to be encrypted with the same password which we use as the domain master password. Also make sure that the certificate's private key (mycert.key) should be encrypted using the same password. The bundle will be later added to the a keystore accessed by Payara Server, which will use the domain master password to open the keystore and also decrypt all bundles and keys inside it.
The keytool command does not support creation of PKCS12 bundles, therefore we must use other means. There are different steps involved, depending on your operating system.
Creation of the PKCS12 Bundle in Linux
In Linux, creation of the bundle using openssl is pretty straightforward:
openssl pkcs12 -export -in mycert.crt -inkey mycert.key -out mycert.p12 -name mydomain_certificate
Path to the public key is given by the -in option, path to the private key is given by -inkey option, and filename of the created bundle is given by -out option. We also need to give the bundle an alias by -name option.
You will be asked for a new password to the created bundle, which is essentially a new keystore, similar to cacerts.jks and keystore.jks. Remember to use the same password as the master password used for the Payara domain.
You may also see what is inside the new bundle, using keytool:
keytool -list -keystore mycert.p12
Creation of the PKCS12 Bundle in Windows
In order to create a bundle from mycert.crt and mycert.key, the most straightforward way is again using openssl, or some other similar tool (like MakeCert). However, they are not available in default Windows installation.
If you already have a certificate signed by a trusted authority, you may import it into Windows store and export it in PKCS12 format, all using Microsoft Management Console (mmc). The signed certificate bundle must have exportable private key. If not, you might try to use the bundle as is - if it does not have PKCS12 format, you need to specify the correct format instead of PKCS12 in some commands later on.
When exporting the bundle, remember to check the option Yes, export the private key, as well as Include all certificates in the certification path if possible and Export all extended properties
To be consistent with the rest of this guide, save the exported bundle into file named mycert.p12.
Microsoft Management Console does not provide an option to assign an alias to the certificate manually. It generates the alias for you, unfortunately the alias often appears like this: {fa2ds2d3-z13b-492d-2c83-f5z215432p2k}. This alias needs to be used later whenever we use alias mydomain_certificate in this guide.
Import the PKCS12 Bundle to the keystore
In previous steps we have created a new keystore bundle with both public and private keys of your certificate. You may see what is inside the new bundle, using keytool:
keytool -list -keystore mycert.p12
This command will ask for password given at creation of the bundle, and will list information about your certificate, together with the alias given to the certificate. The alias is important, as we will use it later to refer to our certificate.
Finally, we need to import the PKCS12 bundle into the keystore in our Payara Server domain. The command keytool will gain do the trick:
keytool -importkeystore -destkeystore keystore.jks -srckeystore mycert.p12 -srcstoretype PKCS12 -alias mydomain_certificate
In the above command, we want to import into keystore.jks another keystore (our bundle) mycert.p12 of type PKCS12, and from that keystore we select only the certificate with alias mydomain_certificate.
Add Certificate to the List of Trusted Certificates
This step involves adding the public key of your certificate or the whole PKCS bundle into the keystore file of trusted certificates in Payara Server domain. This is to make the server recognize the certificate as trusted, in case an external party or another Payara Server instance provide it. This step is optional, if you only intend to secure inbound channels, such as HTTP listeners. But it will do no harm to follow the procedure in any case.
The default keystore file for trusted certificates can be found at <Payara_install>/glassfish/domains/mydomain/config/cacerts.jks.
We need to import our public key file (mycert.crt) into the cacerts.jks keystore with following command:
keytool -importcert -trustcacerts -destkeystore cacerts.jks -file mycert.crt -alias mydomain_certificate
The command will ask for password to the cacerts.jks keystore - this should be the same password as the domain master password.
In case of PKCS bundle (mycert.p1
2), following command will do the same:
keytool -importkeystore -destkeystore cacerts.jks -srckeystore mycert.p12 -srcstoretype PKCS12 -alias mydomain_certificate
The certificate will be installed under alias mydomain_certificate.
Replacing an Old Certificate
If you already have a certificate in your domain and you want to replace it because it will expire soon, you might want to replace it with a new one. In order to do it so that no further configuration changes in the domain are required, you need to remove the old certificate first, before installing the new certificate. Following keytool command will do that:
keytool -delete -alias mydomain_certificate -keystore keystore.jks
To replace the certificate also in trusted certificates keystore, issue the same command also for cacerts.jks file:
keytool -delete -alias mydomain_certificate -keystore cacerts.jks
After removing the old certificate, continue adding the certificate as described before. Just remember that the certificate is referred to in the domain configuration by its alias, therefore the alias of the new certificate must be the same as the alias of the old certificate.
If you want to replace the certificate used by secure admin, it is recommended to refresh all the secure admin settings by running command to turn on secure admin (even if it is already on):
asadmin start-domain mydomain (if domain not yet started)
asadmin enable-secure-admin
asadmin restart-domain mydomain (to apply changes)

Enable Security on HTTP Listener
At this point, the certificate is available for use in your domain. You may use it to secure an HTTP listener or replace the default certificate for the listener http-listener-2, which is secured by default.
First, we need to start the server with our domain.
While server is running, we can use either asadmin CLI or the Admin Console in the web browser to configure the HTTP listener.
Securing HTTP Listener using Admin Console
Open Admin Console in your browser, by default it is located at http://localhost:4848/.
Go to Configurations -> server-config -> HTTP Service -> HTTP Listeners > my-http-listener, where my-http-listener is the HTTP listener you want to configure. By default, there already exists http-listener-2, which is already secured by TLS protocol, using default certificate with alias s1as and listens on port 8181.
If you are adding security to an insecure listener, make sure that security is enabled, as in the following picture:
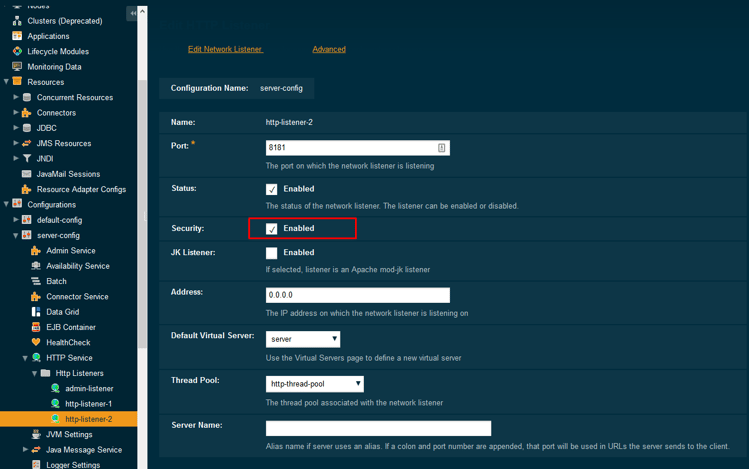
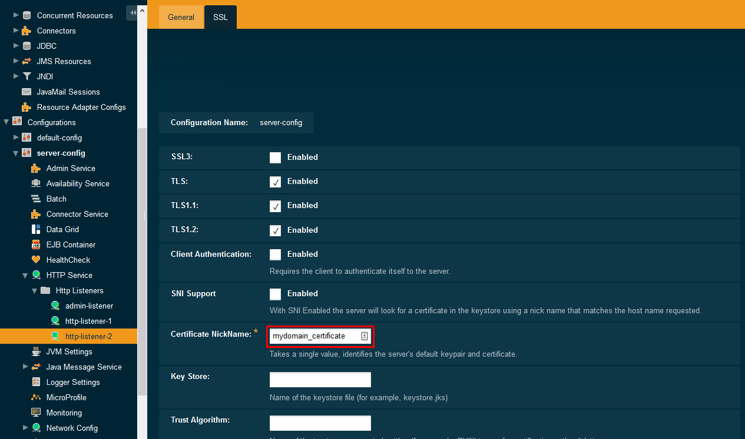
On the SSL tab, TLS should be enabled. It is not recommended to enable SSL3, as it is superseded by TLS protocol and is not widely used. Moreover, there are some security issues with SSL3 protocol.
On the SSL tab, we also want to apply our new certificate - Certificate NickName should contain the alias of our certificate. In our case it is mydomain_certificate.
keytool -list -keystore mycert.p12
If you run the same command against keystore.jks file, you will see the same certificate among other certificates already in the domain keystore (there are already 2 certificates by default: glassfish-instance and s1as).
Finally, you may test the configuration changes in your web browser. With a web application deployed at context root webapp and listener using port 8181, open the following address and check that the connection is secured using the new certificate: https://localhost:8181/webapp or https://<yourdomain>:8181/webapp.
Securing HTTP listener using asadmin
With asadmin, each configuration step is represented by one or more asadmin CLI commands, which set configuration properties using dot notation:
- Make sure that the security is enabled for listener named http-listener-2:
asadmin set configs.config.server-config.network-config.protocols.protocol.http-listener-2.security-enabled=true
- Make sure that TLS protocol is enabled for listener http-listener-2
asadmin set configs.config.server-config.network-config.protocols.protocol.http-listener-2.ssl.tls-enabled=true
asadmin set configs.config.server-config.network-config.protocols.protocol.http-listener-2.ssl.tls11-enabled=true
asadmin set configs.config.server-config.network-config.protocols.protocol.http-listener-2.ssl.tls12-enabled=true
There are 3 versions of TLS protocol available. It is good practice to enable all 3 versions to degrade gracefully for older clients. But you may turn on only TLS 1.2 as well, if you only run the last command. You don't get such granularity when using admin console.
- Apply our new certificate with alias mydomain_certificate to the listener http-listener-2:
asadmin set configs.config.server-config.network-config.protocols.protocol.http-listener-2.ssl.cert-nickname=mydomain_certificate
Turn on Security on Admin Listener
It is possible to secure connections to admin console in a similar way as to any other HTTP listener. However, it is only recommended to turn on SSL security on admin listener when you need to access the Admin Console or run asadmin commands remotely and using the domain name that matches your certificate. Also mind that SSL will be used for communication between instances and domain admin server within a cluster.
If you really need to secure admin listener, repeat the same steps in admin console as for other HTTP listeners, with following exceptions:
- before security is enabled for admin listener, ensure that all admin users have non-empty password
- if an admin user has empty password, change the password in admin console (Domain -> Administrator password), or using asadmin:
asadmin change-admin-password
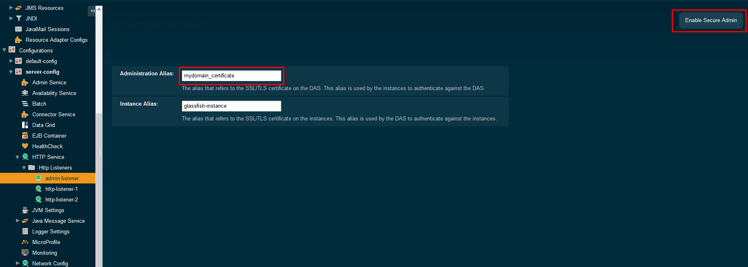
- to enable security for admin listener, use button Enable secure admin on Secure Administration page - a link to this page is provided under Security checkbox in admin-listener general configuration page, as well as through admin console menu: server (Admin server) -> General -> Secure Administration
- you may set your certificate for admin listener using the Secure Administration page - replace s1as in the field Administration Alias with the alias of your certificate, or you may set your certificate later in the same way as with usual HTTP listeners. The latter option will mean that the default certificate will be used for connections to admin console until you set your certificate
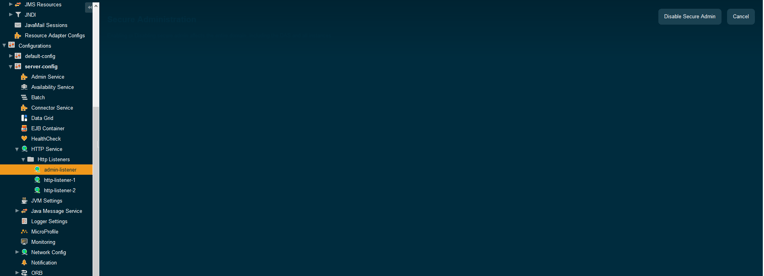
- note that after pressing Enable secure admin, the server will restart and you will be redirected to admin console running with https protocol. If there are any other instances in the domain, you need to restart all of them as well.
Before admin security is enabled:
After admin security is enabled:
Again, secure admin listener can be enabled also by asadmin command:
asadmin enable-secure-admin --adminalias=mydomain_certificate
After this command you need to restart the server, as well as other instances in the domain.
If you need to tweak the configuration further, you may use the same asadmin commands with admin-listener as with other HTTP listeners.
Summary
Hopefully you now understand how to add certificates into Payara Server and how to use them to secure communication with SSL. Although it is not difficult, it requires to do several steps, involving openssl, keytool, and the Admin Console. We have tried to provide explanation for all the necessary and optional steps, with alternative ways to accomplish them in different operating systems and using either the Admin Console or asadmin CLI. It is up to you to decide which approach fits you better to accomplish your security requirements.
Need help with the Payara Platform in production? Learn about Payara Enterprise

Related Posts
Securing Jakarta EE Application Servers Needs Executive Attention
Published on 10 Sep 2025
by Asif Khan
0 Comments
%20Application%20Servers-An%20Executive%20Guide%20Cover.jpg?width=500&name=Securing%20Jakarta%20EE%20(Java%20EE)%20Application%20Servers-An%20Executive%20Guide%20Cover.jpg)
If your organization runs Jakarta EE applications, securing the application server they rely on is not a one-time project. Risks repeat unless leadership sets clear priorities, funds the right controls, and expects steady progress. This post ...
Why Java Developers Need to Help Their CTO Prioritise Security in 2025
Published on 26 Aug 2025
by Asif Khan
0 Comments

If you’re a Java developer, you probably feel sandwiched between frameworks nearing end-of-life, fresh Log4j headlines and endless security patch cycles. Fixing one vulnerability only to uncover another can feel like running on a treadmill.