
Originally published on 10 Jul 2018
Last updated on 17 Jul 2019

In this blog, which follows on from the Cloud Connectors in Payara Micro, we will explain the Microsoft Azure Service Bus connector and how to use it in Payara Server and Payara Micro (the Payara Platform).

A Quick Refresher on Terminology
- Messaging system → A messaging system is a system that handles platform-agnostic communication between machines. This is generally used for communicating between production systems (for example, health check messages), but can also be used for common use cases like chat applications and system integration.
- Broker → A broker is basically another word for a server in the context of messaging systems. It refers to a machine that stores all of the messages and distributes them to multiple clients.
What Are Microsoft Azure and the Azure Service Bus?
Microsoft Azure is a competing cloud computing platform along with the likes of Amazon Web Services and Google Cloud Platform. It provides cloud services from basic hosted virtual machines (IaaS) to hosted services for you to use out of the box (PaaS).
The Azure Service Bus is described by Microsoft in their FAQ as "an asynchronous messaging cloud platform that enables you to send data between decoupled systems". It's one of the PaaS services offered by Microsoft Azure that provides messaging to your hosted applications. The Service Bus provides multiple types of messaging for different use cases. These are all explained nicely in the fundamentals page: https://docs.microsoft.com/en-us/azure/service-bus-messaging/service-bus-fundamentals-hybrid-solutions.
Why Would I Use the Azure Service Bus?
The Service Bus is an integrated way to communicate between services hosted on Azure. The alternative is to host a broker manually on Azure which, although it would give you more flexibility in terms of which broker to choose, it would also add extra setup, costs, and maintenance.
Setting Up an Azure Service Bus
Firstly you'll need to create a Microsoft Azure account. This can be done from the portal: https://portal.azure.com/. At the time of writing this article, Microsoft is providing $200 of credit free of charge for new Azure accounts. This gives you more than enough to test the Azure platform fairly extensively.
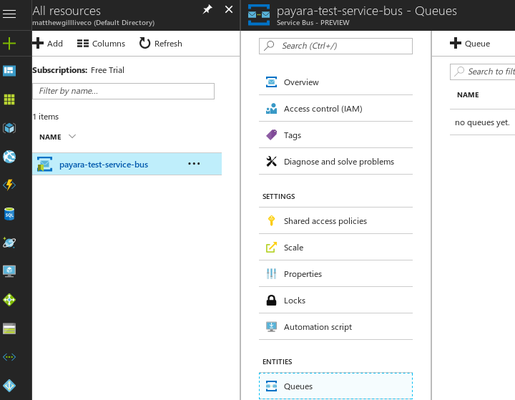
Once you've created an account, you will be taken to the Azure dashboard. From here you'll want to go to 'All Resources' from the left bar:

Resources are the Azure term for the services they host for you, as well as any specific data like security keys. You won't have any resources to begin with, but you can begin with creating a Service Bus immediately. Click on 'Add' and search for 'Service Bus'. Click the Service Bus icon, and after clicking 'Create' from the information panel you'll see the following screen:
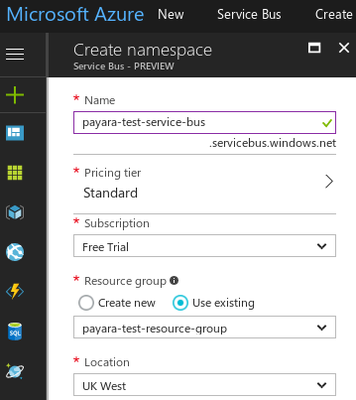
Enter a suitable Service Bus name, and create a new resource group to assign to it. A resource group defines a set of resources that are related. You can configure things like access control for the entire group. You can also deploy and update these resources together.
Click 'Create' when you're done. You'll be taken back to the resource list, where your new Service Bus should be listed. If it's not listed immediately, don't panic! Clicking the 'Refresh' button at the top of the table should make it appear.
Now we need a way to access this Service Bus. To do so, Azure uses access policies, which contain access keys. Azure creates a default access key for your new resource. To find it, click on the new resource and go to 'Shared access policies' → 'RootManageSharedAccessKey'. It will have a field called 'Primary Key' which, along with the name of the policy ("RootManageSharedAccessKey") are what we will use to access the Service Bus, so take a note of both. For the purposes of this guide, the default access policy is fine. For anything else I would suggest you create your own, which will add security as well as allow you to restrict people access to certain parts of the Service Bus. For example, some people may be allowed to listen but not post, and only a few people may be able to manage the Service Bus.

We now have a Service Bus, as well as access to it. But we'll need something to send and receive to/from. A single Service Bus can hold multiple queues and topics, which allows you to define the same users across multiple entities. We'll create a simple queue for this guide. Click on your custom Service Bus, and from there go to 'Queues'.
From here you can create and modify queues. Create a queue and configure the settings appropriately. You can configure the following settings:
- Maximum size → The maximum storage size of the queue.
- Message time to live → How long a message will stay in the queue before it expires and is removed.
- Lock duration → When an item is taken from the queue, it is marked as 'locked' until this duration expires. If the message was removed immediately, then a crashed server would have permanently deleted that message. The 'locked' value means that when this timer expires the item is allowed to be transferred to another worker.
- Move expired messages to the dead-letter subqueue → When a message's timeout is reached, instead of being deleted this message is moved to a different queue. This queue is found at the same URL as the main queue, but with /$DeadLetterQueue appended to the end.
- Enable duplicate detection → This means that duplicate items in the queue will be removed.
- Enable sessions → Means that receivers get allocated a session, and all messages belonging to a particular session are handled by the same broker. This allows the queue to do things like guarantee message ordering.
- Enable partitioning → Improves performance of the queue by storing messages across different partitions and only locking access to a specific partition. This gives the queue a higher throughput.
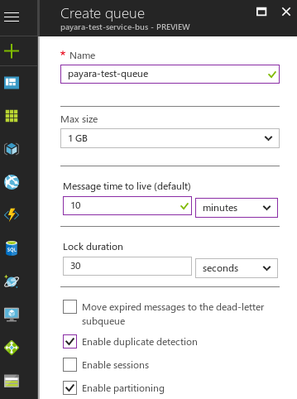
Click 'Create' on the queue. You now have all the information you need to connect to the queue, which means we can move onto creating an application to test the queue.
The bits of information you need to have a note of are:
- The queue name → You'll need the name of the queue for the application to send and receive to/from.
- The key name → This is the name of the key which is used for authentication purposes (The default key is called 'RootManageSharedAccessKey').
- The key contents → This is the long generated key which corresponds to the key above (In the 'Primary Key' field).
A Sample Microsoft Azure Service Bus Integration Application
This sample application will use the Cloud Connectors Suite. It will send a "Hello World!" message to the Service Bus queue, and then receive and print out each of these messages to the server log. These steps require a basic understanding of Java EE and Maven.
Firstly, create a new Maven project. The pom.xml will look like this:
<?xml version="1.0" encoding="UTF-8"?>
<project xmlns="http://maven.apache.org/POM/4.0.0" xmlns:xsi="http://www.w3.org/2001/XMLSchema-instance" xsi:schemaLocation="http://maven.apache.org/POM/4.0.0 http://maven.apache.org/xsd/maven-4.0.0.xsd">
    <modelVersion>4.0.0</modelVersion>

    <groupId>fish.payara.test</groupId>
    <artifactId>azure-test</artifactId>
    <version>1.0-SNAPSHOT</version>
    <packaging>war</packaging>

    <name>azure-test</name>

    <!-- System wide maven properties. -->
    <properties>
        <project.build.sourceEncoding>UTF-8</project.build.sourceEncoding>
        <maven.compiler.source>1.8</maven.compiler.source>
        <maven.compiler.target>1.8</maven.compiler.target>
    </properties>

    <dependencies>
        <!-- Java EE 8 dependency, required for all Java EE code. -->
        <dependency>
            <groupId>javax</groupId>
            <artifactId>javaee-api</artifactId>
            <version>8.0</version>
            <scope>provided</scope>
        </dependency>
        <!--
            The Connector API for accessing the queue in the Service Bus.
            'Provided' scope since we don't want it packaged with the project,
            because it's included in the RAR which is deployed separately.
        -->
        <dependency>
            <groupId>fish.payara.cloud.connectors.azuresb</groupId>
            <artifactId>azure-sb-jca-api</artifactId>
            <version>0.3.0</version>
            <scope>provided</scope>
        </dependency>
        <!--
            The Resource Adapter for the Azure Service Bus.
            Not required for the code, but we are using Maven to copy
            the rar into the target/ folder.
        -->
        <dependency>
            <groupId>fish.payara.cloud.connectors.azuresb</groupId>
            <artifactId>azure-sb-rar</artifactId>
            <version>0.3.0</version>
            <type>rar</type>
            <scope>provided</scope>
        </dependency>
        <!--
            The Payara Micro 181 Jar. Not required for the code, but Maven can
            be used to copy the Jar into the target/ folder the same as the
            resource adapter.
        -->
        <dependency>
            <groupId>fish.payara.extras</groupId>
            <artifactId>payara-micro</artifactId>
            <version>5.181</version>
            <scope>provided</scope>
        </dependency>
    </dependencies>

    <build>
        <plugins>
            <!-- Updates the WAR plugin, to stop the 'no web.xml' error -->
            <plugin>
                <groupId>org.apache.maven.plugins</groupId>
                <artifactId>maven-war-plugin</artifactId>
                <version>3.0.0</version>
            </plugin>
            <!--
                Copies the RAR into the target/ folder during the 'package' phase.
                Not required, but is helpful for deploying to have it in the same
                place as the application.
            -->
            <plugin>
                <groupId>org.apache.maven.plugins</groupId>
                <artifactId>maven-dependency-plugin</artifactId>
                <version>3.0.1</version>
                <executions>
                    <execution>
                        <id>copy-dependencies</id>
                        <phase>package</phase>
                        <goals>
                            <goal>copy-dependencies</goal>
                        </goals>
                        <configuration>
                            <includeArtifactIds>payara-micro,azure-sb-rar</includeArtifactIds>
                            <outputDirectory>target</outputDirectory>
                        </configuration>
                    </execution>
                </executions>
            </plugin>
        </plugins>
    </build>

</project>
Sending and Receiving Messages from the Service Bus
We can make two classes to show the Azure Service Bus usage: a sender class and a receiver class. The first class is the sender, which will send a "Hello World!" message every 3 seconds to the Azure Service Bus. The second class is the receiver, which will check for items to process every second, and then print out any messages it receives to the logs.
The sender class is shown below:
/*
 * Defines an application-wide Connection Factory. This can be put in any class,
 * and is an alternative to creating the Connection Factory in the server.
 */
@ConnectionFactoryDefinition(
        // Defines the JNDI name of the Connection Factory.
        name = "java:app/env/AzureSBConnectionFactory",

        // The description of the Connection Factory
        description = "Azure SB Conn Factory",

        /*
         * The interface which the Connection Factory implements. In this case it's an
         * interface defined in the Resource Adapter.
         */
        interfaceName = "fish.payara.cloud.connectors.azuresb.api.AzureSBConnectionFactory",

        // The name of the Resource Adapter being used.
        resourceAdapter = "azure-sb-rar-0.3.0",

        // The minimum and maximum number of connections in the Connection Pool.
        minPoolSize = 15, maxPoolSize = 30,

        // The level of transactionality of the connections.
        transactionSupport = TransactionSupportLevel.NoTransaction,

        // Any extra properties necessary for the interface being extended.
        properties = {
                // The name of the queue to send messages to
                "queueName=payara-test-queue",

                // The name of the service bus.
                "nameSpace=payara-test-service-bus",

                // The name of the key being used.
                "sasKeyName=RootManageSharedAccessKey",

                // The contents of the key being used.
                "sasKey=sZaLPuEBbSLz9z149dCSqniWk0NJ4iR4GrGMqKXzDQ4=" })

/*
 * The message is being sent on an EJB timer, so the class is declared as a
 * stateless EJB.
 */
@Stateless
public class SendMessage {

    // The Connection Factory is injected with the name specified above.
    @Resource(lookup = "java:app/env/AzureSBConnectionFactory")
    private AzureSBConnectionFactory factory;

    /*
     * This method is called every 3 seconds, and this 3 second interval will be
     * reset if the server restarts (non-persistent).
     */
    @Schedule(hour = "*", minute = "*", second = "*/3", persistent = false)
    public void pingMessage() {
        // Creates a connection
        try (AzureSBConnection conn = factory.getConnection()) {
            // Sends the message to the specified queue.
            conn.sendMessage(new Message("Hello World!"));
        } catch (ResourceException ex) {
            Logger.getLogger(SendMessage.class.getName()).log(Level.SEVERE, "Connection failed.", ex);
        } catch (Exception ex) {
            Logger.getLogger(SendMessage.class.getName()).log(Level.SEVERE, "Connection failed to close.", ex);
        }
    }

}
The other class is for receiving these messages by being declared as a Message Driven bean:
/*
 * Declares the class as a Message Driven Bean (MDB). This is an EJB annotation
 * which means that the class reacts to events from external sources (in this
 * case it's the Azure Service Bus). Properties of the bean are specified in
 * @ActivationConfigProperty annotations.
 */
@MessageDriven(activationConfig = {
    // The name of the service bus
    @ActivationConfigProperty(propertyName = "nameSpace", propertyValue = "payara-test-service-bus"),

    // The name of the key being used.
    @ActivationConfigProperty(propertyName = "sasKeyName", propertyValue = "RootManageSharedAccessKey"),

    // The contents of the key being used.
    @ActivationConfigProperty(propertyName = "sasKey", propertyValue = "sZaLPuEBbSLz9z149dCSqnjWk0NJ4iR4GrGMqKXzDQ4="),

    // The name of the queue to listen on.
    @ActivationConfigProperty(propertyName = "queueName", propertyValue = "payara-test-queue"),

    // The interval (in seconds) for polling the queue.
    @ActivationConfigProperty(propertyName = "pollInterval", propertyValue = "1")
})
// Implements the Listener interface defined in the Azure Cloud Connector API.
public class ReceiveMessage implements AzureSBListener {

    /*
     * Specifies that this method listens asynchronously for messages on the queue
     * defined for the class.
     */
    @OnAzureSBMessage
    public void receiveMessage(IMessage message) {
        // Print the message to the server log.
        System.out.println("Message received: \"" + new String(message.getBody()) + "\"");
    }

}
Now, proceed to build the application with the following command:
mvn clean package |
If the project fails to compile, make sure that your maven dependencies are all correct and you've not missed any bits from above.
Testing Azure Service Bus with Payara Micro
You should now have access to three files:
- The resource adapter (
target/azure-sb-rar-0.3.0.rar - The application WAR for sending and receiving messages (
target/).azure-test-1.0-SNAPSHOT.war - The Payara Micro 181 JAR (target/payara-micro-5.181.jar).
All you need to run the application is the following command (run from the target/ directory).
java -jar payara-micro-5.181.jar --deploy azure-sb-rar-0.3.0.rar --deploy azure-test-1.0-SNAPSHOT.war
Make sure that the deploy commands are in the correct order, or the deployment may fail. Once you've run this and Payara Micro has initialised, you should see messages similar to the following:
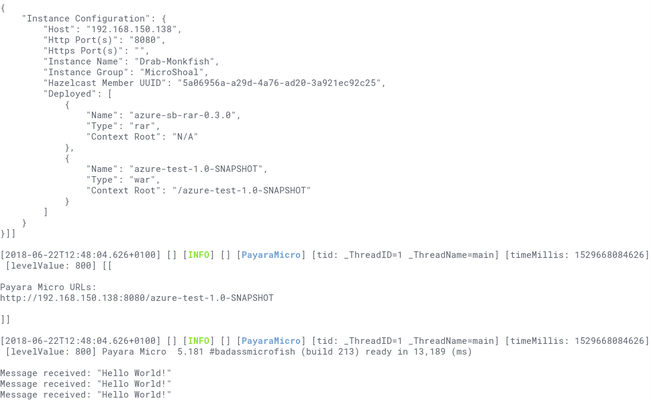
That's how to connect to the Azure Service Bus. This application could now be deployed to an instance also on Azure, and you'd have a backend that can connect to the message broker for fast, decoupled communication.

Related Posts
The Payara Monthly Catch - August 2025
Published on 02 Sep 2025
by Dominika Tasarz
0 Comments

Welcome aboard the August 2025 issue of The Payara Monthly Catch! With summer in full swing, things may have felt a little more quiet across the Java world - but certainly not less interesting! We hope you managed to get some rest and recharge, ...
Conquering Kubernetes Complexity: Why Java Developers Need More Than Just Containers
Published on 08 Aug 2025
by Chiara Civardi
0 Comments

Kubernetes, also known as K8s has become the de facto platform for orchestrating modern microservices architectures, promising resilience, scalability and faster deployment pipelines for Java applications. But for many developers, that promise ...