
Originally published on 20 Sep 2018
Last updated on 22 Nov 2019

Introduction
OpenID Connect is a security mechanism for an application to contact an identity service, verify the identity of the End-User based, and obtain End-User information using REST API's in a secure way.
OpenID Connect extends the OAuth 2.0 protocol. In other word, OpenID Connect is a simple identity layer that sits on the top of the OAuth 2.0 protocol. OpenID Connect is needed because even though OAuth provides authorization, it does not provide authentication.
Payara Services Limited provides the out of the box support for both OAuth 2.0 (since v5.182) and OpenID Connect (since v5.183) as EE Security mechanism.
Key Concepts
To understand how OpenID Connect works we’ll review basic key concepts such as:
OpenID Provider: Authorization Server that offers authentication as a service and providing Claims to a Relying Party about the Authentication event and the End-User.
Relying Party: OpenID Connect Client application that relies on the OpenID Provider to authenticate users and request claims about that user.
Scopes: Scopes are identifiers used to specify what access privileges are being requested. For e.g : openid, email, profile etc.
Claims: Claims are simply key & value pairs that contain information about a end-user, as well meta-information about the authentication event. For e.g : Subject, Issuing Authority, Audience, Issue Date and Expiration Date etc.
- The Subject is a unique identifier assigned to a user by the Identity provider, for example a username.
- The Issuing Authority is the Identity provider that issued the token.
- The Audience identifies the Relying Party who can use this token.
- The Issue and Expiration Date is the date and time the token was issued and will expire.
- The Nonce values which mitigate replay attacks.
Identity Token: Identity of the End User provided by OpenID Provider to the Relying Party. The identity token contains a number of claims about that end User and also attributes about the End-User authentication event.
Access Token: Access Tokens are credentials used to access Protected Resources.
providerURI: On the OpenID Client registration, the configuration information for that OpenID Provider is retrieved from a “${providerUri}/.well-known/openid-configuration" location as a JSON document, including its Token Id, UserInfo and all other endpoint locations.
redirectURI: The Callback URL to which the Authorisation Server will redirect the Browser after authorisation has been granted by the User.
Authentication Flow and Endpoints :
Before we dive into the application configuration details, let’s have a quick look at how OpenID works, and how we’ll interact with it.
Authorisation code flow diagram :
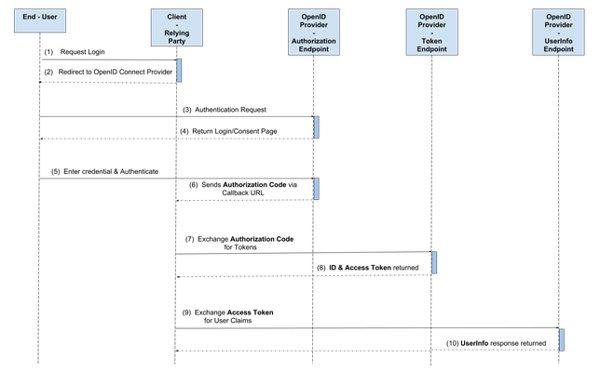
The OpenID Connect Provider has a number of EndPoints with which the End-User and Client Application interact. These are the Authorisation Endpoint, the Token Endpoint, the UserInfo endpoint and the JWKS endpoint.
The Authorisation endpoint is where the End-User is asked to authenticate and grant the client application consent to access their identity, and any other required information such as email, or address. Once consent is given by end-user, this endpoint passes back an Authorisation code.
The Relying party then makes a request for an ID token & Access Token to the token endpoint by exchanging the authorization code with client id & secret, to authenticate the client application for an ID token, an access token and optional refresh token.
The UserInfo Endpoint is a protected resource that is used by the OpenID Provider to return consented user information or claims to the client application, in exchange of a valid access token.
How to Configure an Application:
First, we need to add the following dependencies to our application:
<dependency>

  <groupId>fish.payara.api</groupId>

  <artifactId>payara-api</artifactId>

  <version>5.183</version>

  <scope>provided</scope>

</dependency>
After the registration of application on the OpenID Connect provider and the clientId & secret should be provided by the OpenID Connect provider and you can configure your client to authenticate users for OpenID Connect provider. As Payara provides the support for OpenID Connect using EE Security mechanism so OIDC Client must be configured using @fish.payara.security.annotations.OpenIdAuthenticationDefinition annotation to define the appropriate configuration.
For example :
@OpenIdAuthenticationDefinition(

providerURI = "https://sample-openid-server.com",

clientId = "87068hgfg5675htfv6mrucov57bknst.apps.googleusercontent.com",

clientSecret = "KfhgfhPAhId",

redirectURI = "http://localhost:8080/myapp/Callback"

)
OpenID Client configuration attributes can be configured via Microprofile Config way using the following properties :
- payara.security.openid.providerURI
- payara.security.openid.clientId
- payara.security.openid.clientSecret
- payara.security.openid.redirectURI
Microprofile Config properties value take precedence over @OpenIdAuthenticationDefinition annotation values.
Payara also provides the in-built support for Google and Azure AD OpenID Provider using @fish.payara.security.annotations.GoogleAuthenticationDefinition and @fish.payara.security.annotations.AzureAuthenticationDefinition.
User claims, ID Token and the other authentication information can be accessed after a successful authentication from the fish.payara.security.openid.api.OpenIdContext.
Conclusion
In this quick guide, we learned how to configure the application for OpenID Connect security mechanism. And, as always, you can find the sample source code over on GitHub.
Additional information about OIDC: http://openid.net/specs/openid-connect-core-1_0.html
Related Posts
A Preview of Jakarta REST (JAX-RS) 4.0 in Jakarta EE 11
Published on 13 Nov 2024
by Luqman Saeed
0 Comments

The latest version of Jakarta REST (formerly Java API for RESTful Web Services, aka JAX-RS), Jakarta REST 4.0, will bring some notable improvements and changes as part of Jakarta EE 11. This release focuses on modernizing the specification by ...
The Payara Monthly Catch - October 2024
Published on 30 Oct 2024
by Chiara Civardi
0 Comments

Ahoy ghoulish crew! The October edition of Payara’s Monthly Catch is truly spooktacular! Check out this month's highlights – this month’s edition is packed with must-read guides, bewitching tutorials and technical tricks (and treats!) to keep ...