
Originally published on 02 May 2018
Last updated on 15 Dec 2021

In this blog post, we take an introductory look at connection pools and how to configure them in Payara Server using best practices.
(last updated 15/12/2021)
What is a Connection Pool?
A connection pool is a store of database connections that can be used and (most importantly) re-used to connect to a database.
Why Are Connection Pools Needed?
Database connections are expensive to create and also to maintain. The reasons for this are many, including:
- Establishing a network connection to the database server
- Parsing the connection string information
- Performing user authentication
- Initialising the database connection in the database
- Establishing transactional contexts
Now, if you have a web application with a single user you can simply create a database connection at the start of the user session and then close it at the end. However, this is a highly unlikely scenario!
Now, imagine a more realistic scenario where your web application will be accessed by hundreds or thousands of users. If each user's session creates a database connection, firstly your users will experience a delay whilst that connection is set up and secondly the overall performance of your system will deteriorate.
So, in answer to the question why are they needed - they improve both the performance and scalability of your system.
How do Connection Pools Work?
Rather than creating a new connection each time one is needed, a pool of connections is created by the application server when a connection is needed for the first time. These connections can then be used and re-used. When a new connection is required, the pool is searched for an available connection. If one is available it is returned to the requester. If one is not available then the request is either queued or a new connection is established depending on how many connections are already in the pool and how the pool is configured. Once the connection is finished with, rather than closing it, the connection is returned to the connection pool for use by the next requester. Connections are eventually closed if they are not used for some time unless the minimum number of connections in the pool is reached.
OK, that's the theory out of the way. So, how do they work in practice?
Connection Pools in Payara Server
For this practical demonstration I will be using the following:
- Operating System - Ubuntu 18.04
- Java Version - 1.8.0_172
- App Server – Payara Server 5.181
- Database - H2
If you are using different versions of any of the above then the results may differ.
Creating the Connection Pool - Via the Admin Console
Firstly, start up Payara Server. This can be done from a terminal window with the following Asadmin CLI command:
(we'll assume the current directory is /<payara-home>/bin)
./asadmin start-domain
Once the server has started you can access the Admin Console at http://localhost:4848
In the left hand panel go to Resources → JDBC → JDBC Connection Pools
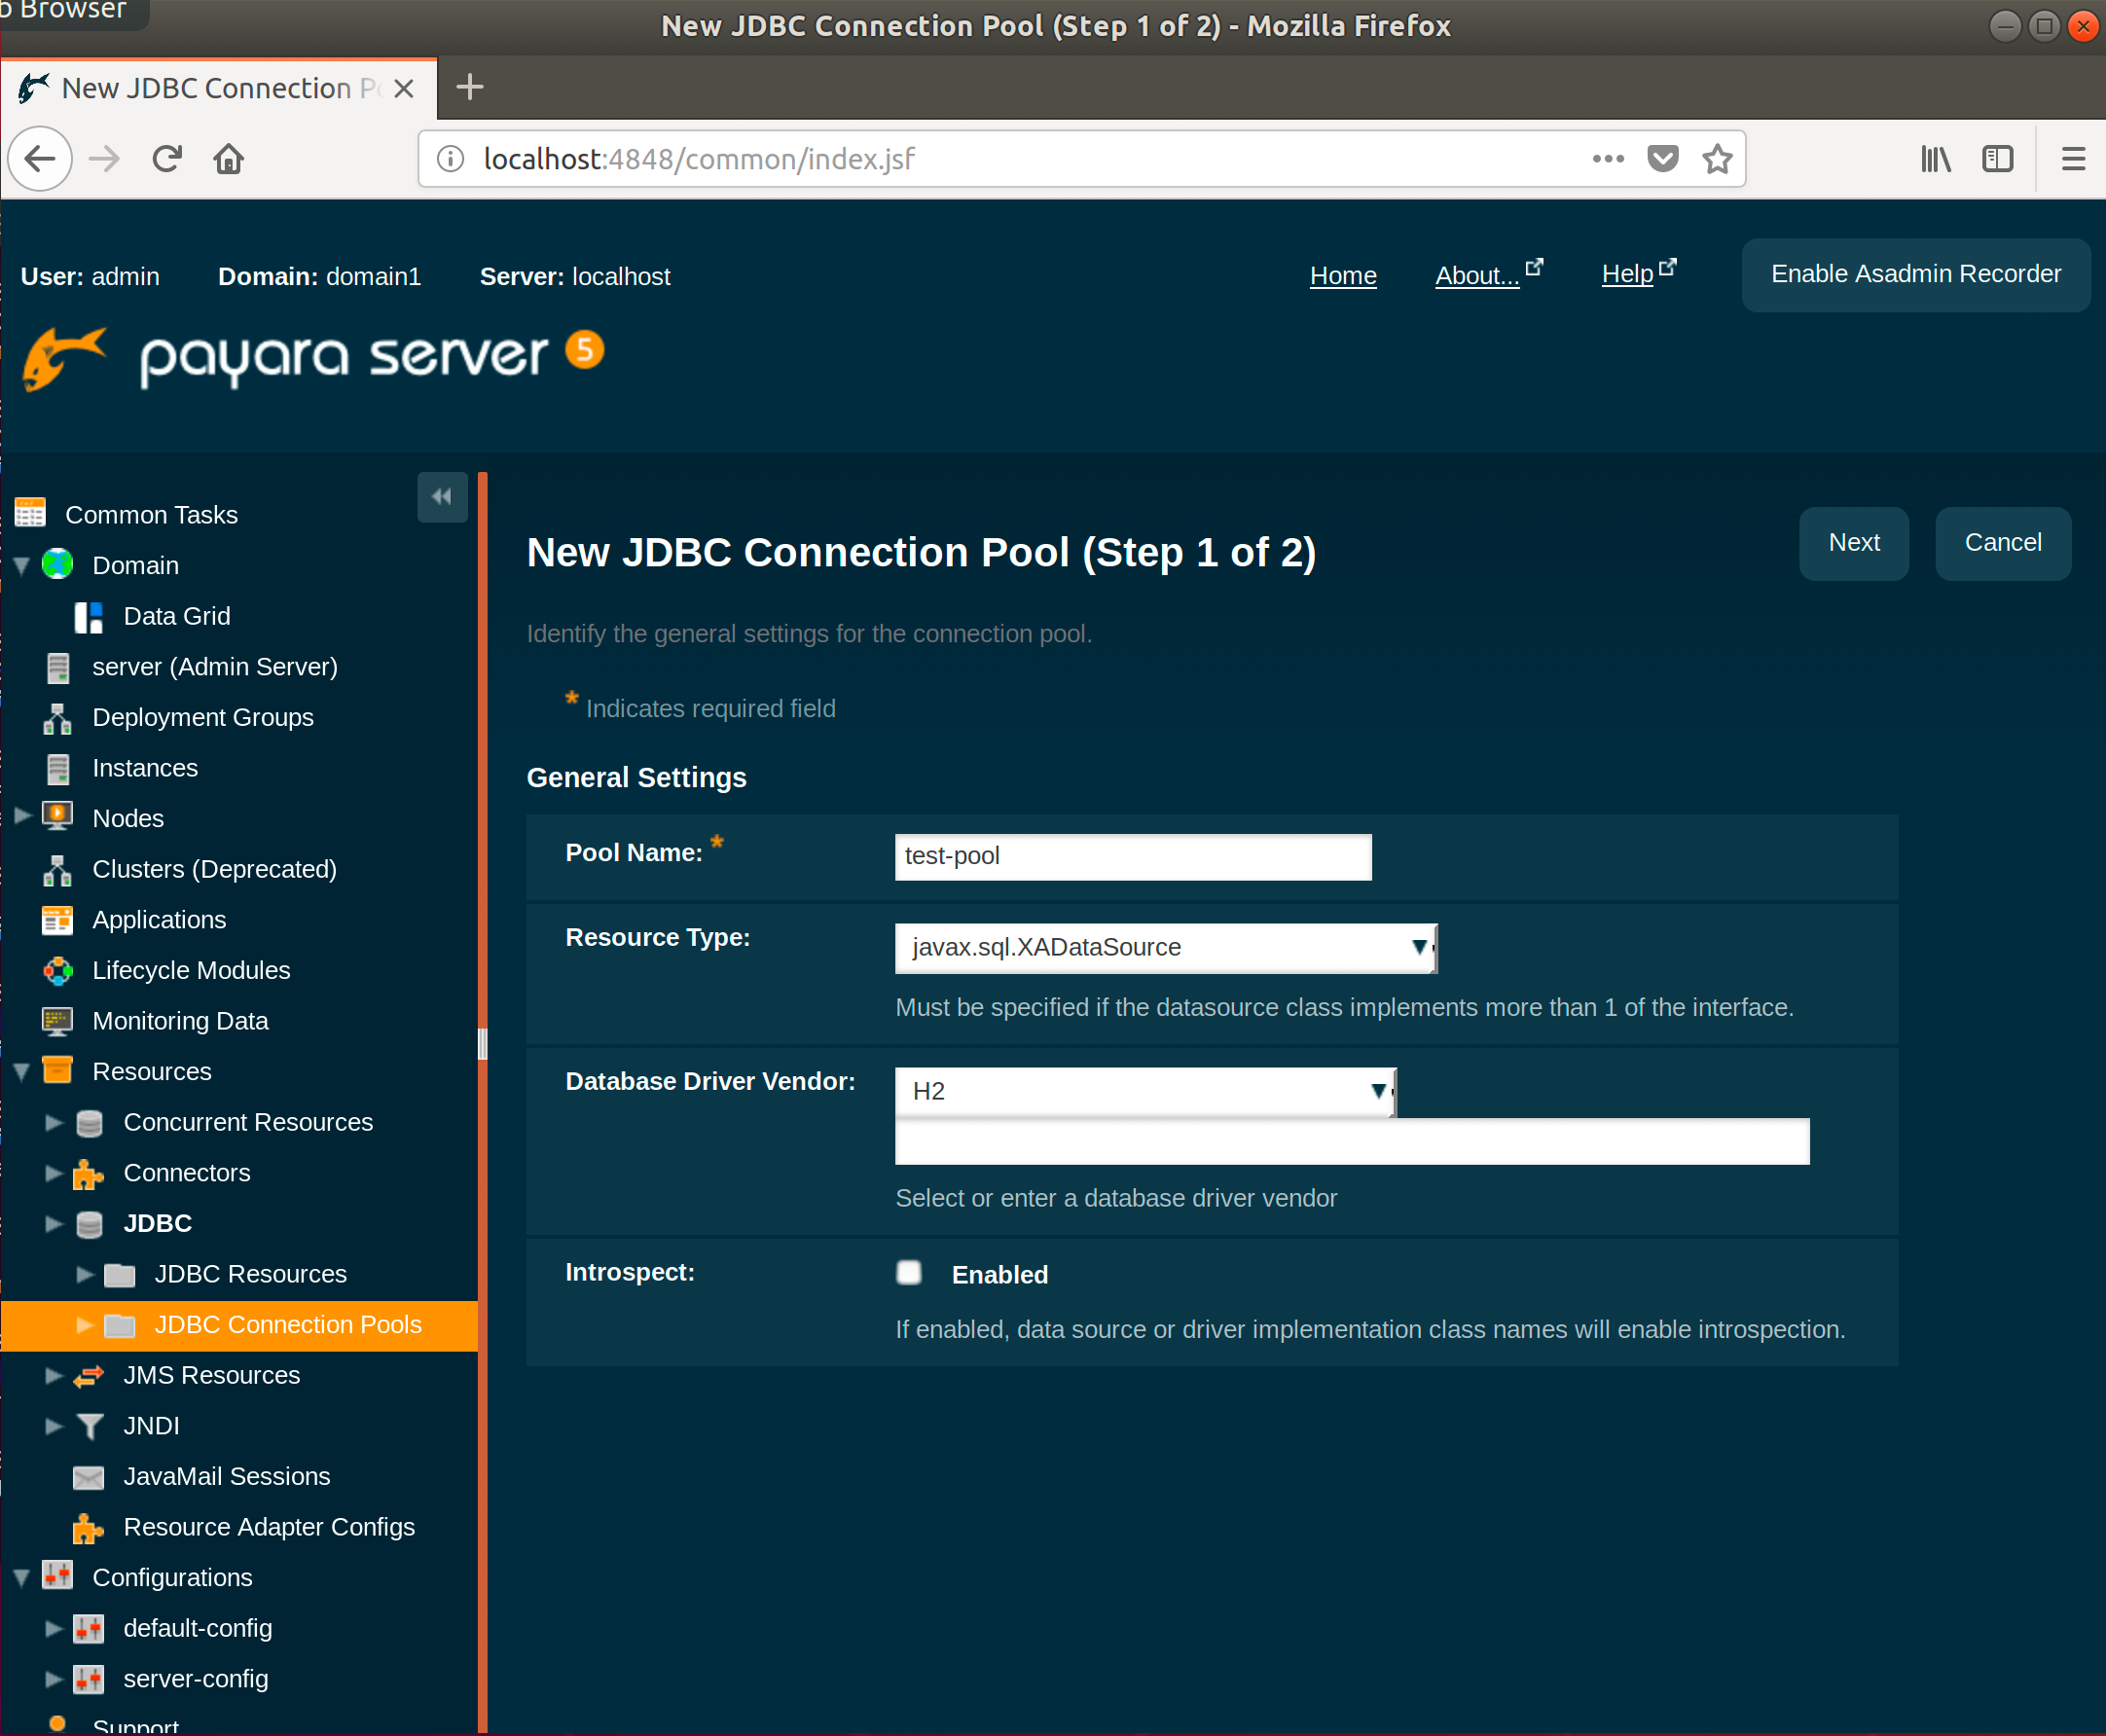
Click New and enter the following values:
- Pool Name - test-pool
- Resource Type - javax.sql.XADataSource
- Driver Vendor – H2
Click Next.
For this example I'll be using an in-memory database using H2 called "test". This is done by scrolling all the way down in the next shown screen and adding the following property:
url => jdbc:h2:mem:test
The other properties can be left at their defaults:
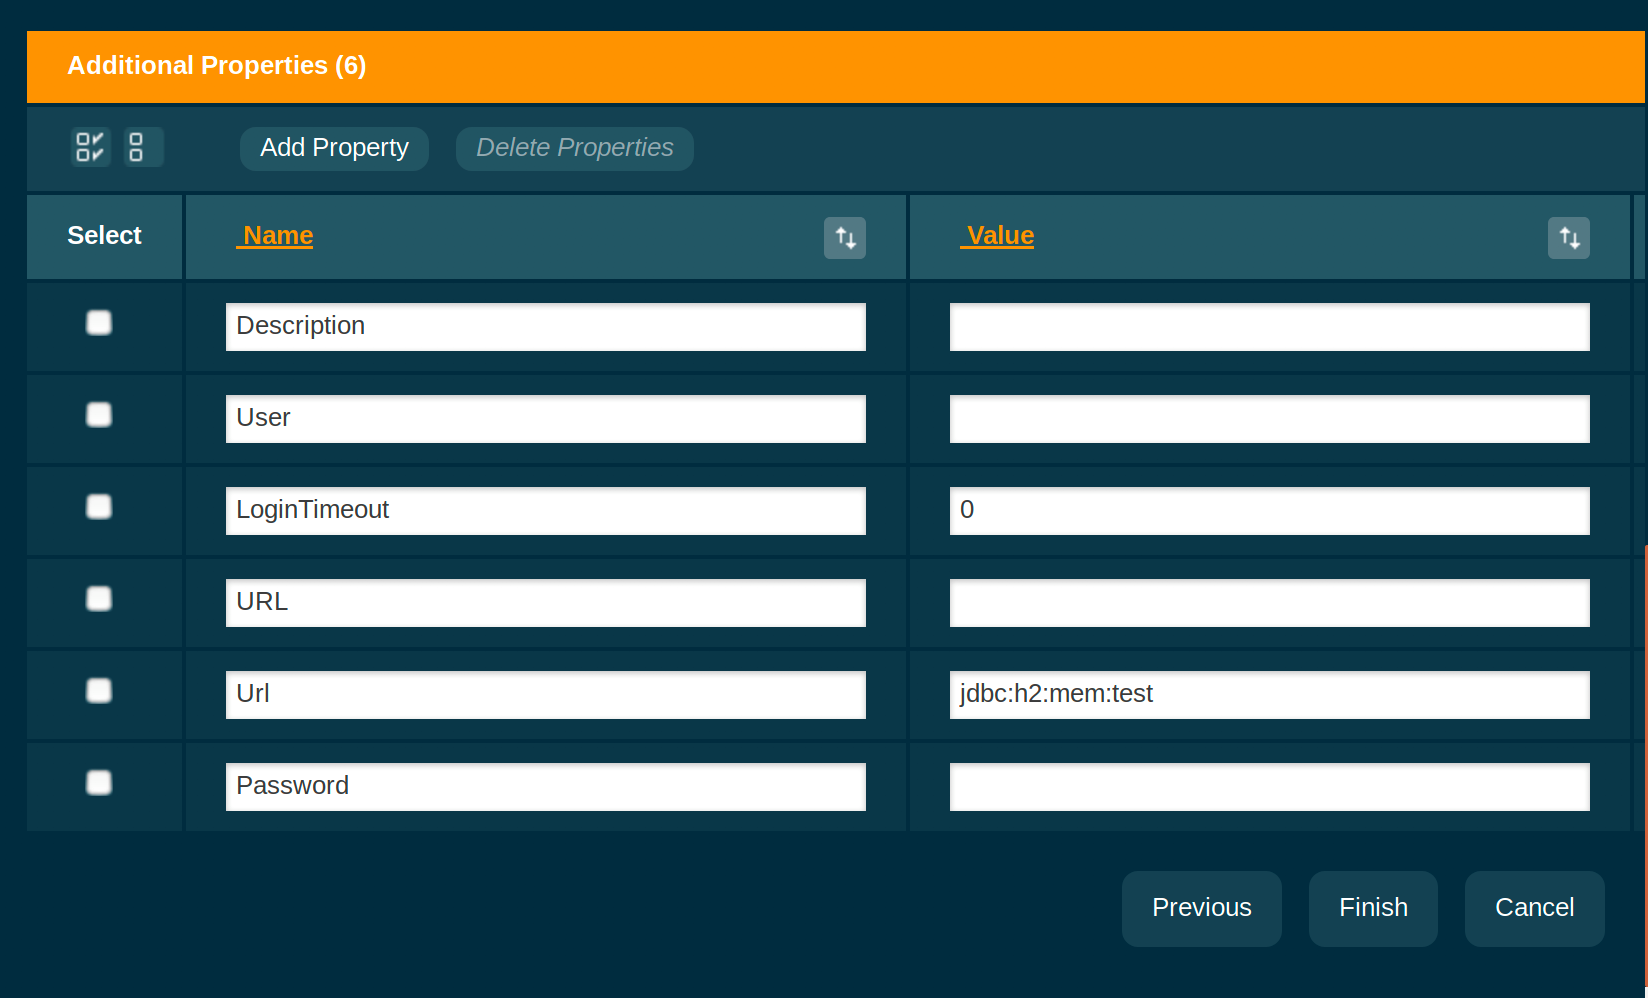
(Note that the properties shown here are dynamically scanned from the DataSource implementation that's being used, which in case of H2 is org.h2.jdbcx.JdbcDataSource)
Now click Finish, accepting all other default values.
Testing the Connection
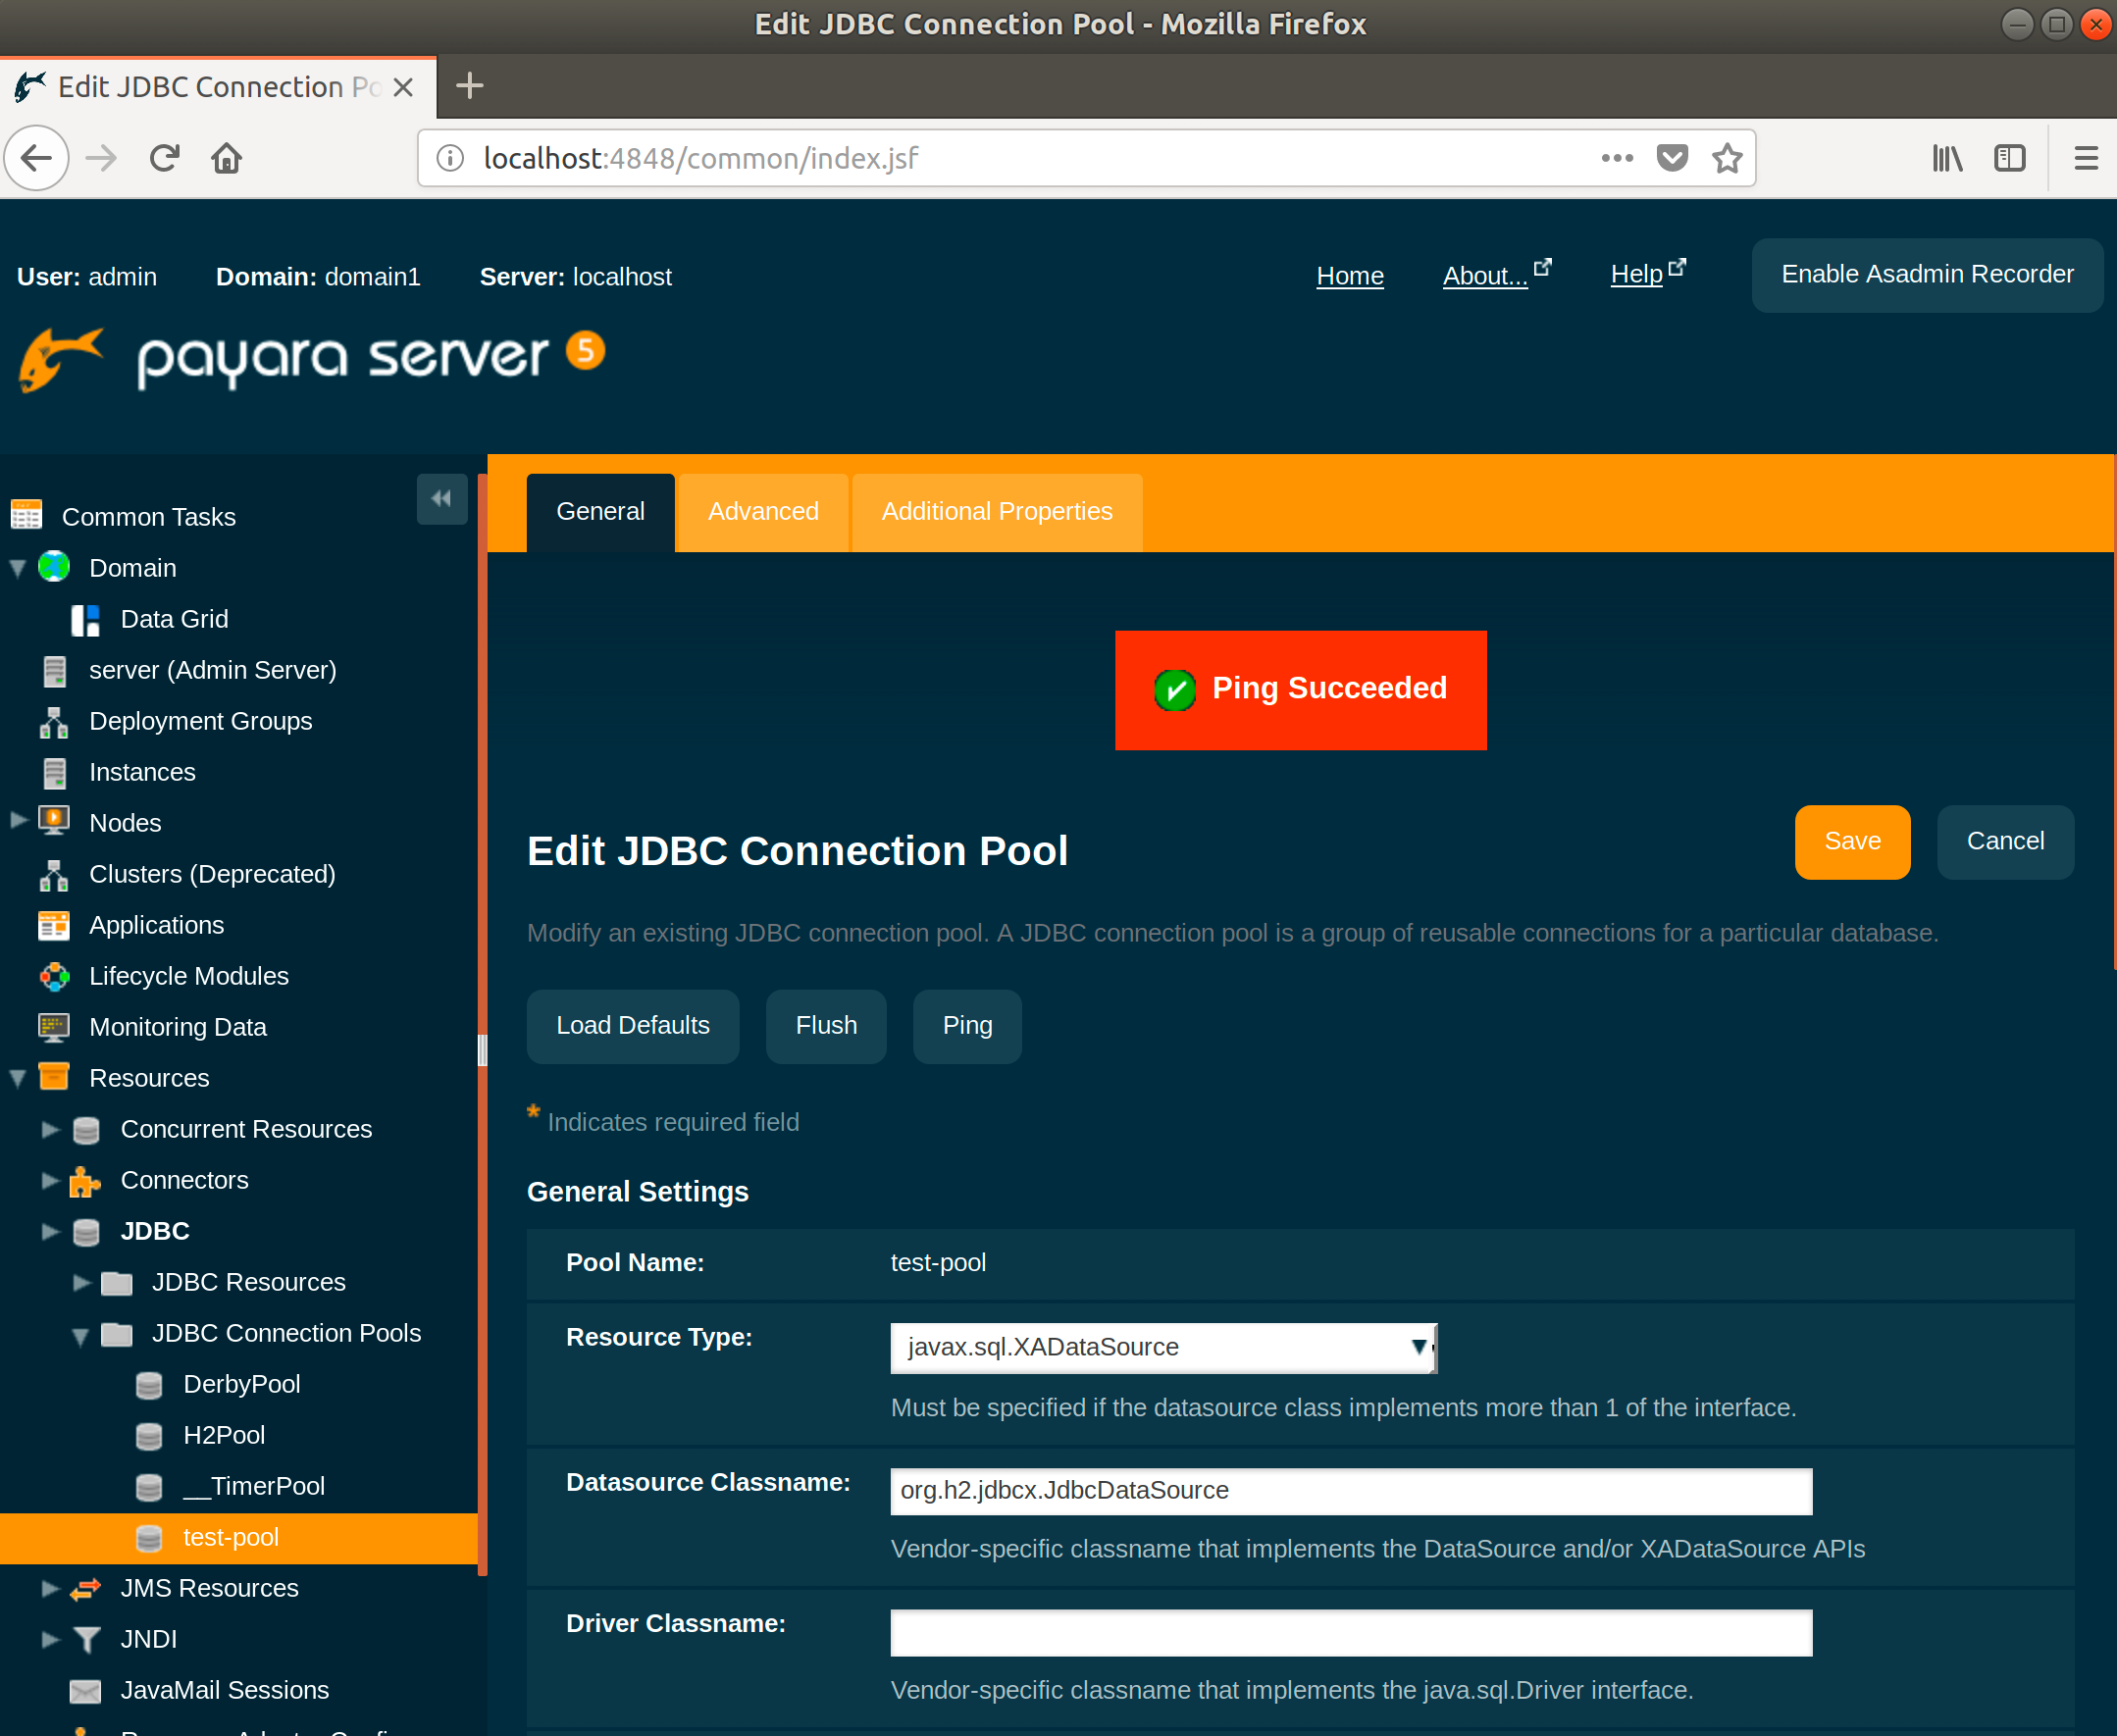
- Click on the connection pool name (test-pool).
- Click the Ping button at the top of the screen.
You should see a message stating Ping Succeeded.

Creating the Connection Pool - Via the Command Line
You can also create a connection pool using the Asadmin CLI Tool with the following:
./asadmin create-jdbc-connection-pool \
    --datasourceclassname org.h2.jdbcx.JdbcDataSource \
    --restype javax.sql.XADataSource \
    --property url="jdbc\:h2\:mem\:test" test-pool2
Note how the colons have to be escaped here. This is needed since the unescaped ones are used to delimit multiple properties and their values. For instance --property user=root:password=test:port=3306. Also note that I'll be using "test-pool2" for the pool created via the command line.
To test the connection from the command line run the following Asadmin CLI command:
./asadmin ping-connection-pool test-pool2
Creating the Connection Pool - Per Application Resources
The connection pools created above are server managed, global pools. This means they are applicable for all applications deployed to Payara Server. Via Jakarta EE annotations as well as deployment descriptors, we can create those per application as well. There's a difference though, and that's that via the Jakarta EE alternative a "data source" ("jdbc-resource"), is created together with the connection pool.
Using an annotation:
@DataSourceDefinition(
  name = "java:app/MyApp/MyDS",
  className = "org.h2.jdbcx.JdbcDataSource",
  url = "jdbc:h2:mem:test"
)
Using an entry in web.xml, ejb-jar.xml or application.xml.
<data-source>
  <name>java:app/MyApp/MyDS</name>
  <class-name>org.h2.jdbcx.JdbcDataSource</class-name>
  <url>jdbc:h2:mem:test</url>
</data-source>
Connection Pool Sizing
Connection pools should be sized to cater for the maximum number of concurrent connections.
The maximum size should be set in accordance with the maximum number of client requests your system can process. If your application receives 100 requests and each of those requires a database connection then if your connection pool is anything less than 100 some of those requests will have to wait for a connection to either be created or become available.
The minimum size of the connection pool ensures that a number of connections to the database are always established - this means that if you have a pool with a minimum size of 10 and you receive 10 requests then all can retrieve a database connection without waiting for the pool to create a new connection.
There is always a trade off with setting these values as the minimum value requires that those connections are maintained regardless of system load and the maximum value could potentially require a large number of concurrent database connections.
These values will be different for everyone. There are no magic numbers so it's a case of understanding your application, what your expected load (both steady and worst case) will be, monitoring to see if this changes and setting values accordingly. As a general rule of thumb though, if you find yourself having to constantly increase the maximum value, say from 200 to 300, from 300 to 500 etc, then you may have to look at your software architecture. For instance, in a transaction processing system, saving each transaction independently to a database could perhaps be replaced with a system where multiple transactions are queued first, and then saved to a database in one go using a JDBC or JPA batch.
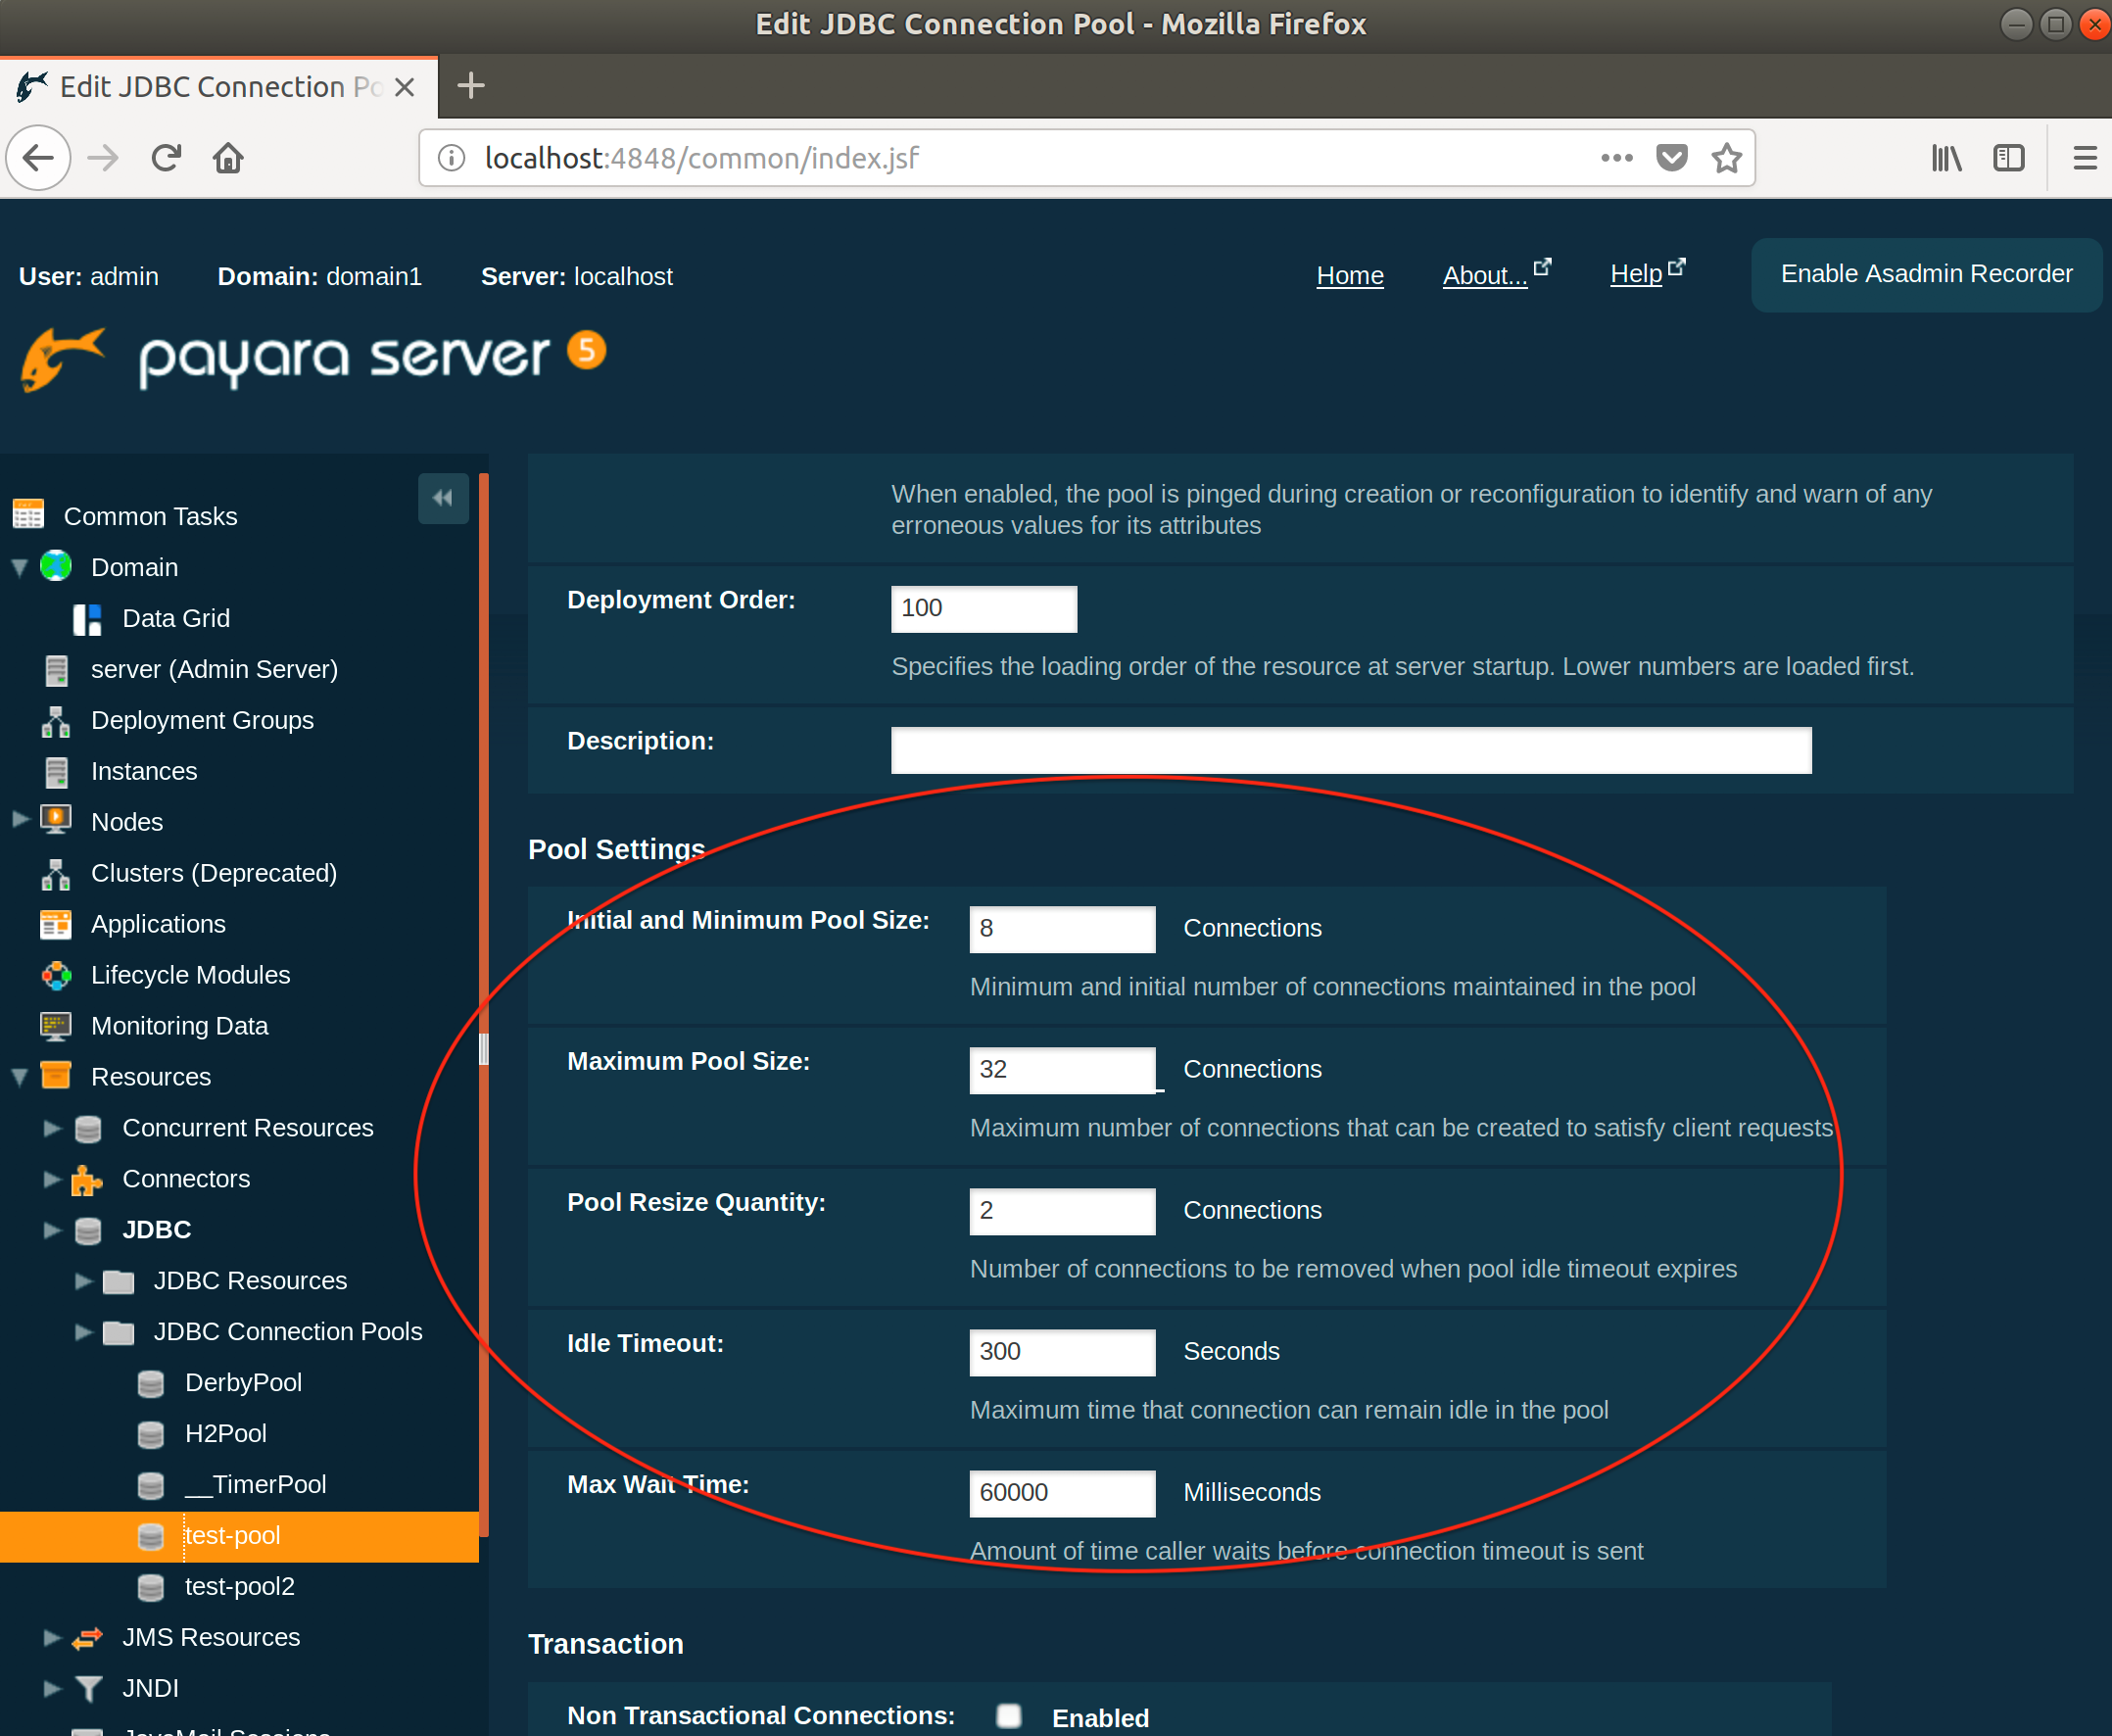
Setting Min/Max Sizes - Via the Admin Console
Click on the connection pool name and under Pool Settings you will find Initial and Minimum Pool Size and Maximum Pool Size. Set these to your required sizes.
Setting Min/Max Sizes - Via the Command Line
To set the initial & minimum pool size:
./asadmin set resources.jdbc-connection-pool.test-pool2.steady-pool-size=10
To set the maximum pool size:
./asadmin set resources.jdbc-connection-pool.test-pool2.max-pool-size=200
Creating Min/Max Sizes - Per Application Resources
Using an annotation:
@DataSourceDefinition(
  name = "java:app/MyApp/MyDS",
  className = "org.h2.jdbcx.JdbcDataSource",
  initialPoolSize = 10,
  minPoolSize = 10,
  maxPoolSize = 200,
  url = "jdbc:h2:mem:test"

)
Using an entry in web.xml, ejb-jar.xml or application.xml:
<data-source>
  <name>java:app/MyApp/MyDS</name>
  <class-name>org.h2.jdbcx.JdbcDataSource</class-name>
  <initial-pool-size>10</initial-pool-size>
  <max-pool-size>200</max-pool-size>
  <min-pool-size>10</min-pool-size>
  <url>jdbc:h2:mem:test</url>
</data-source>
Note that Payara Server's steady-pool-size property translates to two standard properties here, while coincidentally max-pool-size has the exact same name in the standard descriptors.
Connection Validation
Connection validation ensures that connections aren't assigned to your application after the connection has already gone stale.
Connection validation is always a trade-off between how sure you want to be that a connection is valid and the performance impact from validation. There will be a negative performance impact by having to return an invalid connection by your application and borrow a new one, so finding the right balance is key.
Before using a connection from the pool a simple query is sent to test the connection. If their is an issue with the connection it is removed from the pool and another one used. The issue here is that if you have an issue such as the database being down and you have a large number of connections then each of those connections will be tested and removed.
In order to avoid this you can set connection validation so that if a connection fails all connections are closed.
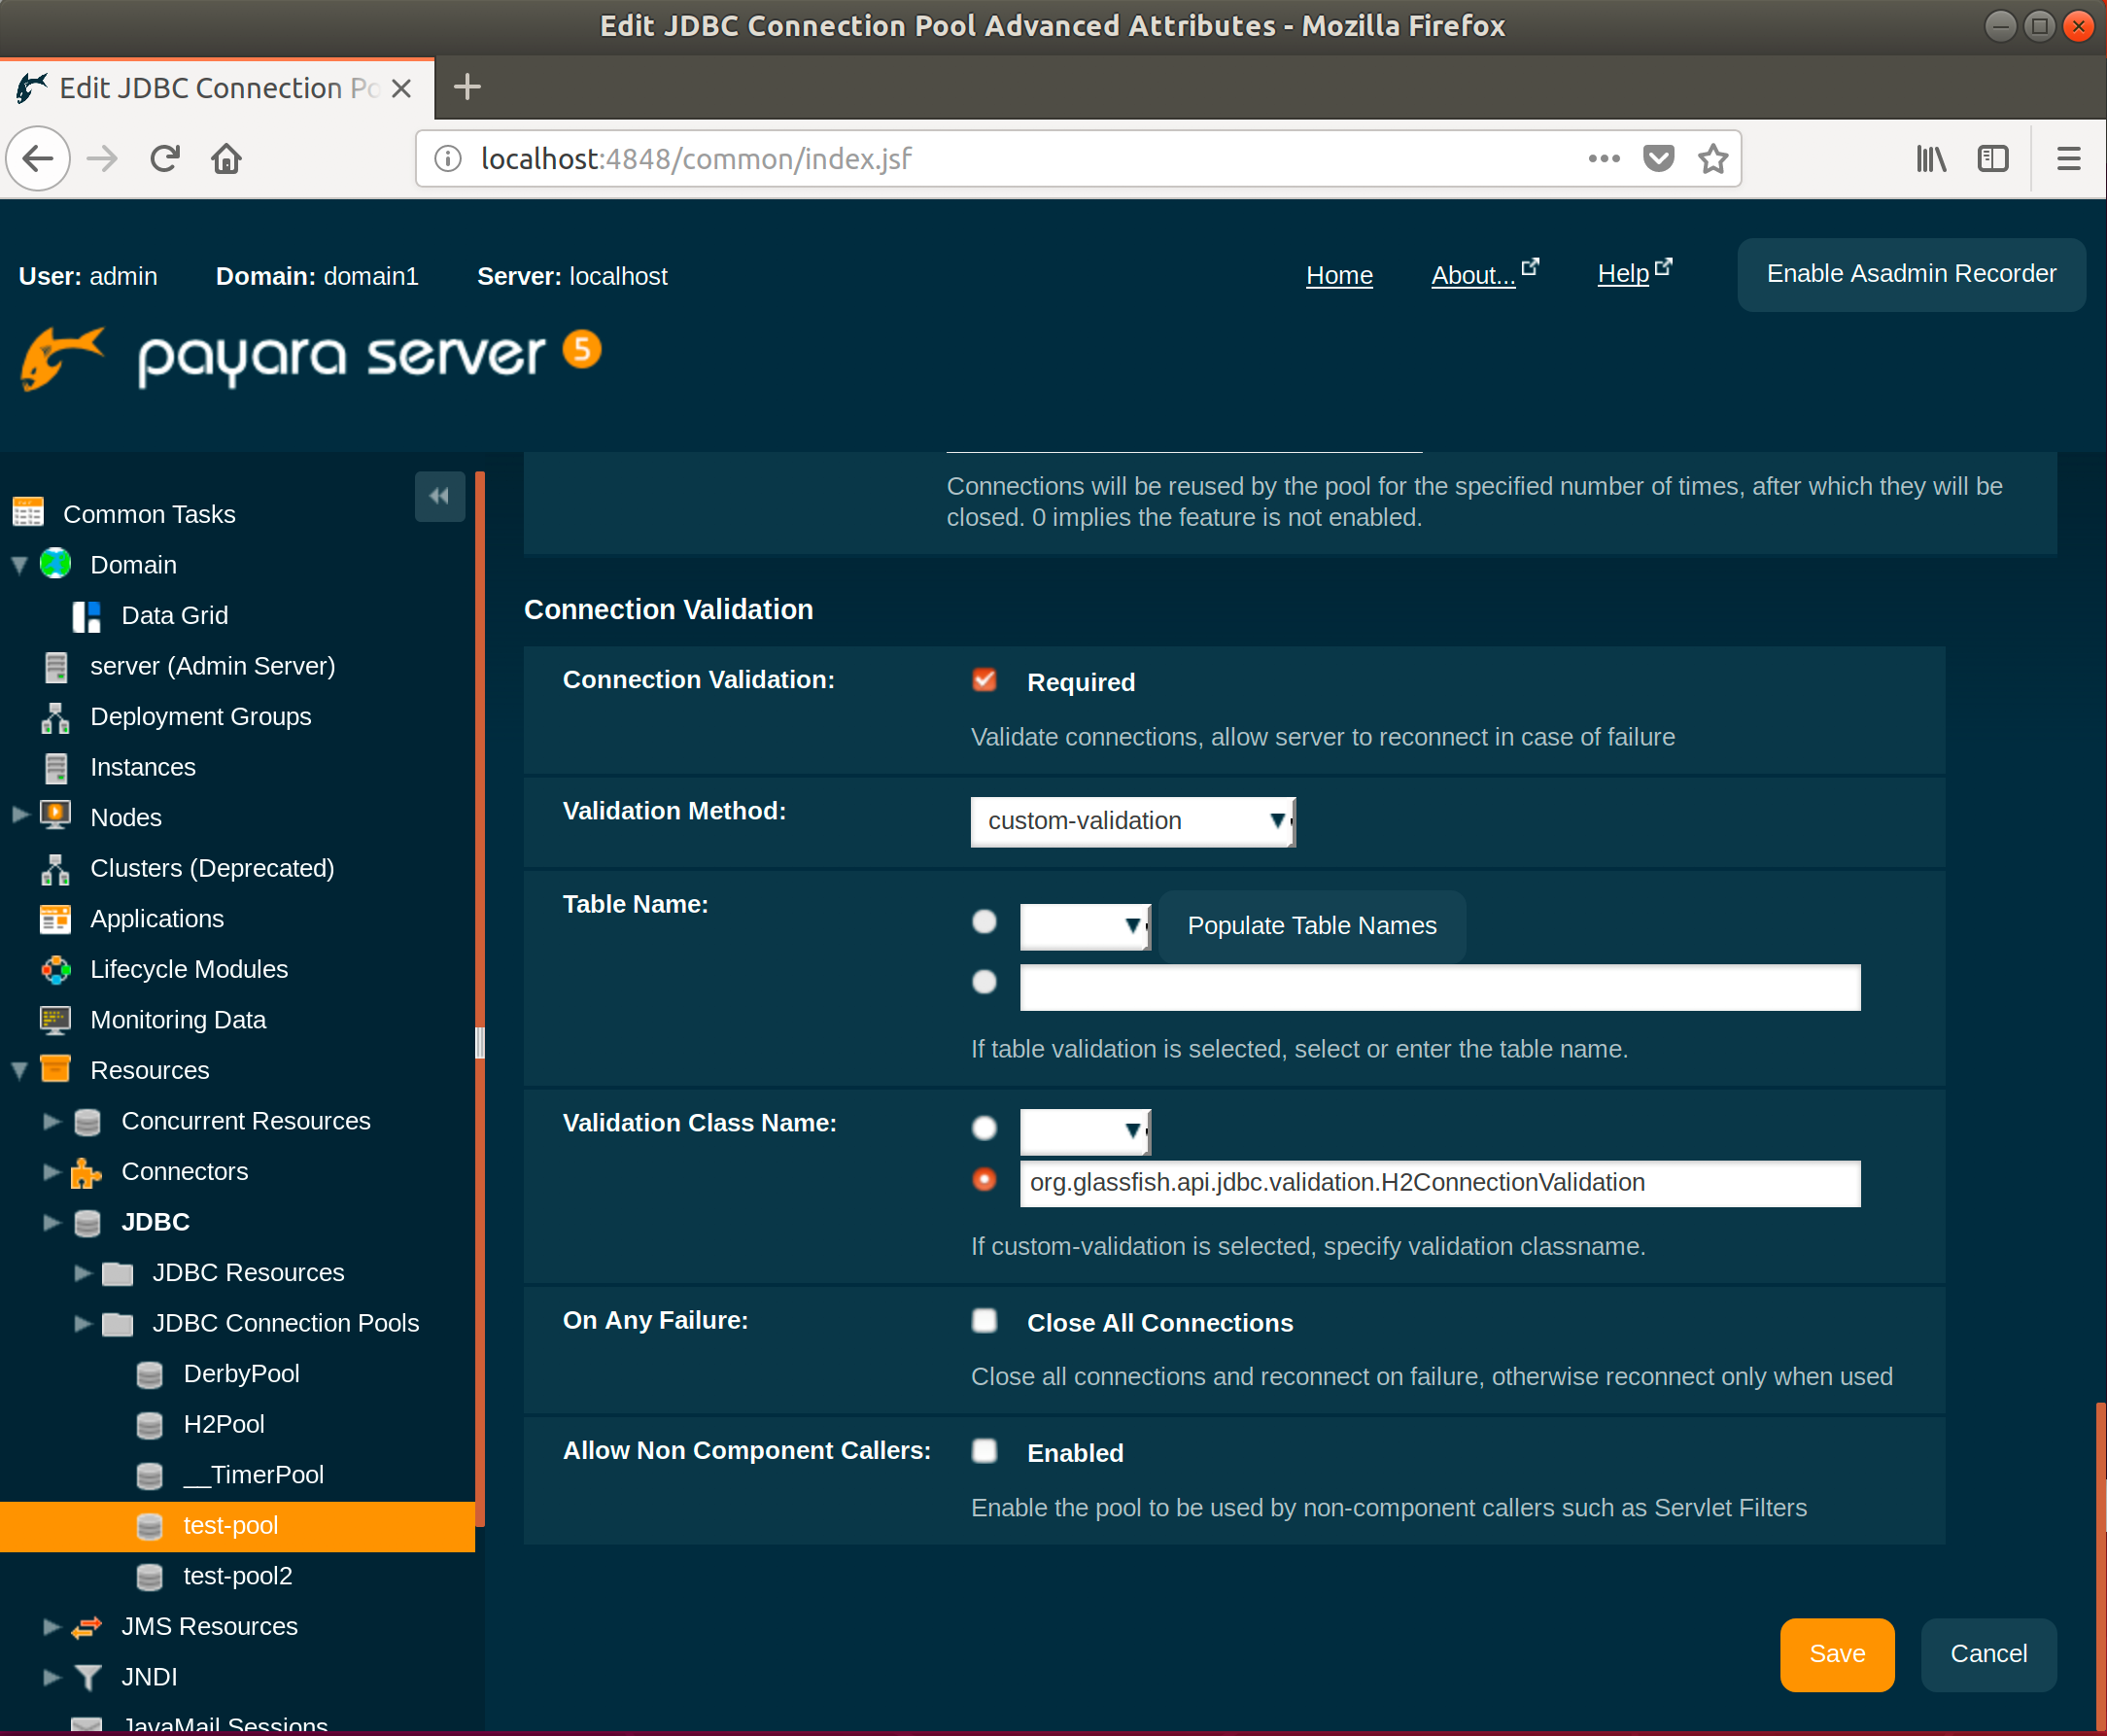
Connection Validation - Via the Admin Console
- Click on the name of the pool
- Select the advanced tab
- Scroll down to Connection Validation and select the following settings:
- Connection Validation - required
- Validation method - custom-validation
- Validation class name – org.glassfish.api.jdbc.validation.H2ConnectionValidation
From the same screen you can also set whether to close all connections on failure.
Connection Validation - Via the Command Line
To turn on connection validation :
./asadmin set resources.jdbc-connection-pool.test-pool2.is-connection-validation-required=true
./asadmin set resources.jdbc-connection-pool.test-pool2.connection-validation-method=custom-validation
./asadmin set resources.jdbc-connection-pool.test-pool2.validation-classname=org.glassfish.api.jdbc.validation.H2ConnectionValidation
You can also set whether to close all connections on failure with the following command:
./asadmin set resources.jdbc-connection-pool.test-pool2.fail-all-connections=true
Connection Validation - Per Application Resources
Using an annotation:
@DataSourceDefinition(
  name = "java:app/MyApp/MyDS",
  className = "org.h2.jdbcx.JdbcDataSource",
  initialPoolSize = 10,
  minPoolSize = 10,
  maxPoolSize = 200,
  url = "jdbc:h2:mem:test",
  properties = {
    "fish.payara.is-connection-validation-required=true",
    "fish.payara.connection-validation-method=custom-validation",
    "fish.payara.validation-classname=org.glassfish.api.jdbc.validation.H2ConnectionValidation"
  })
)
Using an entry in web.xml, ejb-jar.xml or application.xml:
<data-source>
  <name>java:app/MyApp/MyDS</name>
  <class-name>org.h2.jdbcx.JdbcDataSource</class-name>
  <url>jdbc:h2:mem:test</url>
  <property>
    <name>fish.payara.is-connection-validation-required</name>
    <value>true</value>
  </property>
  <property>
    <name>fish.payara.connection-validation-method</name>
    <value>custom-validation</value>
  </property>
  <property>
    <name>fish.payara.validation-classname</name>
    <value>org.glassfish.api.jdbc.validation.H2ConnectionValidation</value>
  </property>
  <initial-pool-size>10</initial-pool-size>
  <max-pool-size>200</max-pool-size>
  <min-pool-size>10</min-pool-size>
</data-source>
Note that there are no standard properties corresponding to connection validation. Payara Server supports setting these as vendor specific properties. These properties are normally mainly intended as data source properties. The Jakarta EE / common annotations spec makes no clear distinction between properties intended for the data source and those intended for the connection pool. Payara Server makes this distinction by prefixing properties intended for the pool with "fish.payara.".
See "Advanced Connection Pool Properties in Deployment Descriptors" in the Payara Platform documentation for more information.
Statement and Connection Leak Detection
Statement and Connection Leak Detection allows you to set time-outs so that if Statements or Connections haven't been closed by an application they can be logged and/or closed.
In testing I would recommend setting it so that leaks are simply logged but not closed. However, in production I would recommend that leaks are closed. If you have tested thoroughly enough then there shouldn't be any but if there are you don't want to leave them open. Monitoring software should be configured to alert on detected leaks and then further investigation can take place and fixes can be put in place.
By default these values are set to 0 meaning detection is turned off.
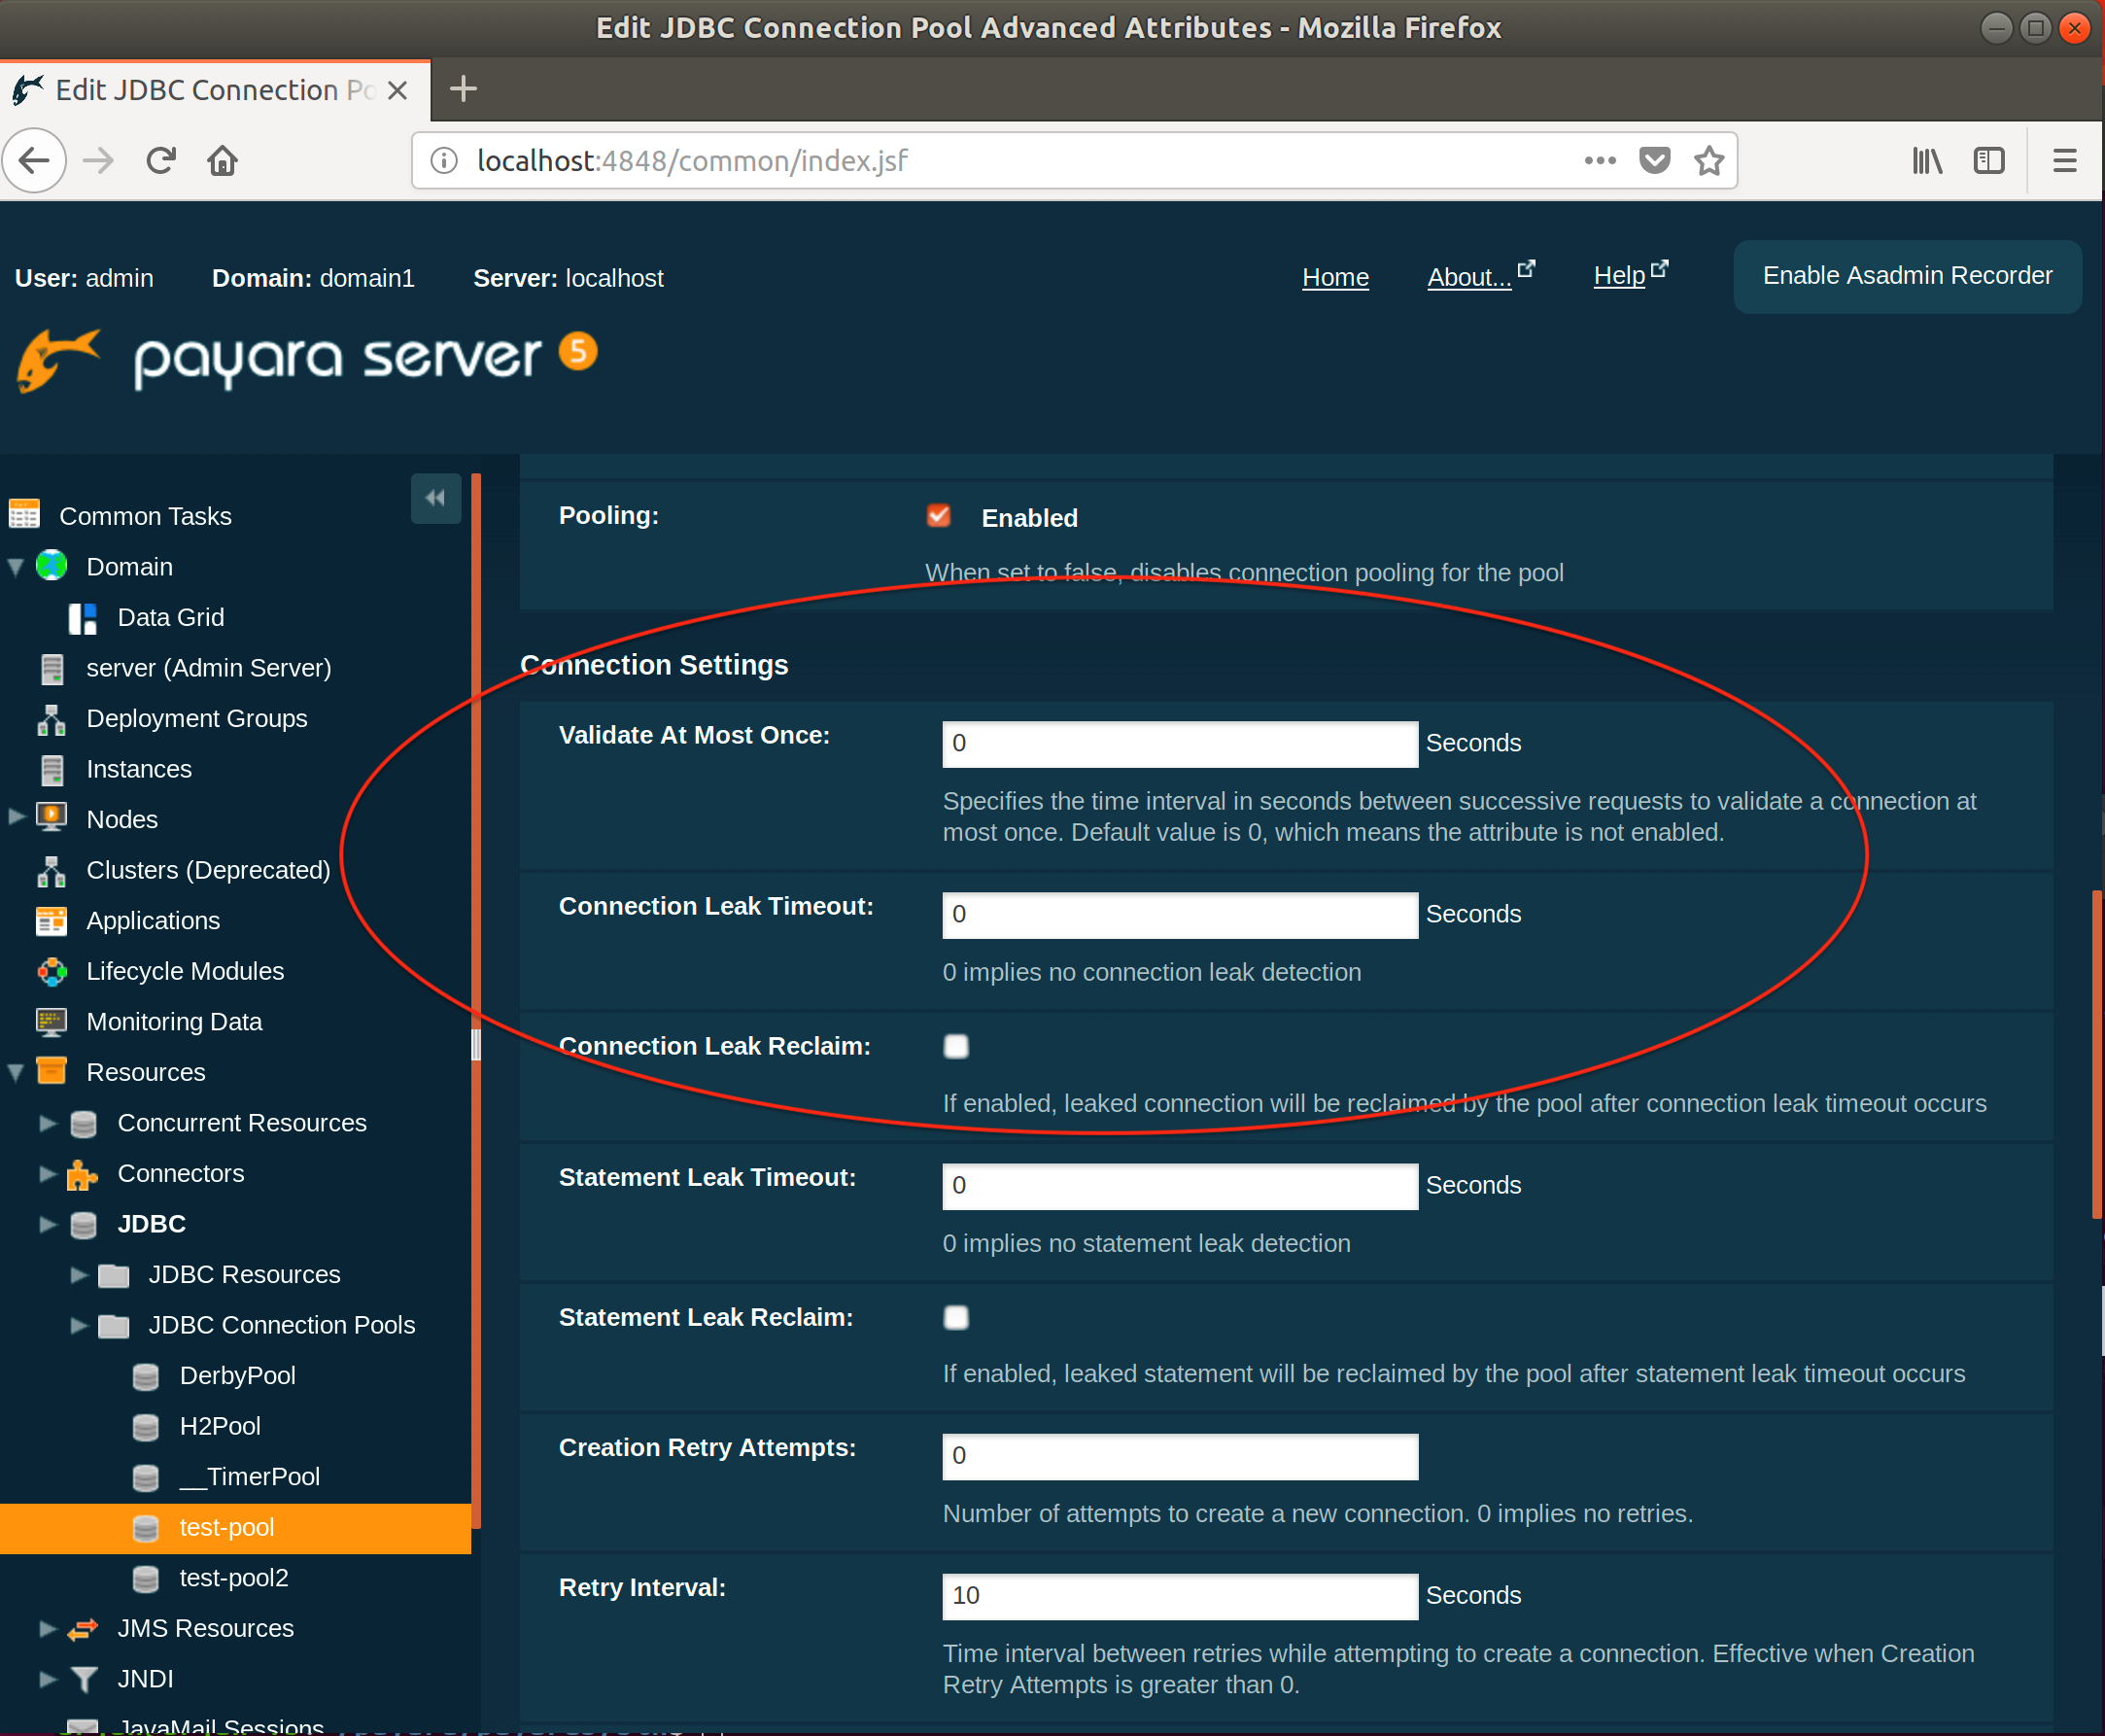
Setting Statement and Connection Leak Detection - Via the Admin Console
- Click on the name of the pool
- Select the advanced tab
- Scroll down to Connection Settings
- Set the Connection Leak Timeout and Statement Leak Timeout value
Setting Statement and Connection Leak Detection - Via the Command Line
You can set the time-out values with the following commands:
./asadmin set resources.jdbc-connection-pool.test-pool2.statement-leak-timeout-in-seconds=5
./asadmin set resources.jdbc-connection-pool.test-pool2.connection-leak-timeout-in-seconds=5
Setting Statement and Connection Leak Detection - Per Application Resources
Using an annotation:
@DataSourceDefinition(
  name = "java:app/MyApp/MyDS",
  className = "org.h2.jdbcx.JdbcDataSource",
  initialPoolSize = 10,
  minPoolSize = 10,
  maxPoolSize = 200,
    url = "jdbc:h2:mem:test",
    properties = {
        "fish.payara.is-connection-validation-required=true",
        "fish.payara.connection-validation-method=custom-validation",
        "fish.payara.validation-classname=org.glassfish.api.jdbc.validation.H2ConnectionValidation",
        "fish.payara.connection-leak-timeout-in-seconds=5",
        "fish.payara.statement-leak-timeout-in-seconds=5"
    })
)
Using an entry in web.xml, ejb-jar.xml or application.xml:
<data-source>
  <name>java:app/MyApp/MyDS</name>
  <class-name>org.h2.jdbcx.JdbcDataSource</class-name>
  <url>jdbc:h2:mem:test</url>
  <property>
    <name>fish.payara.is-connection-validation-required</name>
    <value>true</value>
  </property>
  <property>
    <name>fish.payara.connection-validation-method</name>
    <value>custom-validation</value>
  </property>
  <property>
    <name>fish.payara.validation-classname</name>
    <value>org.glassfish.api.jdbc.validation.H2ConnectionValidation</value>
  </property>
  <property>
    <name>fish.payara.connection-leak-timeout-in-seconds</name>
    <value>5</value>
  </property>
  <property>
    <name>fish.payara.statement-leak-timeout-in-seconds</name>
    <value>5</value>
  </property>
  <initial-pool-size>10</initial-pool-size>
  <max-pool-size>200</max-pool-size>
  <min-pool-size>10</min
-pool-size>
</data-source>
Once these values are set if connection or statement leaks are detected you will see messages similar to the ones below in the application log.
WARNING: A potential connection leak detected for connection pool test-pool. The stack trace of the thread is provided below:
WARNING: A potential connection leak detected for connection pool test-pool. The stack trace of the thread is provided below:
WARNING: A potential statement leak detected for connection pool test-pool. The stack trace of the thread is provided below:
At this point you can go back to your development team and get them to investigate the root cause.
Conclusion
Well, that's it for this blog. We've looked at a brief overview of Connection Pools, how to create and configure them in Payara Server along with a few best practice settings to consider.
As with all server configuration settings you should always take a close look at your application's needs before making changes. You should always performance test and load test your application to ascertain the best settings, particularly before making changes in production. One size does not fit all! Once you have decided upon the optimal settings you should then monitor and re-evaluate regularly to ensure you are always running with the best settings.
Need Help With Payara Platform in Production?
Learn about Payara Enterprise

Related Posts
The Payara Monthly Catch - July 2025
Published on 31 Jul 2025
by Chiara Civardi
0 Comments

Your Round-Up of the Latest Java & Jakarta EE News.
Welcome aboard the July issue of The Monthly Catch. As always, we’re bringing you the latest updates, product news and expert resources from across the Payara ecosystem.
This month, we’re ...
Multi-stage Docker Builds for Efficient Jakarta EE Deployments with Payara
Published on 17 Jul 2025
by Luqman Saeed
0 Comments

Enterprise Jakarta EE applications require extensive tooling during development - Maven for dependency management, full JDKs for compilation, and various build utilities. However, production environments need only the compiled application and ...