
Originally published on 06 Jul 2017
Last updated on 14 Jul 2017

Security is always a concern you must have when implementing applications that will run in production environments. Both the JVM and Payara Server have a strong tool set of security implementations for most use cases in the industry, so you won’t have to worry about implementing your own security measures from scratch.
Even if you implement all security measures needed to protect the integrity and confidentiality of your data, considering the human component of your application is something many engineers tend to forget! Identifying who can access sensitive data in your application at specific times, and how, is a crucial task that can be eased with the audit-logging capabilities that come into Payara Server. Security Auditing is the process of identifying and registering specific security events (like authentication and authorization events executed by the JACC container) and creating an audit trail that can be used to determine the effectiveness of these measures.
Audit Logging in Payara Server
Audit Modules
Payara Server allows the integration of special audit modules that can be used to create audit trails of all authentication and authorization decisions. Audit modules are simple POJO (Plain Old Java Object) classes that can be used to programmatically take special actions when authentication or authorization events are triggered by the JACC container.
Every Audit module must extend the com.sun.appserv.security.AuditModule class, which is an abstract class that offers a collection of operation methods that can be used to identify successful or unsuccessful authorization events identified by the JACC container. Here is the structure of this class:
AuditModule class
package com.sun.appserv.security;

import com.sun.enterprise.security.BaseAuditModule;
import java.util.Properties;
import javax.servlet.http.HttpServletRequest;

public abstract class AuditModule extends BaseAuditModule {

    public void webInvocation(String user, HttpServletRequest req, String type, boolean success) {
    }

    public void ejbInvocation(String user, String ejb, String method, boolean success) {
    }

    public void webServiceInvocation(String uri, String endpoint, boolean success) {
    }

    public void ejbAsWebServiceInvocation(String endpoint, boolean success) {
    }
}
An audit module implementation must provide overriding methods for the methods shown in the class. Here's a brief explanation of the purpose of each method:
webInvocationUsed to audit all HTTP request authorization events directed through the web container. This method has access to the user that makes the request, the request object, the type of permission verified (eitherhasUserDataPermissionorhasResourcePermission) and a flag that determines whether the authorization was successful or not.ejbInvocationUsed to audit authorization events for EJB method calls directed through the EJB container. This method has access to the user that tries to execute the method, the names of both the EJB and its method and a flag that determines whether the authorization was successful or not.webServiceInvocationUsed to audit authorization events for SOAP web service calls, during the validation of the Web Service request. This method applies to web services implemented using theServletmechanism. The method has access to the URL of the service's representation, the name of the endpoint called and a flag that determines whether the authorization was successful or not.ejbAsWebServiceInvocationUsed to audit authorization events for SOAP web service calls, during the validation of the Web Service request. This method applies to web services implemented using an EJB. The method has access to the name of the endpoint called and a flag that determines whether the authorization was successful or not.
The AuditModule class extends the BaseAuditModule class, which is responsible for auditing all authentication events identified by the JACC container, and presents some lifecycle method callbacks that can be used to correctly configure the module. Here is the structure of the class:
BaseAuditModule class
package com.sun.enterprise.security;

import java.util.Properties;

public abstract class BaseAuditModule {

    protected Properties props = null;

    public void init(Properties props) {
        this.props = props;
    }

    public void authentication(String user, String realm, boolean success) {
    }

    public void serverStarted() {
    }

    public void serverShutdown() {
    }
}
An audit module implementation must provide overriding methods for the methods shown in the class as well. Here's a brief explanation of the purpose of each method:
initUse this method to initialize the attributes of a module, using the properties received as parameters.authenticationUsed to audit all authentication events made by the JACC container. The method has access to the user that requested to be authenticated, the security realm used to verify the user's credentials and a flag that determines whether the authentication was successful or not.serverStartedThis method is called after the server has started so it can be used to prepare any resources or dependencies needed for the module to work correctlyserverShutdownThis method is called before the server's shutdown so it can be used to clean up any resources or dependencies used by the module.
Audit modules are easy to implement. Payara Server encourages developers to implement modules for the specific needs of their organizations. These modules are "pluggable", which means that you can add multiple modules and all of them will perform their audit operations on all security events! If you need a module to execute new actions based on a new business requirement, just develop the module implementation class and add it to the server! If a module is not needed anymore, it can be removed from the server just as easily (see example below).
Default Audit Module
Payara Server already comes with a simple audit module named default which you can locate in the server-config → Security → Audit Modules section in the administration console:
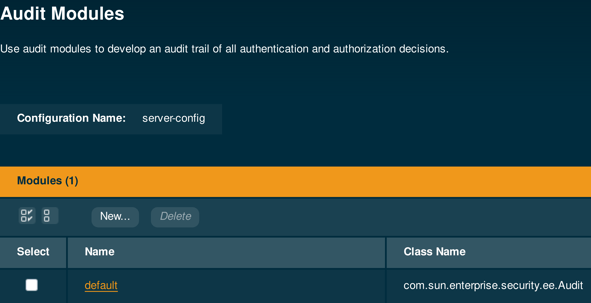
This audit module simply logs all authentication and authorization events to the server’s log under the javax.enterprise.system.core.security logger, creating a simple but useful audit trail. This module is disabled by default, so if you want to use it you must enable it first.
Example
To show an example of the audit trail created by this module, we will proceed to create a single test application and configure the audit module accordingly to check out the results.
First, we will proceed to create a sample Web application that will use secured REST endpoints to test the module.
Our application will consist of the following 4 components:
1 - A REST application configuration class:
@ApplicationPath("/resources")
public class ApplicationConfig extends Application{
}
2 - Two REST endpoints, each one with only one method path:
@Path("/message")
@RequestScoped
public class MessageTestEndpoint {

    @GET
    public String getMessage(){
        return "This is a test message";
    }
}
@Path("/execute")
@RequestScoped
public class ExecutionTestEndpoint {

    private static final Logger LOG = Logger.getLogger(ExecutionTestEndpoint.class.getName());

    @POST
    public void execute(String message){
        LOG.log(Level.INFO, "Got message: {0}", message);
    }
}
3 - A web.xml deployment descriptor that contains security constraints for our 2 endpoints:
<?xml version="1.0" encoding="UTF-8"?>
<web-app xmlns="http://xmlns.jcp.org/xml/ns/javaee"
     xmlns:xsi="http://www.w3.org/2001/XMLSchema-instance"
     xsi:schemaLocation="http://xmlns.jcp.org/xml/ns/javaee http://xmlns.jcp.org/xml/ns/javaee/web-app_3_1.xsd"
     version="3.1">
    <security-constraint>
        <display-name>Protected REST Resource for all users</display-name>
        <web-resource-collection>
            <web-resource-name>Test message endpoint</web-resource-name>
            <url-pattern>/resources/message/*</url-pattern>
            <http-method>GET</http-method>
        </web-resource-collection>
        <auth-constraint>
            <role-name>*</role-name>
        </auth-constraint>
    </security-constraint>
    <security-constraint>
        <display-name>Protected REST Resource for admin users</display-name>
        <web-resource-collection>
            <web-resource-name>Test execution endpoint</web-resource-name>
            <url-pattern>/resources/execute/*</url-pattern>
            <http-method>POST</http-method>
        </web-resource-collection>
        <auth-constraint>
            <role-name>admin</role-name>
        </auth-constraint>
    </security-constraint>
    <login-config>
        <auth-method>BASIC</auth-method>
    </login-config>
    <security-role>
        <role-name>admin</role-name>
    </security-role>
    <security-role>
        <role-name>normal</role-name>
    </security-role>
</web-app>
4 - A glassfish-web.xml deployment descriptor that declares the use of default group-to-role mapping (this is to make our example simpler):
<?xml version="1.0" encoding="UTF-8"?>
<!DOCTYPE glassfish-web-app PUBLIC "-//GlassFish.org//DTD GlassFish Application Server 3.1 Servlet 3.0//EN" "http://glassfish.org/dtds/glassfish-web-app_3_0-1.dtd">
<glassfish-web-app error-url="">
  <context-root>/audit-module-test</context-root>
  <property name="default-role-mapping" value="true">
    <description>Enable default group to role mapping</description>
  </property>
</glassfish-web-app>
You may have noticed that we have defined 2 roles: admin and normal. We are using the both roles to safeguard the /message/ endpoint and only the admin role to safeguard the /execute/endpoint.
Now, we need to configure the respective admin and normal groups on the server’s default security realm, file (notice that in the web.xml we aren’t configuring a specific realm, so it applies). We will create 2 test users: alice (admin) and bob (normal), with the following administration commands:
create-file-user --groups=admin --userpassword=alice --target=server-config --authrealmname=file alice
create-file-user --groups=normal --userpassword=bob --target=server-config --authrealmname=file bob
Notice that the username and password are same for the sake of simplicity.
Finally, we need to enable the default audit module so it can start logging authentication and authorization events. We can do this in the admin console by changing the auditOn property to true:
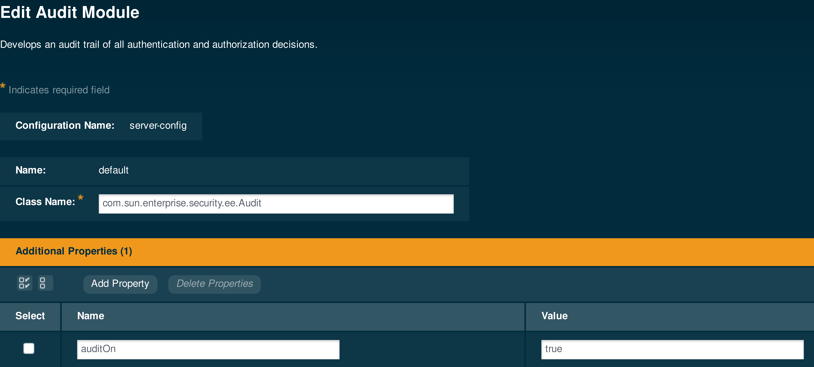
Or, we can also run the following administration command to achieve the same result:
asadmin set server.security-service.audit-module.default.property.auditOn=true
You need to enable the audit module feature on the server, so go to the server-config → Security section, and check the Audit Logging box to enable it:
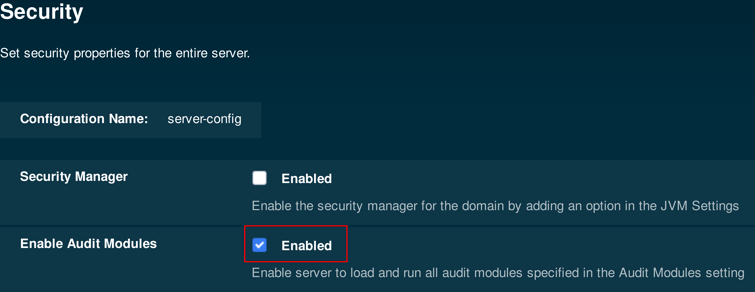
Make sure that the Audit Logging module is enabled, or this won't work!
The same result can be achieved by running the following administration command:
asadmin set configs.config.server-config.security-service.audit-enabled=true
Server Restart Required
After making the changes on the security configuration for the server, we need to restart the domain or instance to make sure these changes are applied correctly.
Having completed these steps, proceed to deploy the sample application.
Example 1 - An Audit Log for a Valid Request
We will test our application and the audit module behavior by using the cURL tool and send sample requests for the first endpoint (/message):
curl -u alice:alice http://localhost:8080/audit-module-test/resources/message
curl -u bob:bob http://localhost:8080/audit-module-test/resources/message
You will notice the following log entries in the server’s log that represent the successful authentication and authorization events for the test requests made for both users:
Info: Audit: Authentication for user = (alice) under realm = (file) returned = true
Info: Audit: [Web] Authorization for user = (alice) and permission type = (hasResourcePermission) for request GET /audit-module-test/resources/message returned =true
Info: Audit: Authentication for user = (bob) under realm = (file) returned = true
Info: Audit: [Web] Authorization for user = (bob) and permission type = (hasResourcePermission) for request GET /audit-module-test/resources/message returned =true
Example 2 - An Audit Log for an Invalid Request
Having done this, we will proceed to test the other endpoint (/execute) as well with 2 more sample requests using cURL too:
curl -u alice:alice -X POST http://localhost:8080/audit-module-test/resources/execute --data "This is a test message from alice"
curl -u bob:bob -X POST http://localhost:8080/audit-module-test/resources/execute --data "This is a test message from bob"
bob(since he doesn't have authorization to call this endpoint), along with the successful events of user alice and the log message printed from the endpoint's :Info: Audit: Authentication for user = (alice) under realm = (file) returned = true
Info: Audit: [Web] Authorization for user = (alice) and permission type = (hasResourcePermission) for request POST /audit-module-test/resources/execute returned =true
Info: Got message: This is a test message from alice
...
Info: Audit: Authentication for user = (bob) under realm = (file) returned = true
Info: Audit: [Web] Authorization for user = (bob) and permission type = (hasResourcePermission) for request POST /audit-module-test/resources/execute returned =false
See Part 2 - Creating a Custom Audit Module
Related Posts
Securing Jakarta EE Application Servers Needs Executive Attention
Published on 10 Sep 2025
by Asif Khan
0 Comments
%20Application%20Servers-An%20Executive%20Guide%20Cover.jpg?width=500&name=Securing%20Jakarta%20EE%20(Java%20EE)%20Application%20Servers-An%20Executive%20Guide%20Cover.jpg)
If your organization runs Jakarta EE applications, securing the application server they rely on is not a one-time project. Risks repeat unless leadership sets clear priorities, funds the right controls, and expects steady progress. This post ...
Why Java Developers Need to Help Their CTO Prioritise Security in 2025
Published on 26 Aug 2025
by Asif Khan
0 Comments

If you’re a Java developer, you probably feel sandwiched between frameworks nearing end-of-life, fresh Log4j headlines and endless security patch cycles. Fixing one vulnerability only to uncover another can feel like running on a treadmill.