
Originally published on 13 Nov 2018
Last updated on 13 Nov 2018

JConsole is a useful tool for monitoring Java processes. You can collect data from a Java process such as: heap memory usage, thread count, CPU usage, classes loaded and MBean data. This allows you to gauge whether any Java process is using too much system resources. This guide will show you how to monitor Payara as a local process (on the same machine), or a remote process. This blog will assume that you've got a valid JDK and Payara install.
JConsole is installed with most JDKs, so if you don't have a link to it as a GUI program, you will be able to run it manually from $JDK_HOME/bin/jconsole (.exe if you're on windows). Once it is running, you'll be faced with a screen that let's you select which process to monitor. You should also start Payara on the machine you'll be monitoring.
Monitoring a Local Instance
If Payara and JConsole are running on the same machine, you'll be given the option of a process looking similar to the one highlighted below.
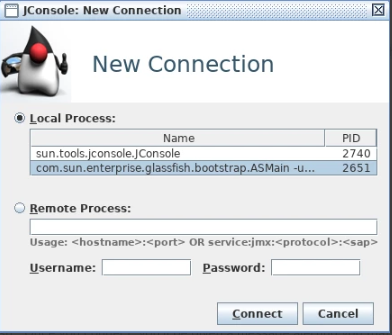
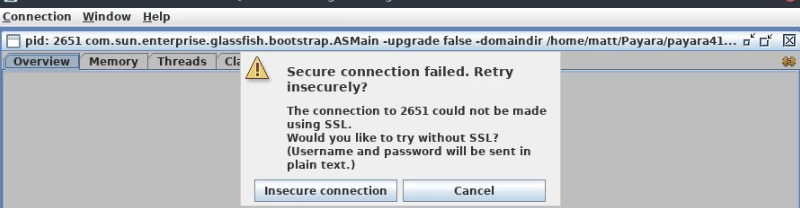
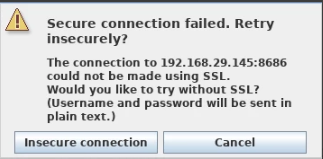
Assuming Payara and JConsole are running under the same user on the same machine, you'll spot it easily as the process name will contain "glassfish". Once you connect, you'll be given a message alerting you that you need to connect without SSL. This is okay as you're on the same machine, so you don't need a secure connection.
Monitoring a Remote Instance
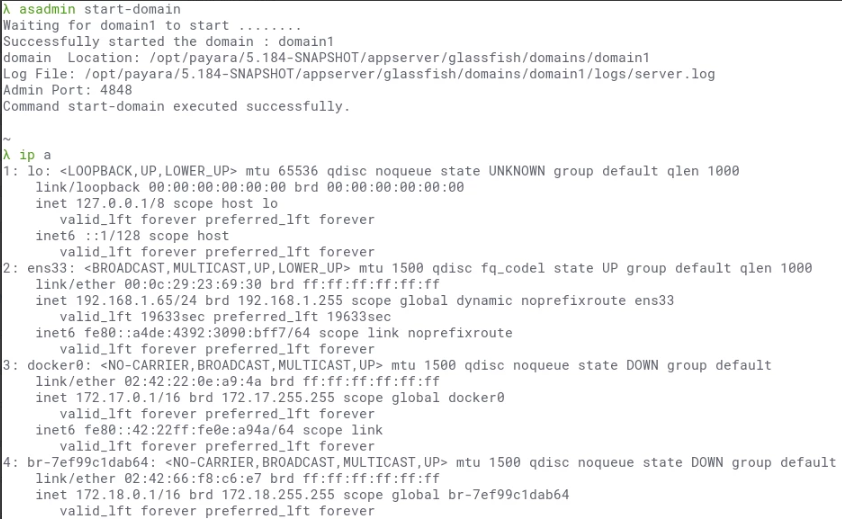
From your machine running Payara, startup the Payara instance. Make a note of the IP of your machine. For example, the one below is 192.168.1.65.
To connect remotely using JConsole, at least one of two requirements must be met:
- The connection is secure.
- The JMX connection is configured to listen on a single address.
By default, Payara is configured to listen on 0.0.0.0 (a wildcard corresponding to all addresses). Security is also disabled by default. By proxy this also means that remote JMX connections are not possible without some configuration changes. The next steps will guide you through both possible options.
Single Address Configuration
For security reasons, JMX can only be either over secure SSL or a single specified address. This means that you can, for example, limit JMX connections to local connections by only listening on the 192.168.xxx.xxx address. This prevents the outside world from monitoring your servers. To specify an address to listen on, you can either use the admin console or asadmin utility. After either of these methods, be sure to restart the server.
Asadmin

Admin Console
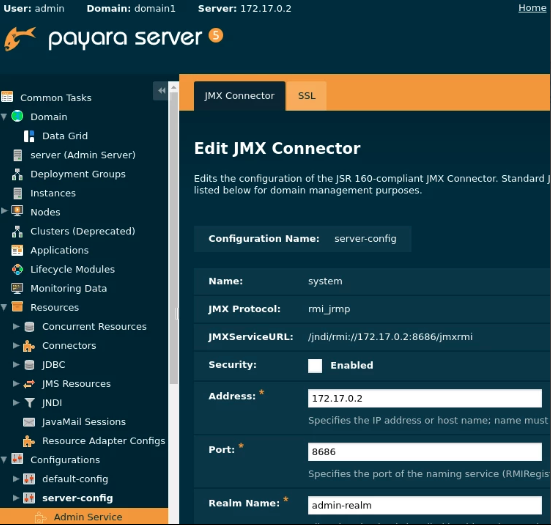
Go to [your-config]→Admin Service→JMX Connector. From here you'll see the JMX configuration options. At the top of the screen you can see the machine IP (172.17.0.2). This is the address I choose to specify for the JMX network address. If you don't want to connect with SSL, disable the 'security' option. Note that disabling security doesn't prevent the need to provide JConsole with the admin username and password if they are configured in a non standard way.
SSL Configuration
The only way to listen on 0.0.0.0 for JMX connections is to do so over SSL. Configuring SSL for JConsole isn't a straightforward process, but can be done in a small number of steps:
- Change the admin password (required for secure administration).
- Enable secure administration.
- Copy the keystore to the JConsole machine.
Firstly, the admin password must be changed. This can be done through the asadmin utility:

You will be prompted for the old admin password, which will be empty. If you have already configured an admin password, you can skip this step.
Secondly, secure administration must be enabled. This can be done either from the admin console (Server (Admin Server) → General → Secure Administration) or by running the asadmin enable-secure-admin command.
Thirdly, find a copy of the domain keystore on the remote machine. This is required since the SSL connection will provide the server certificate for authentication. JConsole accepts no certificates by default unless manually configured to do so. Because of this, a local copy of the keystore will be required to pass to JConsole.
Copying the keystore can be done using SCP if both machines are linux and the machine running Payara has an SSH server installed. The format for this command is as follows:
scp user@192.168.xxx.xxx:/payara5/glassfish/domains/running-domain/config/keystore.jks /path/to/local/directory
This command will copy the keystore (file which contains the provided server certificate) over to the local machine. Make sure that the keystore copied is the same one as from the running domain.
Once you have a copy of the keystore, run JConsole using the following command:
jconsole -J-Djavax.net.ssl.trustStore=/path/to/keystore.jks -J-Djavax.net.ssl.trustStorePassword=changeit
This will allow JConsole to trust the provided SSL certificate. The default password for the Payara keystores is 'changeit', although this should be changed if it's different for your own domain.
Once you've started JConsole in this manner, connecting should not prompt you to make an insecure connection.
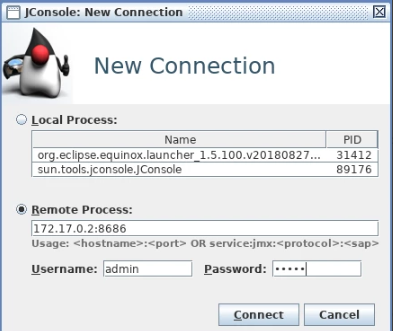
Connecting Remotely
Assuming JConsole is started, select 'remote process' from the menu. For the URL you'll want to enter: <hostname>:<port>. Remember that if you have enabled secure admin or otherwise changed the 'admin' user password for Payara Server, you'll need to specify this to JConsole regardless of whether 'security' is enabled for the JMX connector. The default port for JMX is 8686. Click connect, and wait for a connection.
If you haven't enabled secure connections, you'll need to select 'insecure connection' as with the local connection.
Once you've connected successfully, you'll be presented with the JConsole landing page:

Monitoring Data
The Overview tab is self explanatory. It provides a quick summary of commonly used statistics. You can limit the data to a specific timeframe before current, from as long as a year, to as short as a minute.
The Memory tab is for monitoring the memory usage of the Payara instance. It can show data like max memory usage, garbage collection time, as well as finely monitor heap and non—heap memory usage. If you want to be even more granular, you can break these memory types down into their components. There are lots of articles online explaining the different memory types, so I won't go into depth in this blog.
The Threads tab is for monitoring the amount of threads being used at a given moment, as well as further detail on each thread should you need it.
The Classes tab is for monitoring the amount of classes that are loaded or unloaded. Since Payara server is so large, this isn't a terribly useful tab unless you have something specific you're looking for.
The VM Summary tab is for giving information on the running JVM instance. This can be useful if you're looking for something specific, such as the running JVM arguments.
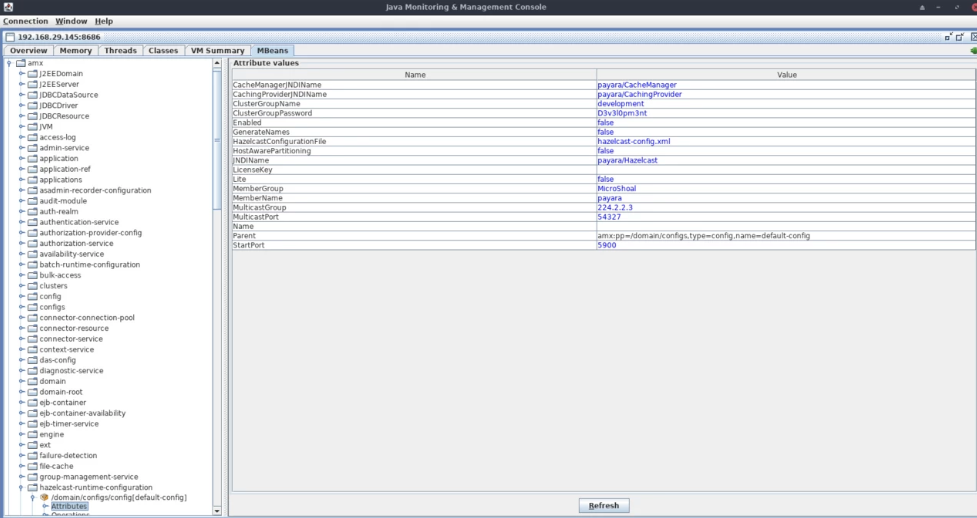
The MBeans tab is used for giving information on the managed beans running on the server. MBeans represent a device, an application, or any resource that needs to be managed. These can be useful for getting more granular information on a running application or some other information which can't be found in the other tabs. For example, for Payara you can find out the hazelcast information of an instance under amx → hazelcast-runtime-configuration → /domain/configs/config[default-config] → Attributes. This shows information such as the group name, group password, or whether it's enabled or not.
And that's how to monitor Payara using JConsole either locally or remotely! JConsole is an extremely useful tool in finding out information about a running Java program with almost no setup needed.
Give Payara Server a Try:

Related Posts
Join Live Webinar Series - Boost Your System Performance: Troubleshoot Faster & Cut GC Waste
Published on 07 Oct 2024
by Dominika Tasarz
0 Comments

We’re excited to invite you to two informative webinars happening later this month, which we're running in collaboration with yCrash.
During the first webinar, you will learn how to capture 16 essential artifacts that can dramatically ...
Ensuring Seamless Operations and Maximum Profitability: Key Insights on Application Server Efficiency and SLAs - Part 2
Published on 12 Aug 2024
by Chiara Civardi
0 Comments

Robust and efficient application servers are crucial for companies relying on software applications, whether supporting e-commerce platforms, financial services portals, or internal operations. To ensure smooth operations and deliver seamless ...