
Published on 20 Apr 2021
.jpg?width=200&name=Payara%20ECE%202018%20sponsor%20(2).jpg)
When a user needs to access multiple applications in your environment, you should not require authentication for each application. If the user has already been authenticated for one of the applications, he or she should should not be asked for credentials when he accesses one of the other applications during the same browser session. This concept is called Single Sign-on where the authentication credentials are 'shared' in the environment and can be used by any application in that environment.
The Single Sign-on principle became more important in the last few years as the idea of microservices is also applied to the front end - and thus your big application is now a set of smaller, connected apps. When you are using Micro Frontends or Self-Contained Systems, you should consider implementing a Single Sign-on strategy.
In this blog, I describe how you can implement a single sign-on strategy based on the Payara Realm concept which is useful when all the applications are running on the same Payara Server Domain. It doesn't need a third-party product to handle the Single Sign-on data.
Note: If your applications are running on a different domain you'll want to read the blog about using single sign-on via OpenIDConnect and Payara Platform.
Payara Realm
What is a realm? The term is confusing since it is used in different ways by different products. A realm determines the Authentication and Authorization info for the users of the applications deployed on the Payara Server. When accessing a protected resource, the realm asks for the credentials of the user, (through a Form entry for example), and compares it to the stored data. If successfully authenticated, the system can determine if the user is allowed to see the page or execute the action based on the roles it is assigned.
Within Payara Server, there are many realms available by default, including a File-based realm, LDAP-based, PAM and Solaris integrated. There are also custom realms that can be created and used by Payara Server.
In this blog, I use the File Realm in the single sign-on example, but any realm can be used. The following Asadmin CLI commands create a specific Group and a user. The password for the user is requested interactively.
./asadmin set configs.config.server-config.security-service.auth-realm.file.property.assign-groups=Users
./asadmin create-file-user --groups=Users --target=server-config --authrealmname=file rudy
 Java Software Developer, Ismet Serhat ÖZTÜRK wrote a blog about how to create a JDBC Realm for user authentication on Payara Server.You can also watch our video about securing a JSF application for more information.
Configuration
The bulk of the application configuration is done within the web.xml file. There we define a security constraint for a web resource, and how the credentials are retrieved and validated.
This is the snippet required for our demo application:
<security-constraint>
   <web-resource-collection>
      <web-resource-name>Secure Application</web-resource-name>
      <url-pattern>/secured/*</url-pattern>
      <http-method>GET</http-method>
   </web-resource-collection>

   <auth-constraint>
      <role-name>User</role-name>
   </auth-constraint>
</security-constraint>

<login-config>
   <auth-method>FORM</auth-method>
   <realm-name>file</realm-name>
   <form-login-config>
      <form-login-page>/loginform.html</form-login-page>
      <form-error-page>/loginerror.html</form-error-page>
   </form-login-config>
</login-config>

<security-role>
   <role-name>User</role-name>
</security-role>
The <security-constraint> defines that all pages in the /secured path need an authenticated user that has the role User.
The <login-config> determines how the credentials are retrieved. In our application, we use a Form-based mechanism using the HTML page loginform.html and the submitted credentials are matched using the file realm.
And the last tag defines that our application uses a role called User.
This is an example of a loginform page in HTML. The main aspects are the j_security_check action and the names for the input fields (j_username and j_password):
<form action="j_security_check" method=post>
   <p><strong>Please Enter Your User Name: </strong>
   <input type="text" name="j_username" size="25">
   <p><p><strong>Please Enter Your Password: </strong>
   <input type="password" size="15" name="j_password">
   <p><p>
   <input type="submit" value="Submit">
   <input type="reset" value="Reset">
</form>
The second bit of the configuration is done through the payara-web.xml file, also located in the WEB-INF folder. Here we define the mapping of the user Groups defined in the realm and the roles used in the application. You can also opt for an automatic one-to-one mapping but in that case, the roles used in the application must match the assigned Groups to the user.
<?xml version="1.0" encoding="UTF-8"?>
<!DOCTYPE payara-web-app PUBLIC "-//Payara.fish//DTD Payara Server 4 Servlet 3.0//EN" "https://raw.githubusercontent.com/payara/Payara-Server-Documentation/master/schemas/payara-web-app_4.dtd">
<payara-web-app>
   <security-role-mapping>
      <role-name>User</role-name>
      <group-name>Users</group-name>
   </security-role-mapping>
</payara-web-app>
Payara Server will now redirect to the loginform.html page when the user tries to access a secured page and authentication is not yet performed for the application. When the credentials match and the user has the correct role (mapped from the group) the requested page is returned to the user.
However, when deploying another application, using the same file realm, Payara Server still requests the authentication even if the user is already authenticated in the first application.
Single Sign-on
To set up the Single Sign-on, we need to configure the Server. This can be done very easily using the following Asadmin CLI command.
./asadmin set configs.config.server-config.http-service.sso-enabled=true
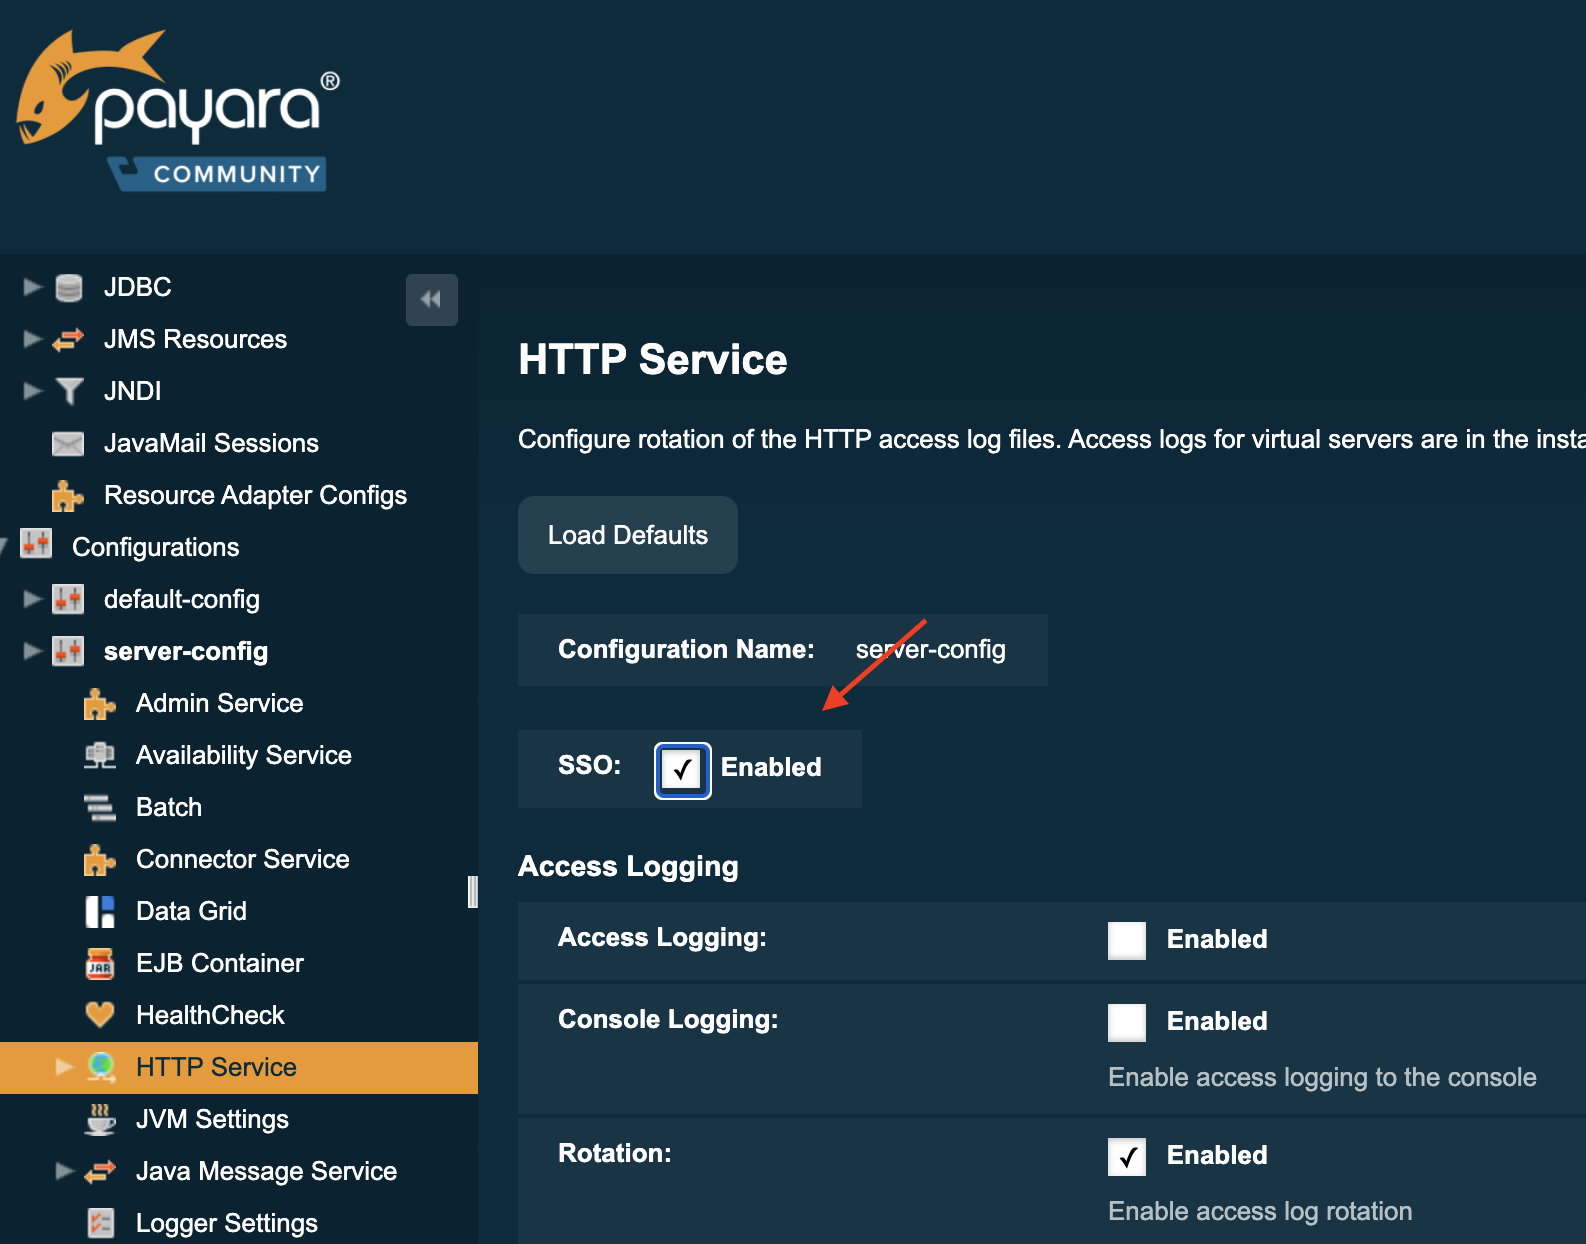
This activates the Single Sign-on for the entire Server, for all applications running on it. If that is not desired, it is possible to activate the Single Sign-on option for a newly created Virtual Server and assign the applications that participate in the Single Sign-on to that Virtual Server.
The feature works by putting the required information in a cookie so that it can be retrieved and inspected by other applications. No sensitive information, like the password, is stored in the cookie. The cookie stores a reference to the internal data so that a user can be authenticated automatically in the other applications.
When you logout in one application, the information is removed so that a logout is also performed in the other applications. This functionality is called Single Logout and is always active using this option.
Conclusion
When you require a Single Sign-on solution for applications deployed on a single Payara Domain, a simple setting can be activated to achieve this. This works will all Realms available on Payara Server, including the custom-defined ones.
When you need a single Sign-on between applications deployed on different domains, have a look at the OpenIdConnect option described in How to Use OpenIDConnect with Payara Platform to Achieve Single Sign-on.
Related Posts
Securing Jakarta EE Application Servers Needs Executive Attention
Published on 10 Sep 2025
by Asif Khan
0 Comments
%20Application%20Servers-An%20Executive%20Guide%20Cover.jpg?width=500&name=Securing%20Jakarta%20EE%20(Java%20EE)%20Application%20Servers-An%20Executive%20Guide%20Cover.jpg)
If your organization runs Jakarta EE applications, securing the application server they rely on is not a one-time project. Risks repeat unless leadership sets clear priorities, funds the right controls, and expects steady progress. This post ...
Why Java Developers Need to Help Their CTO Prioritise Security in 2025
Published on 26 Aug 2025
by Asif Khan
0 Comments

If you’re a Java developer, you probably feel sandwiched between frameworks nearing end-of-life, fresh Log4j headlines and endless security patch cycles. Fixing one vulnerability only to uncover another can feel like running on a treadmill.