
Originally published on 10 Sep 2018
Last updated on 12 Aug 2019

Eclipse MicroProfile is a framework that brings innovative technology to enterprise applications. Both Payara Server and Payara Micro provide the most recent MicroProfile version as soon as possible. Along with the aim to simplify development of microservices and cloud deployment, MicroProfile is continually adopting other modern approaches and patterns like reactive programming.
But why is support for reactive programming needed? The reason is that more and more applications are exposed to public users, which raises quality expectations for responsiveness, error prevention and recovery, and processing of large data streams. The vast number of users and processed data also introduces a much higher need for cost optimizations by reducing resource usage. A reactive programming model addresses all of this by allowing the development of responsive and resilient applications that can make the most of all available resources.
A Reactive Pipeline
Now let’s imagine we have a task to create an application that receives a constant stream of transactions from a stock exchange. It should process them and display relevant transactions instantly in a browser page. This means we need to process incoming data and display results to users right before their eyes as fast as possible. The reactive approach is suited very well for this task. We can build a reactive pipeline to handle each incoming transaction, evaluate it, send the result further to the UI layer, which sends it to all interested pages opened in a browser, which then display it inside a browser without any user interaction. Let’s say that we also want to decouple a data processor from the UI layer into a separate component and connect both using a message broker. We’ll end up with an application structured as the following diagram:
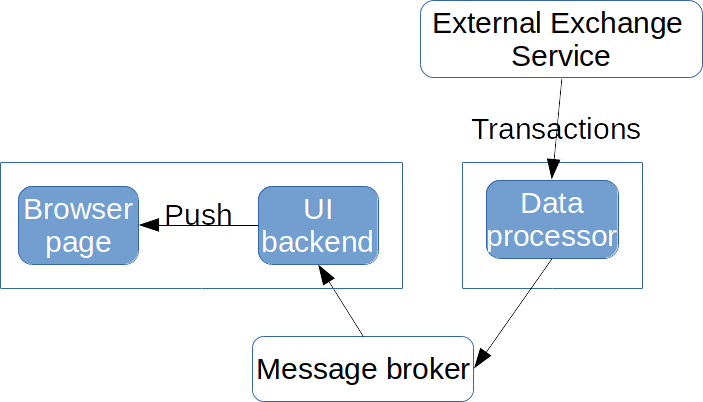
The sequence of arrows from an Exchange Service to a browser page forms our reactive pipeline. The chain doesn’t go from the user (browser page) but in the opposite direction because changes happen somewhere in the system and our application reacts to them and notifies the user about changes as they happen. All communication is asynchronous so that components may continue processing other incoming data after passing execution further.
MicroProfile Reactive Features
MicroProfile 2.0 provides the following features that support reactive programming:
- Reactive REST client (via JAX-RS)
- Server-Sent Events (SSE) server and client (via JAX-RS)
- Asynchronous events (via CDI)
- Metrics and Health endpoints to react to resource usage and service failures
The list isn’t very long at the moment but many more features are to come in the near future. You may expect asynchronous error recovery interceptors in the Fault Tolerance specification and completely new specifications for reactive messaging, reactive stream operators and asynchronous processing across multiple threads. Meanwhile, MicroProfile doesn’t stand in the way and allows combination with Java EE functionality as well as widely used reactive libraries.
In platforms like Payara Micro, which support both MicroProfile 2.0 and Java EE 8, we can connect any message broker via the JCA technology (Java EE Connector Architecture). The Payara Cloud Connectors open source project provides JCA connectors for multiple cloud and high-throughput brokers, including Kafka which is often used in reactive architectures. We can also use Java EE Concurrency Utilities API to gain more control over asynchronous executions and isolate distinct components within separate executors and thread pools.
Until MicroProfile provides a common set of reactive stream operators, a library like RxJava is essential to glue all the asynchronous components together efficiently. It allows assembling stream operators into reactive pipelines that control how data flows through an application.
Architecture of an Example Application
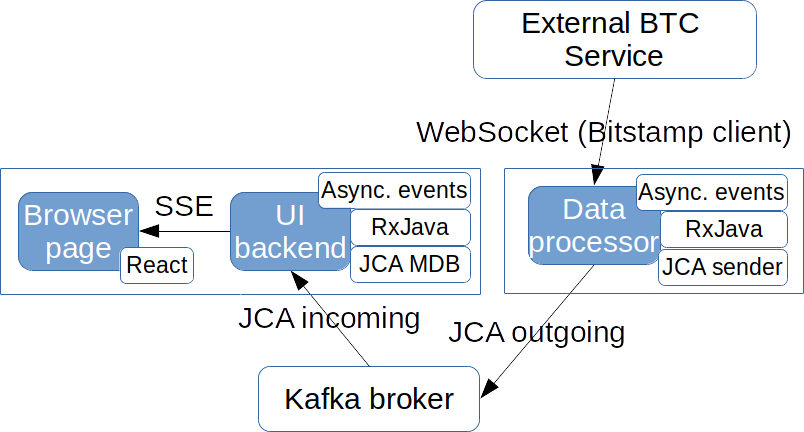
We now know our tools and can continue with filling technology gaps in the structure of our example application. SSE fits well for sending data to browser pages. Between individual services, JCA with a Kafka broker is much more efficient. It also decouples producers and consumers and thus allows scaling them independently.
We’ll use the Bitstamp Bitcoin (BTC) service, which will be our External Exchange Service providing us with data about Bitcoin transactions. Bitstamp already provides a WebSocket client to their service to get immediate information as transactions happen. We’ll just use it to connect and emit asynchronous CDI events so that the rest of our reactive pipeline is decoupled from the Bitstamp specifics.
Our architecture, including the chosen technology, looks like this:
To build and deploy our application, we need to do the following steps:
- Create a Data Processor maven module that consumes transactions and resends them as messages to a Kafka Broker
- Create a Frontend maven module that receives messages from Kafka and sends data to a browser via SSE
- Create a page in Frontend that consumes SSE events and updates the page with React
- Install, configure and run Kafka Broker with a topic
- Run Data Processor and Frontend services connected to the Kafka broker
Using Events and Messages
Both Maven modules will use MicroProfile 2.0 and Java EE 8 dependencies.
In the code, we’ll separate Bitstamp-specific WebSocket client code from the rest by raising an asynchronous CDI event. This event will be handled in a new thread to avoid blocking processing of other transactions. We’ll inject an event object and later call it to fire an event asynchronously:
public class TransactionHandler {
 @Inject
 Event btcTxEvent;

 public void handle(String transactionJson) {
  btcTxEvent.fireAsync(transactionJson);
 }
}
Incoming data is in JSON String format and we just raise an event with the same data.
The next step is to turn this CDI event into a Kafka message. A stateless EJB called KafkaPublisher will inject a JCA connection factory resource with @Resource annotation. Using Payara Cloud Connectors, the injected type is KafkaConnectionFactory. To use it, we need the kafka-jca-api artifact as a provided dependency in pom.xml:
<dependencies>
 <dependency>
  <groupId>fish.payara.cloud.connectors.kafka</groupId>
  <artifactId>kafka-jca-api</artifactId>
  <scope>provided</scope>
 </dependency>
<dependencies>
The EJB has these 3 essential parts:
- connection configuration via a
@ConnectionFactoryDefinitionannotation - injection of a
KafkaConnectionFactorywith that configuration - a business method, which sends a message to a Kafka topic via a connection acquired from the injected
KafkaConnectionFactory
To glue our Kafka connector class with the transaction handler, we’ll register its business method as an observer of the asynchronous events with the @ObservesAsync annotation on a String argument. Here’s what the code of KafkaPublisher looks like:
@ConnectionFactoryDefinition(name = "java:global/env/KafkaCF",
interfaceName = "fish.payara.cloud.connectors.kafka.KafkaConnectionFactory",
resourceAdapter = "kafka-rar")
@Stateless
public class KafkaPublisher {

 // lookup is the same string as
 // the name of the definition above
 @Resource(lookup = "java:global/env/KafkaCF")
 KafkaConnectionFactory factory;

 public void sendMessage(@ObservesAsync String value)
                                    throws Exception {

  try (KafkaConnection conn = factory.createConnection()) {
   conn.send(new ProducerRecord<>("btcTx", value), callback);
  }
 }
}
In the Frontend Maven project, we’ll listen for those messages in an MDB which implements KafkaListener interface:
@MessageDriven(activationConfig = {
 @ActivationConfigProperty(
   propertyName = "topics", propertyValue = "btctx")
)
public class KafkaConsumer implements KafkaListener {

 @Inject
 Event btcTxEvent;

 @OnRecord
 public void processMessage(ConsumerRecord record) {
  btcTxEvent.fireAsync(record.value());
 }
}
We fire another event from this MDB. This time the event is fired in the frontend service and thus seamlessly propagates from the data producer service via the Kafka broker. If needed, we could plug in an alternative mechanism for transmitting CDI events across services. For example, Payara Micro provides a built-in mechanism called CDI event bus, which uses Hazelcast to dispatch CDI events.
Creating a Reactive Stream from Received Events
We’ll turn the stream of CDI events into a RxJava flowable to gain more control over the processing pipeline and later inject it into the SSE resource. We’ll use the Flowable.create method to create a flowable backed by a provided emitter:
Flowable flowable = Flowable.create( emitter -> storeEmitter(emitter), BackpressureStrategy.LATEST);
We need to store the provided emitter and use it to emit data when CDI events are fired. We create a separate bean that will:
- create a flowable in its
@PostConstructmethod and store the emitter - produce a
Publisherfrom the flowable so that it can be injected elsewhere - observer fired CDI events and send them to the stored emitter
Note that the RxJava will create an emitter only after the flowable is subscribed to. If a CDI event is received earlier, the emitter is null and events should be ignored.
Also note that the full Flowable class is not valid for CDI injection, therefore we inject it using its Publisher interface. We then continue building the processing pipeline in an SSE endpoint using the JAX-RS API provided by MicroProfile:
@Inject
Publisher<String> transactions;

@Context
void setSse(Sse sse) {
 broadcaster = sse.newBroadcaster()

 // convert JSON strings into SSE events
 // and subscribe an SSE broadcaster to receive them
 Flowable.fromPublisher(transactions)
  .map(data -> {
   return sse.newEventBuilder()
      .mediaType(MediaType.APPLICATION_JSON_TYPE)
      .data(data)
      .build();
   })
  .subscribe(broadcaster::broadcast);
}
We’re using a SseBroadcaster from JAX-RS as a destination (sink) in our pipeline. From there, the SSE events are sent to every open SSE connection registered with the broadcaster. In our application, all pages are treated equal and receive information about any transaction. Using the broadcaster is the simplest way to send the same SSE event to every open web page that listens to the SSE events. SSE resources are simply registered with the broadcaster in their resource method:
@GET
@Produces(MediaType.SERVER_SENT_EVENTS)
public void getBtcTransactions(@Context SseEventSink eventSink) {
 btcTxBroadcaster.register(eventSink);
}
If no SSE connection is registered at the time when a broadcaster receives an SSE event, the event is ignored. This also means that all the work required to compute the SSE event is discarded. To avoid processing incoming messages and creating SSE events, we would need a way to pause the computation until there are clients ready to receive SSE events. This technique is called back pressure. The best solution would be if the broadcaster notified that it wants to receive events only if there is at least one registered SSE connection. The broadcaster, however, doesn’t provide any information about the number of registered connections. One of the options is to subscribe using the subscribe method that accepts a Subscriber from the reactive streams API. This interface allows controlling the flow by requesting new data only when there are registered SSE sinks in the broadcaster. Though, this information isn’t directly available from the broadcaster. We would need to track the number of registered sinks, increasing the number when registering a sink and decreasing it when the broadcaster’s onClose event is triggered. We won’t go into more details but I highly recommend to consider this technique for production applications to avoid wasteful computations.
Finally, we need to create a web page that opens an SSE connection to our SSE resource and updates the UI. MicroProfile doesn’t provide any help in this area but it’s pretty easy to do it using plain JavaScript or a convenient JavaScript framework.
Running the Application
Before we can run the application, we need to install and run a Kafka broker and create a topic called "btctx" which we used to send and receive messages.
Once the Kafka broker is running, we can start the data producer with the following command line with Payara Micro:
java -jar payara-micro.jar --port 8081
        kafka-rar.rar BTCDataProducer.war
And the frontend can be started with:
java -jar payara-micro.jar kafka-rar.rar BTCFrontend.war
The frontend service binds to the port 8080 by default and it’s accessible at http://localhost:8080/BTCFrontend/
Payara Micro also offers to build a self-contained executable JAR file which contains all the dependencies and can be executed with the java -jar command. There are 2 ways to build such an executable (uber) JAR. In Maven projects, an uber JAR can be built with the bundle goal of the payara-micro-maven-plugin. In other situations, it’s possible to build an uber JAR with the --outputUberJar command line option of payara-micro.jar. With both approaches, it’s possible to override default configuration and bundle any additional dependencies. For example, the following command will build an uber JAR that includes Kafka RAR, the BTCDataProducer application and also sets the default value of HTTP port to 8081:
java -jar payara-micro.jar --outputUberJar BTCDataProducer.jar
             --port 8081 kafka-rar.rar BTCDataProducer.war
What to Expect in the Future?
MicroProfile is a versatile framework to build production Java applications. Although it’s driven mostly by MicroServices patterns, it doesn’t stand in the way if we want to apply other patterns and programming styles like reactive programming. Furthermore, the work on better support of reactive programming has already started. Soon it will be possible to use MicroProfile reactive streams instead of RxJava flowable. The work on a reactive messaging API is also progressing. Once it’s available, it can be used instead of the Message Driven EJB mechanism to send and receive messages via Kafka broker or any underlying broker.
Source code of the Bitstamp monitor example application: . Watch it for updates as more reactive features will be being released in MicroProfile.
Related Posts
The Payara Monthly Catch - August 2025
Published on 02 Sep 2025
by Dominika Tasarz
0 Comments

Welcome aboard the August 2025 issue of The Payara Monthly Catch! With summer in full swing, things may have felt a little more quiet across the Java world - but certainly not less interesting! We hope you managed to get some rest and recharge, ...
Conquering Kubernetes Complexity: Why Java Developers Need More Than Just Containers
Published on 08 Aug 2025
by Chiara Civardi
0 Comments

Kubernetes, also known as K8s has become the de facto platform for orchestrating modern microservices architectures, promising resilience, scalability and faster deployment pipelines for Java applications. But for many developers, that promise ...