Published on 20 Jul 2017

Continuing our introductory blog series, this blog will demonstrate how to add load balancing capability to Apache Web Server and forward to our simple Payara Server cluster.
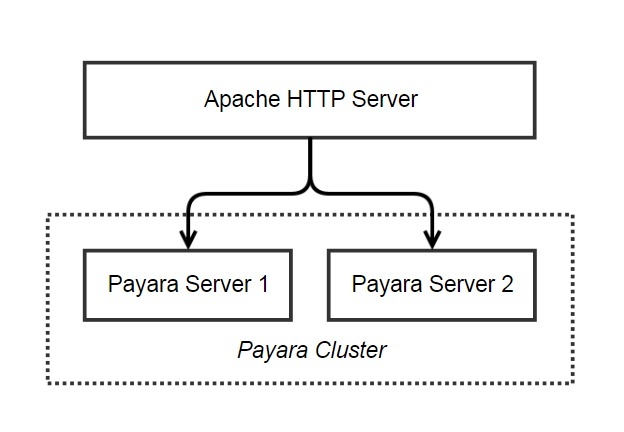
A load balancer can redirect requests to multiple instances, primarily for the purpose of distributing incoming requests between cluster members based on pre-determined rules. This could be a simple "round-robin" algorithm, where the workload is distributed to each instance in turn, or a weighted algorithm where requests are delivered based on a pre-determined weight for each cluster member.
A load balancer plays a key role in our cluster:
If you have been following this series, so far we have:
- Set up Apache Web Server on Ubuntu
- Set up forwarding to the Payara Server DAS
- Created two "standalone" Payara Server instances, clustered using Hazelcast
This blog will demonstrate how you enable Apache Web Server to load balance requests across our cluster using the Apache Web Server mod_proxy_balancer module.
Requirements
To follow along with this blog, the cluster we created in Part 3 and our Apache configuration from Part 2 will be required.
As it currently stands, this environment is:
- Our cluster:
- One Ubuntu 16.04 host with JDK8, Apache Web Server, and Payara Server installed, with a Domain Administration Server and another instance ("local-instance").
- One Ubuntu 16.04 host with JDK8, OpenSSH, and Payara Server installed, with a single Payara Server instance ("second-Ubuntu-host-instance") controlled by the DAS on the first host.
- The rest-jcache example from the Payara Examples repository
Since this blog is demonstrating Apache's load balancing capabilities, we will need the clusterjsp sample application, which we will deploy to our cluster.
Deploying the clusterjsp application
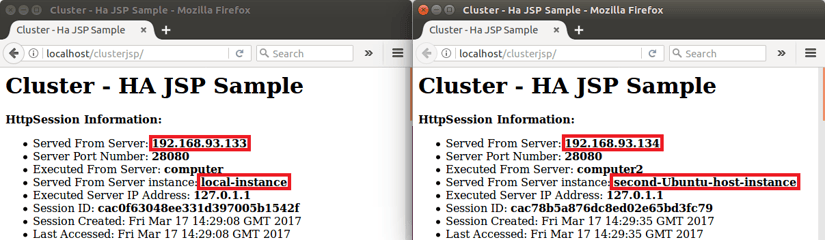
Clusterjsp is a simple web application which can show HTTP session information alongside details of the server instance which served the request. This should make it clear if Apache is load balancing our requests between our two server instances!
Deploy the application by going to the "Applications" page on the Admin Console and making sure to target the application to both our "Standalone" instances (in our case, "local-instance" and "second-Ubuntu-host-instance"), with everything set to the default values.
With our application deployed, click on "Launch" to display the links to the clusterjsp application:

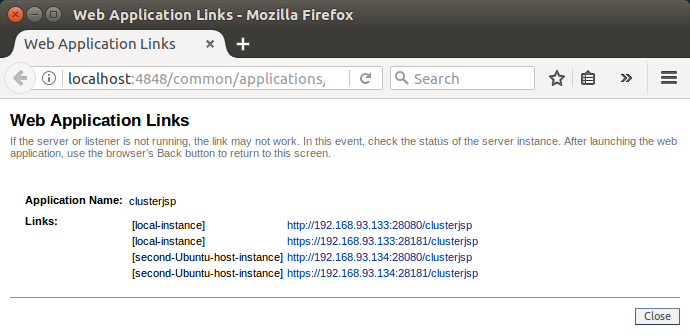
Now we have the endpoints we need to add to our load balancer! We have the choice of HTTP or HTTPS, here, since Payara Server can be accessed directly if needed. Since we are going to use Apache, we can terminate SSL when requests reach the load balancer rather than continuing to pay the performance cost to HTTPS at this stage. It should be noted, however, that the performance cost of HTTPS will only be the case until both Apache Web Server and Payara Server (with Servlet 4) fully support HTTP/2, after which HTTPS will almost certainly be much more performant than HTTP.
Setting up Apache Web Server as a Load Balancer
With our environment set up, we can begin modifying the Apache Web Server configuration. If you have been following this series of blogs you should already have Apache Web Server installed with a basic mod_proxy_http, and your a site congfiguration called "payaraSite" at /etc/apache2/sites-available/payaraSite.conf, which should look like this:
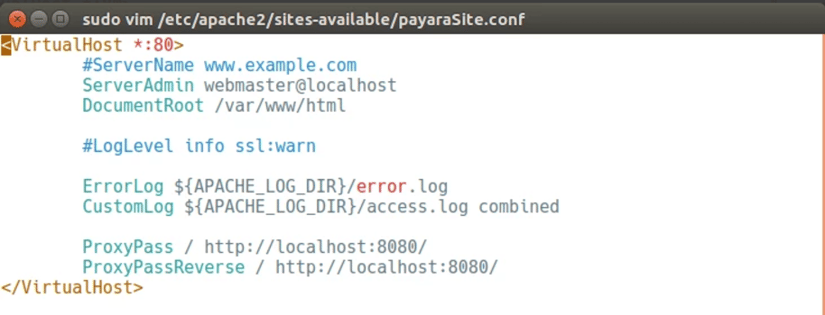
While this worked when we were using the ProxyPass directives to forward to the Domain Admin Server (DAS), we now have two cluster members as separate instances at http://192.168.93.133:28080/ and http://192.168.93.134:28080/, and no longer want to send traffic to the DAS.
It is not possible to add multiple endpoints to the same ProxyPass directive, so we need to introduce mod_proxy_balancer, which will allow us to, effectively, point our ProxyPass directive to a list of endpoints.
Configuring Mod Proxy Balancer
The modified configuration is similar to what we had previously done by forwarding traffic to a specific URL, except the URL will now point to a block of possible endpoints within a <Proxy> tag, and a load balancer method to determine how the proxy is chosen.
To start, we must first enable the module proxy_balancer and a simple load balancing method using our Apache Web Server helper tools which were installed as part of the Ubuntu apache2 package:
sudo a2enmod proxy_balancer lbmethod_byrequests
The by_requests method of load balancing simply alternates between instances in a round-robin. With the module now active, reopen the payaraSite.conf file with your chosen text editor. We need to first create a <Proxy> block which contains a list of endpoints where our app is located as shown:
<Proxy balancer://payara>
       BalancerMember http://my-local-host:8080
       BalancerMember http://my-remote-host:8080
</Proxy>

ProxyPass         /  balancer://payara/
ProxyPassReverse  /  balancer://payara/
Once we have a list of endpoints, we can change the ProxyPass directives to use one of the endpoints we just specified, by referencing the <Proxy> block. We could create multiple <Proxy> blocks with different names to refer to different lists of endpoints, depending on which applications we wanted to load balance and what endpoints they were deployed to.
In our case, the configuration file should now look something like this:
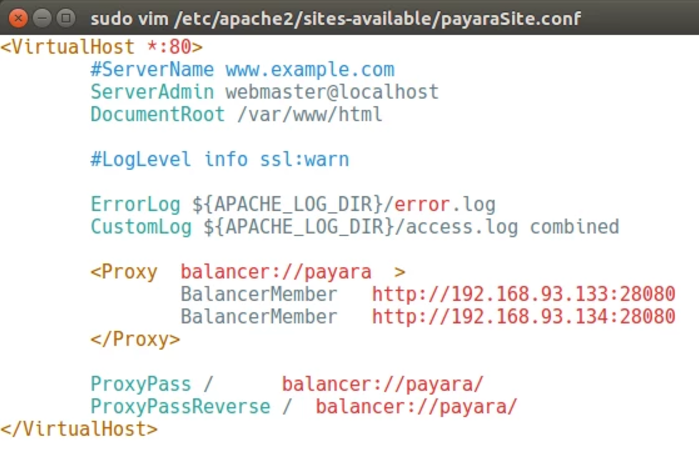
Save your configuration and restart Apache:
sudo service apache2 restart
So now, on the host where Apache is installed, whenever we load the page http://localhost/clusterjsp we will find that each request alternates between being served from the first or second Payara Server instances:
Summary
So with that done, we have implemented basic load balancing to spread requests across multiple Payara Server instances, all thanks to Apache Web Server and its mod_proxy_http and mod_proxy_balancer modules. This configuration is relatively naïve and won't take into account session data, so in our next blog, we will enable sticky sessions to make sure that users' sessions will be pinned to a single Payara Server instance, rather than bouncing between the two.
For now, if you have any questions, feel free to post a comment below.