Published on 21 Nov 2015

 We have already introduced Spring Boot to Payara Micro, the new fish on the block!, by implementing Spring Boot based RESTful web services and hosted on Payara Micro. While implementing it, we didn’t deal with any of the XML configurations or dependency management needed for the Spring framework with the help of the Spring Boot
With this article, we will take it one step further by introducing new modules from Java EE like JPA, JSF and many others. Spring Boot will ease the development yet again for us with its bootstrapping methodology. After building our sample application containing simple user interface and persistency, we will deploy it onto Payara Micro, the application server that offers running Java EE applications on a cluster with a small footprint (~60mb) and directly from the console.It’s worth to mention that Payara Micro is fully compatible with the Java EE 7 Web Profile - you will see for yourself how easy it is to create a CRUD page that integrates with an embedded database provided by Payara Micro.All of the examples in this article are based on Spring Boot version 1.2.6.RELEASE and Payara Micro version 4.1.153, which are the latest available versions at the time of writing. The complete source code given in the article is available here.
Project Structure and Dependencies
Let’s start our development by taking our Spring Boot REST example as a code basis. The only dependencies that we are going to add are: JSF + PrimeFaces for the user interface and Spring boot starter JPA for the persistency. They are given as follows.
<dependency>
    <groupId>org.springframework.boot</groupId>
    <artifactId>spring-boot-starter-data-jpa</artifactId>
</dependency>

<dependency>
    <groupId>org.primefaces</groupId>
    <artifactId>primefaces</artifactId>
    <version>5.2</version>
</dependency>
Payara Micro already ships with Mojarra v2.2.11, which is the JSF implementation from Oracle, so providing the PrimeFaces dependency only will suffice on the UI side. Spring Boot’s starter for JPA bundles all the necessary dependencies for Hibernate so we don’t need to provide a persistency provider either. Spring Boot can also auto-configure embedded databases like H2, HSQL or Derby. Since Payara Micro ships with an embedded Derby database already, we don’t even need to write one line of code to connect to that database, other than only extending our repository classes from the class, JpaRepository. We’ll get to that soon, just stick with us!
Implementing a CRUD page
First we should define our domain object as a JPA managed entity. Person class definition that achieves this is given below.
@Entity
public class Person implements Serializable {
@Id
@GeneratedValue
private int id;
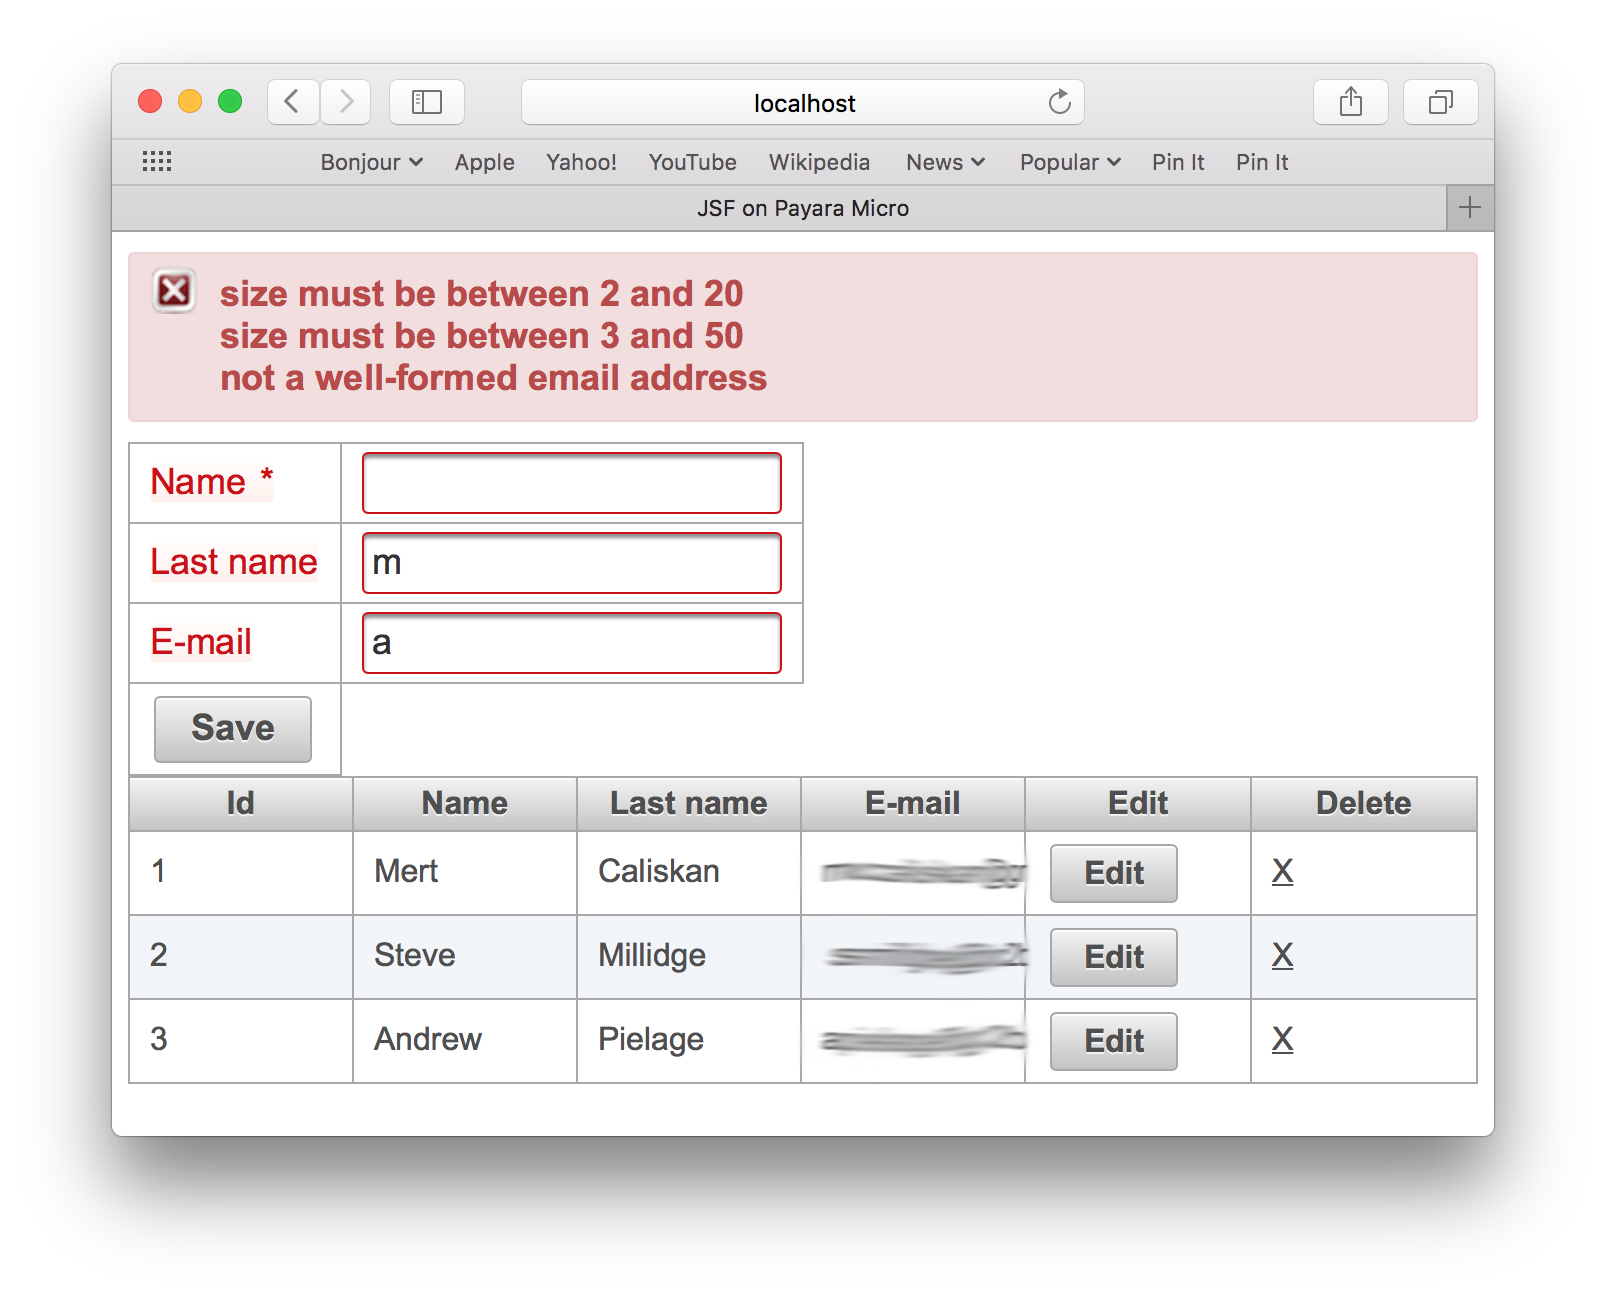
@NotNull
@Size(min = 2, max = 20)
private String name;
@Size(min = 3, max = 50)
private String lastName;
@Email
private String email;
// getters & setters
}
As you can also notice, entity contains bean validation annotations like
@Size, @NotNull and@Email, which apply constraints on the properties of the domain object. These validations will be automatically integrated on the JSF input field components.Spring Data module provides standardized repository implementation model based on JPA. It maps an interface per managed domain object and the corresponding person repository definition is given below.
public interface PersonRepository extends
JpaRepository<Person, Integer> {
}
For populating the DB, we need to implement a Spring bean with a method annotated by@PostConstruct, so that it inserts sample person objects into in memory database while getting up application.
@Service
public class DbInitService {
    @Autowired
    private PersonRepository repository;
    @PostConstruct
    public void init() {
        Person person1 = new Person(1, "Mert", "Caliskan", "emailaddress@gmail.com");
        repository.save(person1);
        Person person2 = new Person(2, "Steve", "Millidge", "emailaddress1@c2b2.co.uk");
        repository.save(person2);
        Person person3 = new Person(3, "Andrew", "Pielage", "emailaddress2@c2b2.co.uk");
        repository.save(person3);
    }
}
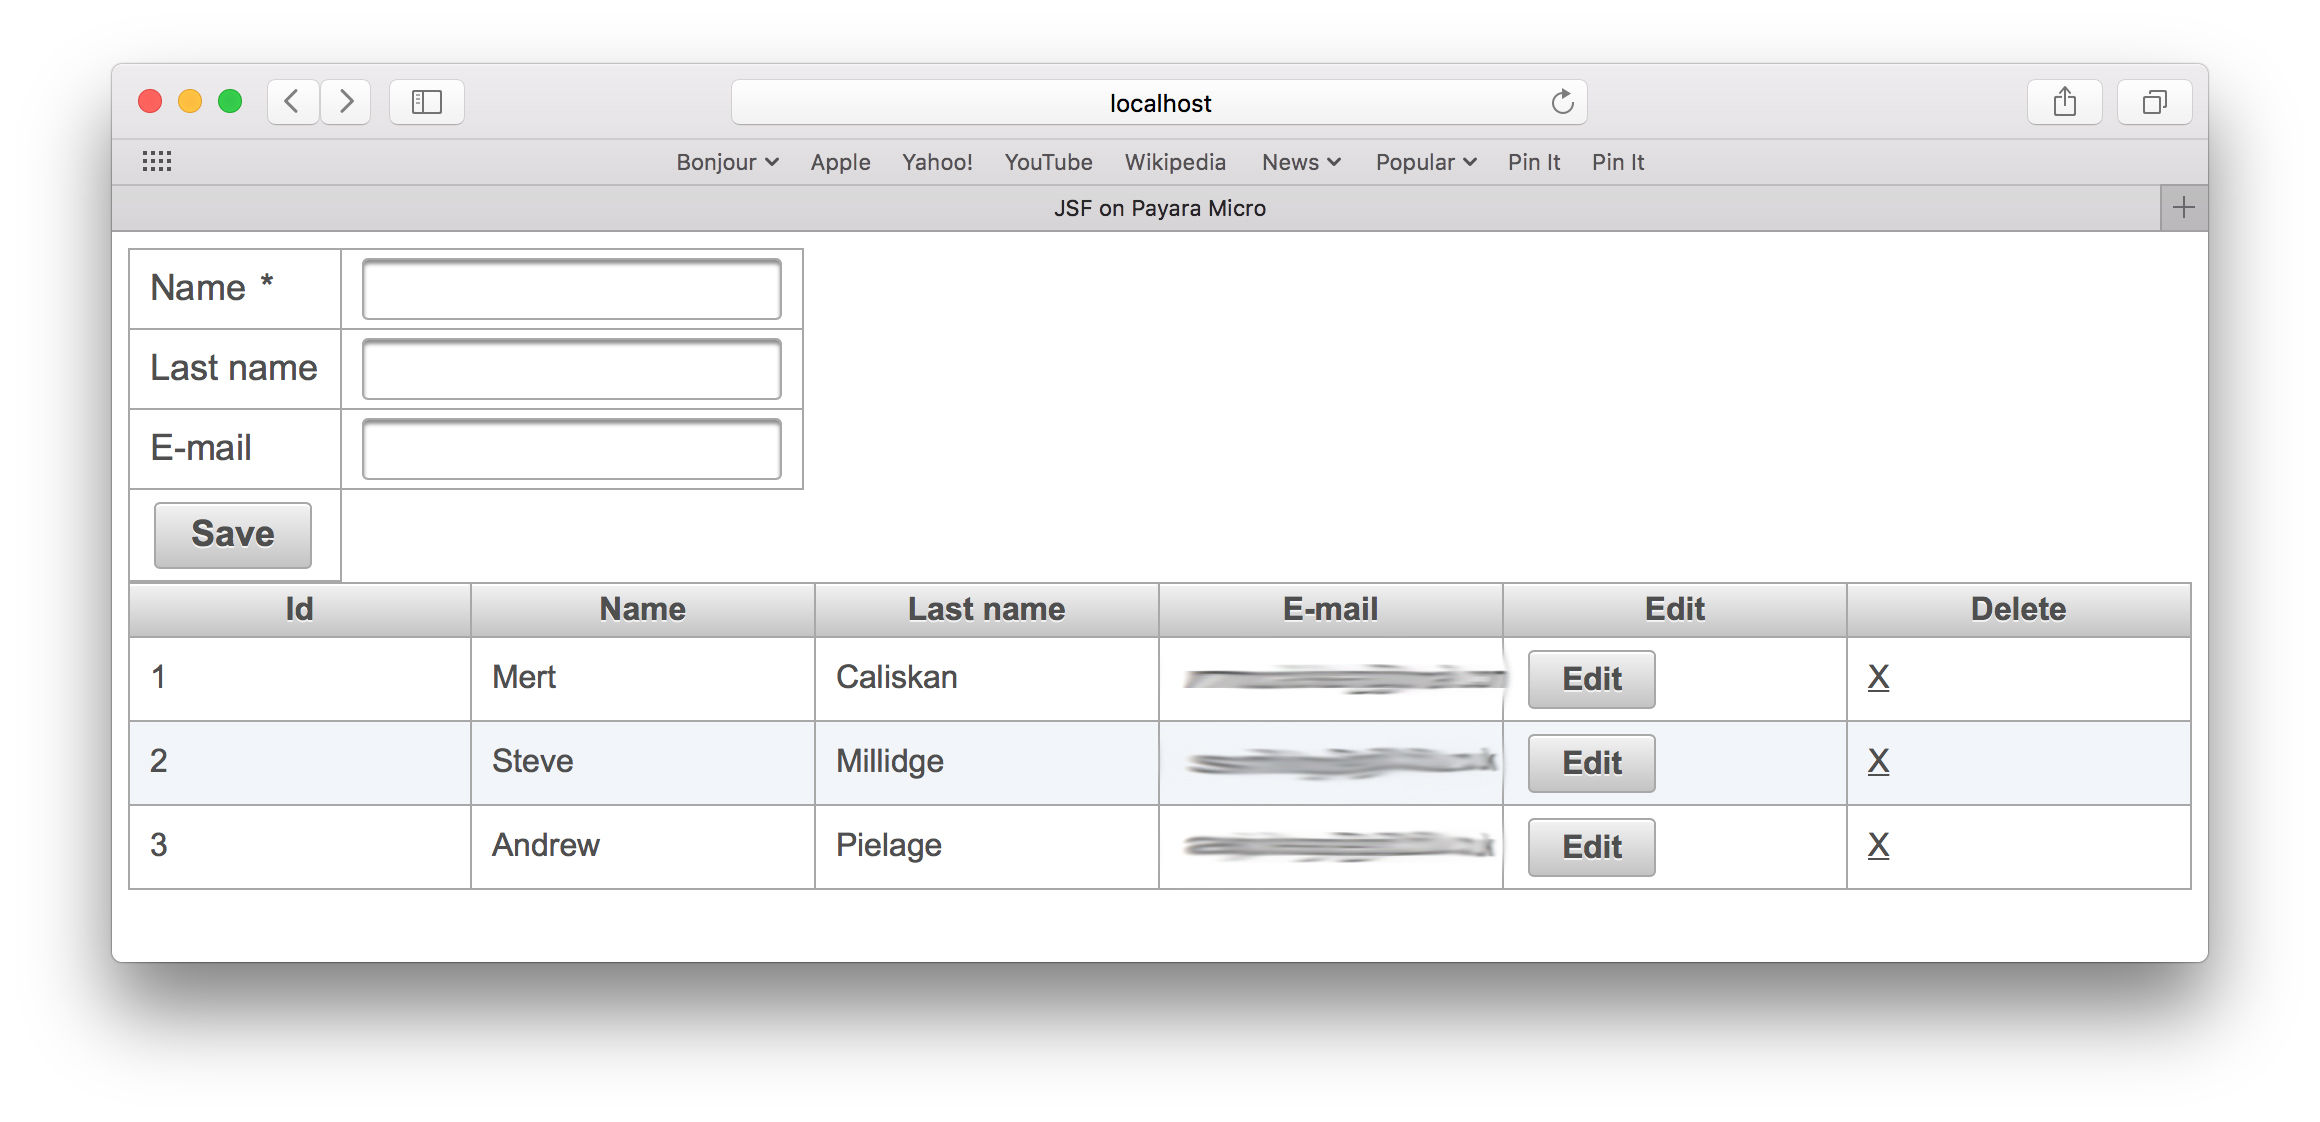
As the last step of implementation, the person.xhtml page and its corresponding managed bean definition are listed below. The page consists of 2 sections that contain a grid for inputting a new person and a data table for listing the saved persons by retrieving from the database. Table also supports editing and deleting a person from the list with a button and a link.
<html xmlns="http://www.w3.org/1999/xhtml"
      xmlns:h="http://xmlns.jcp.org/jsf/html"
      xmlns:f="http://xmlns.jcp.org/jsf/core"
      xmlns:p="http://primefaces.org/ui">

<f:view>
    <h:head>
        <title>JSF on Payara Micro</title>
    </h:head>
    <h:body>
        <h:form id="form">
            <p:messages id="messages" />
            <p:panelGrid id="newPerson" columns="2">
                <p:outputLabel for="txt_name" value="Name" />
                <p:inputText id="txt_name" value="#{personView.person.name}" />
                <p:outputLabel for="txt_lastname" value="Last name" />
                <p:inputText id="txt_lastname" value="#{personView.person.lastName}" />
                <p:outputLabel for="txt_email" value="E-mail" />
                <p:inputText id="txt_email" value="#{personView.person.email}" />
                <p:commandButton id="btn_save" value="Save" action="#{personView.savePerson}"
                                 process=":form:newPerson"
                                 update=":form:newPerson :form:personList :form:messages">
                </p:commandButton>
            </p:panelGrid>
            <p:dataTable id="personList" value="#{personView.personList}" var="p">
                <p:column>
                    <f:facet name="header">
                        <h:outputText value="Id" />
                    </f:facet>
                    <h:outputText value="#{p.id}" />
                </p:column>
                <p:column>
                    <f:facet name="header">
                        <h:outputText value="Name" />
                    </f:facet>
                    <h:outputText value="#{p.name}" />
                </p:column>
                <p:column>
                    <f:facet name="header">
                        <h:outputText value="Last name" />
                    </f:facet>
                    <h:outputText value="#{p.lastName}" />
                </p:column>
                <p:column>
                    <f:facet name="header">
                        <h:outputText value="E-mail" />
                    </f:facet>
                    <h:outputText value="#{p.email}" />
                </p:column>
                <p:column>
                    <f:facet name="header">
                        <h:outputText value="Edit" />
                    </f:facet>
                    <p:commandButton value="Edit" process="@this" update=":form:newPerson">
                        <f:setPropertyActionListener value="#{p}" target="#{personView.person}" />
                    </p:commandButton>
                </p:column>
                <p:column>
                    <f:facet name="header">
                        <h:outputText value="Delete" />
                    </f:facet>
                    <p:commandLink action="#{personView.deletePerson(p)}" process="@this" update=":form:personList">
                        <h:outputText value="X" />
                    </p:commandLink>
                </p:column>
            </p:dataTable>
        </h:form>
    </h:body>
</f:view>
</html>
PersonView managed bean class is a Spring bean and the person repository is injected into it with the @Autowired annotation.
@Controller
public class PersonView implements Serializable {
    @Autowired
    private PersonRepository personRepository;
    private Person person = new Person();
    public List<Person> getPersonList() {
        return personRepository.findAll();
    }
    public void savePerson() {
        personRepository.save(person);
        person = new Person();
    }
    public void deletePerson(Person person) {
        personRepository.delete(person);
    }
    public void setPerson(Person person) {
        this.person = person;
    }
    public Person getPerson() {
        return person;
    }
}
Wrapping it up
To integrate Spring beans into JSF pages, we need to define an EL Resolver in JSF configuration file, which is the faces-config.xml. The file should be placed under WEB-INF folder.
<faces-config version="2.2"
              xmlns="http://xmlns.jcp.org/xml/ns/javaee"
              xmlns:xsi="http://www.w3.org/2001/XMLSchema-instance"
              xsi:schemaLocation="http://xmlns.jcp.org/xml/ns/javaee
              http://xmlns.jcp.org/xml/ns/javaee/web-facesconfig_2_2.xsd">

    <application>
        <el-resolver>org.springframework.web.jsf.el.SpringBeanFacesELResolver</el-resolver>
    </application>
</faces-config>
The web.xml, web application deployment descriptor file, should also be placed under WEB-INFfolder in order to package the application as a war file. This file is also needed to correctly deploy our application onto Payara Micro. The configuration file should contain the FacesServlet definition, which is the gateway servlet for handling all of our JSF requests.
<web-app xmlns="http://xmlns.jcp.org/xml/ns/javaee"
         xmlns:xsi="http://www.w3.org/2001/XMLSchema-instance"
         xsi:schemaLocation="http://xmlns.jcp.org/xml/ns/javaee
     http://xmlns.jcp.org/xml/ns/javaee/web-app_3_1.xsd"
         version="3.1">

    <servlet>
        <servlet-name>Faces Servlet</servlet-name>
        <servlet-class>javax.faces.webapp.FacesServlet</servlet-class>
        <load-on-startup>1</load-on-startup>
    </servlet>

    <servlet-mapping>
        <servlet-name>Faces Servlet</servlet-name>
        <url-pattern>*.jsf</url-pattern>
    </servlet-mapping>

</web-app>
As a last step, executing mvn clean install command within the application folder should create a war archive out of it.
Getting it up and Running
With Payara Micro it’s so easy to deploy a war archive through the console. Download Payara Micro v4.1.153 from here first and then just execute the command given below.java -jar payara-micro-4.1.153.jar --deploy %PATH_TO%/ spring-boot-jpa-jsf-example-1.0-SNAPSHOT.warWhen you request for the person JSF page as http://localhost:8080/spring-boot-jpa-jsf-example-1.0-SNAPSHOT/person.jsf, you should be seeing a visual output as follows:
The Bean Validation will be automatically integrated to JSF components so inputting malformed data to the input fields will lead to visual notifications on the page as given below.